Discover the art of inlay routing! Ready to elevate your woodworking skills with stunning inlays? Let’s dive in together!

Inlaying is a skill that creates intricate designs by embedding various materials into substrates like wood.
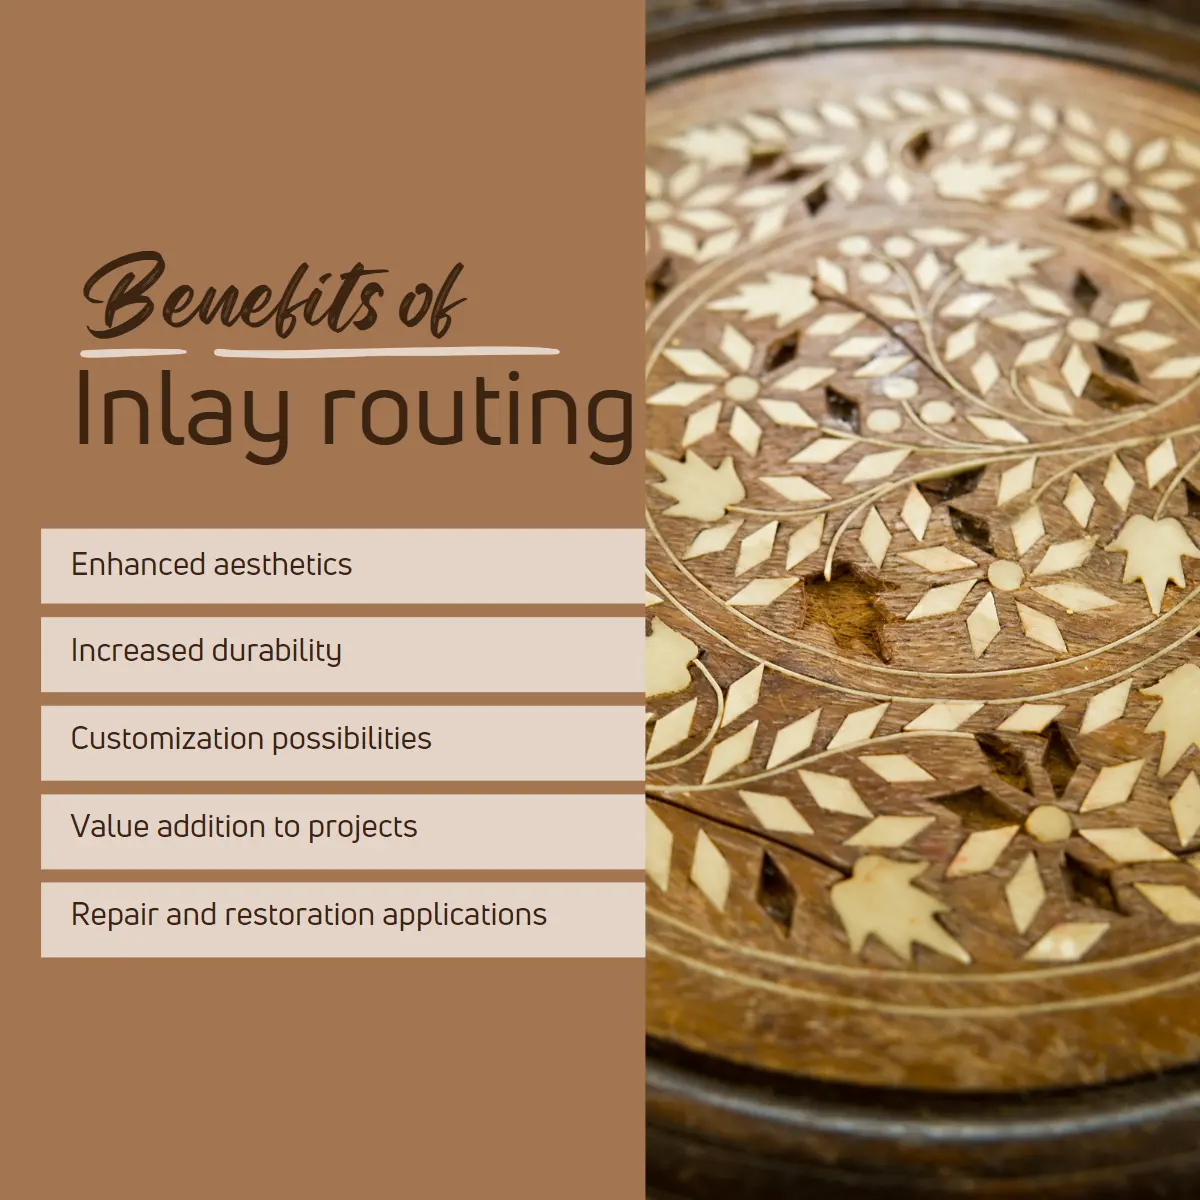
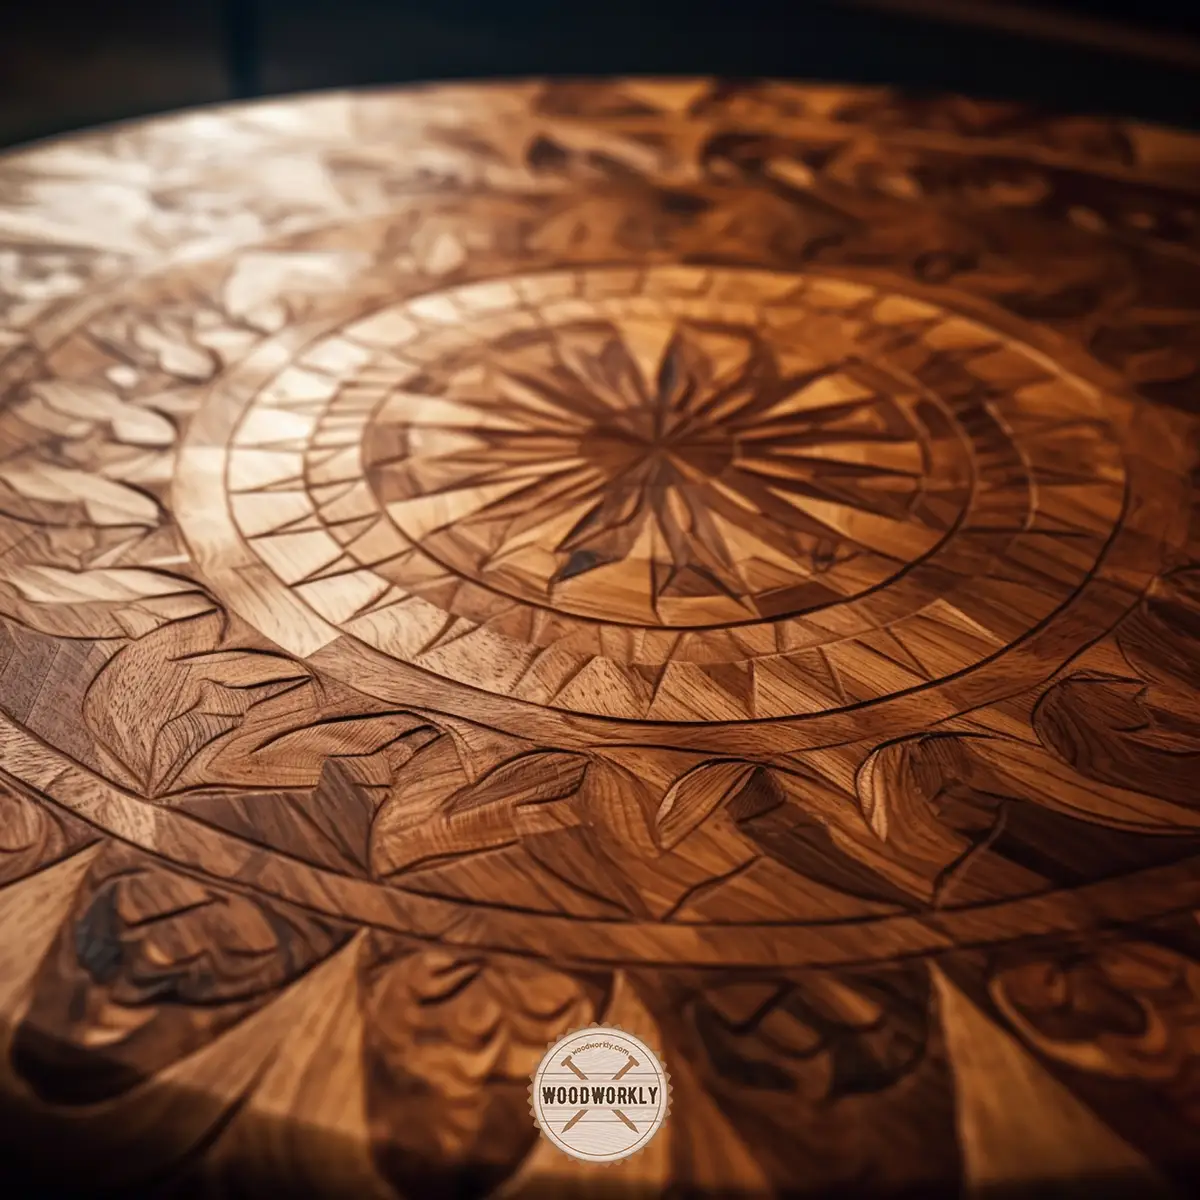
Inlay routing is a specialized woodworking technique that elevates the aesthetic appeal of your woodworking projects such as furniture, artwork, or instruments.
I was curious about how to start inlay routing to inlay the wood surface of one of my tabletops with a router.
I did deep research and was able to find out much useful information about inlay routing.
So, let’s see, How to inlay wood with a router?
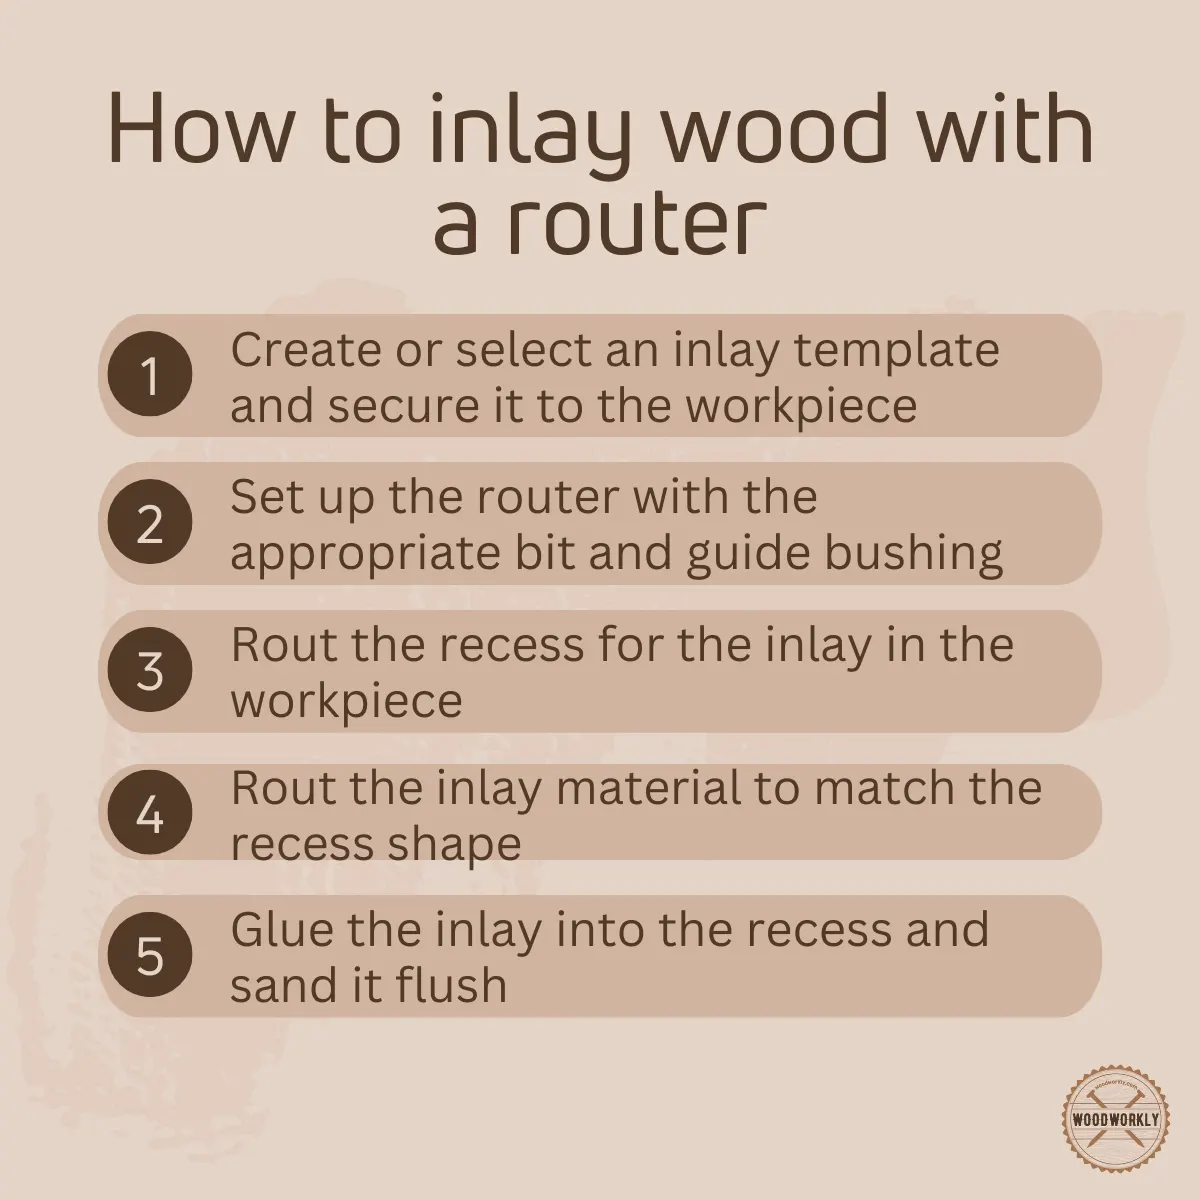
To inlay wood with a router, first, create and secure inlay template to the wood. Then set up the router with guide bushing and router bit. Next, route the recess and prepare and dry-fit the inlay. Then, glue the inlay into the recess, clamp, and let dry. Finally, level and finish the wood surface.
That’s just a quick snapshot and there’s a lot more to know about inlay routing.

In this article, I’ll explore the inlay routing world to find out, what kind of router you need for an inlay, and what router bits you should use and discuss how to inlay wood with a router step by step in detail.
Furthermore, I’ll answer some frequently asked questions as well.
Let’s jump in!

In order to make things clearer, first have a look at what is inlay routing with its importance in woodworking projects.
What Is an Inlay Routing?
Inlay routing is a woodworking technique that is done by embedding decorative materials and artwork such as wood, metal, or other materials, into a solid surface to create unique, creative detailed designs and patterns.
Inlay routing improves the aesthetics of the surface and is also able to use for repairing and strengthening damaged areas.
You can use routers to make precise and detailed recesses for inlays. This process is popular among woodworking professionals and hobbyists.
Woodworking inlays is a popular practice that started centuries ago to achieve beautiful designs.
The use of router combine with templates and specialized bits, allows for excellent precession and repeatability, resulting product that is both visually appealing and durable.
I have identified the key feature of inlay routing which is the juxtaposition of contrasting materials.
For example, a dark wood inlay can be embedded into a lighter wood surface, creating a beautiful visual effect.
Metal inlays, such as brass and aluminum, can also be used to increase the appearance and sophistication of wooden pieces and furniture.
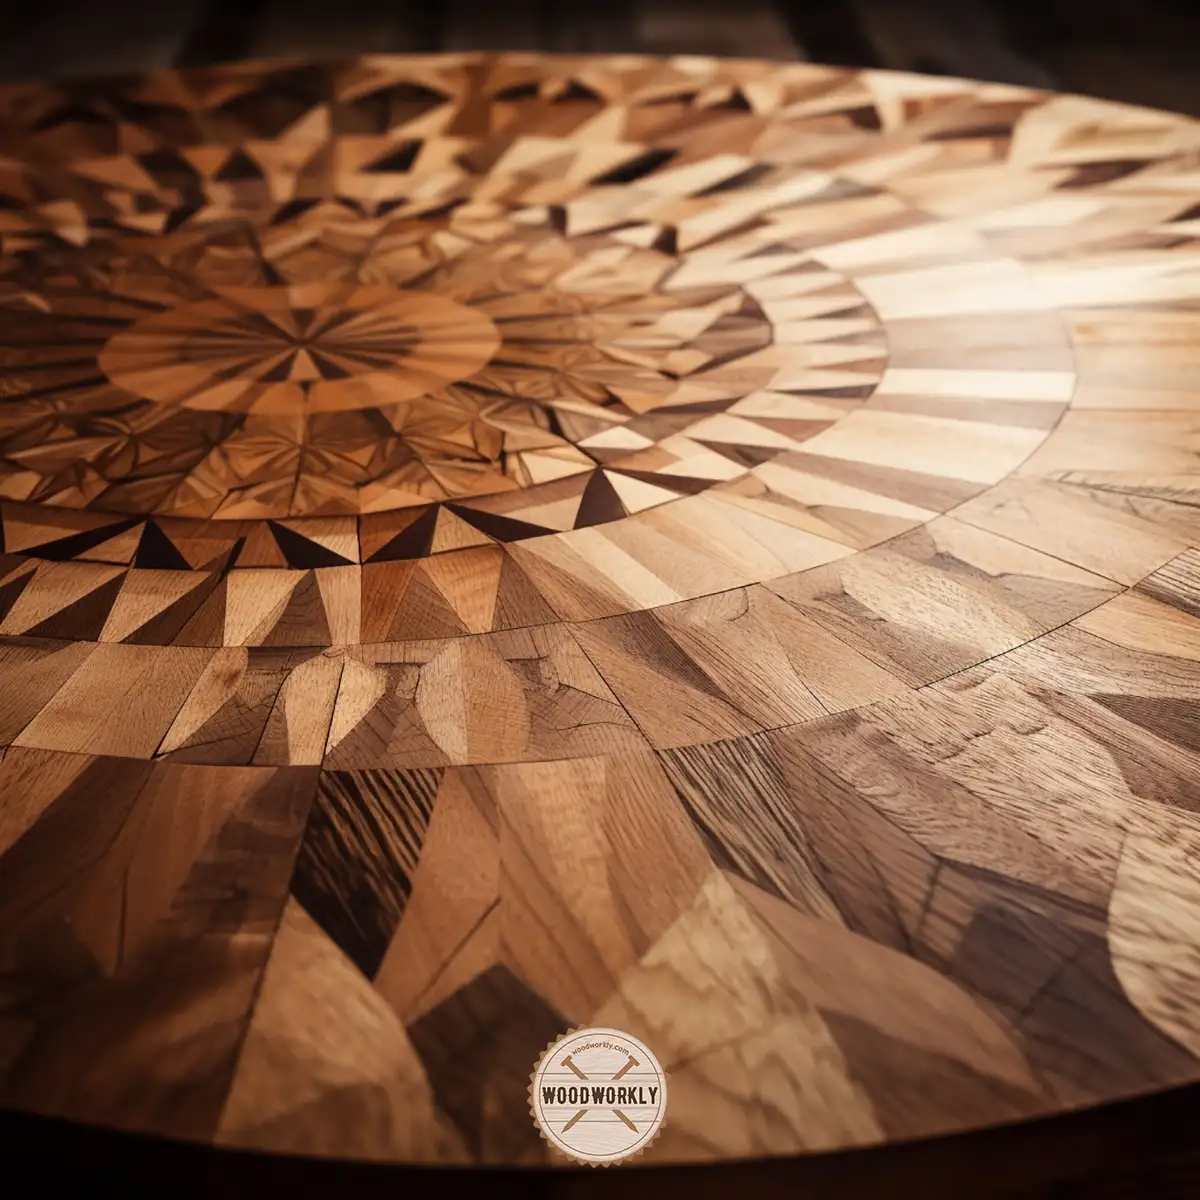
Basically, by inlay routing wood is used to create intricate patterns, motifs, or even images within a wooden piece.
You can use different types of wood to combine and create contrasting colors and textures, resulting in stunning visual effects that increase the value of the project overall.
Plus, you can use metal inlays, stone inlays, and inlays from other materials as well to combine with wood to create one-of-a-kind designs.
Whether you’re a seasoned professional or an enthusiastic hobbyist mastering inlay routing can improve your woodworking projects to the next level of beauty.

Can You Use A Router For Inlays?
Yes, you can use router for inlays since it is a versatile and powerful tool with a wide range of woodworking tasks.
Router offers various benefits over traditional methods and is great for both professionals and beginners who want to achieve precise and accurate inlay work with wood.
Let’s have a look at some advantages and limitations you’ll probably receive by using router for inlays.
Benefits Of Using Router For Inlays
Here’re some benefits you’ll get by using router for inlaying wood,
- High precision and accuracy
- Repeatability and consistency
- Time-saving
- Versatility
Let’s have a look at each of those benefits in detail to understand how important is router when inlaying wood.
High Precision And Accuracy
Routers have suitable types of bits and templates to inlay wood with high accuracy and precision.
This will result in a tighter fit and cleaner look for the finished piece of wood inlay, ensuring that your inlay work stands out in all the correct ways.
Repeatability And Consistency
Keeping consistency is one of the main challenges that most woodworkers regularly face when using traditional methods when inlaying wood, especially when making multiple identical inlays.
But with the router you won’t face any consistency issues since it enables you to create consistent and repeatable patterns, ensuring that each piece in the series of wood lays looks uniform and professional.
Time-Saving
Hand-cutting inlays takes a lot of time for the process and installation, particularly for detailed designs.
With routers, you can speed up the process drastically. It allows you to create beautiful inlays in a fraction of the time it would take using traditional methods with hand tools.
Versatility
Routers can be used to handle different types of woods including hardwoods, softwoods, and even metals and stones.
Therefore, you can use routers for a wide range of applications when inlaying, enabling you to experiment with different materials and designs with unique results until you select the material that suits your preference the most.
Let’s see some drawbacks and limitations you might face in using routers for inlaying tasks.
Limitations And Challenges Of Using Router For Inlays
Here’re some limitations and challenges you might face by using router for inlaying wood,
- Learning curve with lots of practice.
- Need proper setup and tools.
- Dust and debris.
Let’s have a look at each of those limitations and challenges you’ll face with the router during inlaying to overcome them with the right solutions.
Learning Curve With Lots Of Practice
Learning to use a router correctly is a skill that you should master over time with lots of practice and patience.
When inlaying you need to know both how to use router and how to inlay correctly which are two separate methods. So, yes there is an extra effort you’ll have to take when using router for inlaying.
There’s a learning curve involved in mastering the technique. You need to have enough practice and patience to achieve the desired level of precision and accuracy.
However, with enough practice and dedication and with proper guidance, many woodworkers catch up quickly with the way of using router properly.
This will eventually become a huge benefit for them in future not only for inlaying, but also for other woodworking activities.
Need Proper Set-Up And Tools
In order to create successful designs inlays using a router, you need to have the appropriate setup and tools, including a compatible router, appropriate bits, templates, and guide bushings.
This will require a considerable amount of initial investment, but the results will be well worth the money you spend.
As you can see, using a router for inlays is a fantastic option for woodworkers who want to achieve precise, accurate, and beautiful results.
The benefits of using a router for inlays far outweigh the limitations and challenges, making it a worthwhile investment of time and resources.
What Kind Of Router Do You Need For An Inlay?
Choosing the right type of router is essential to get promising results when inlaying wood to achieve results with high precision and accuracy with ease of use.
There’re some specific features and specifications you need to consider when selecting a router for your inlay work.
Router Specifications For Inlay Routing
Here’re some router specifications you should go for when selecting the correct router for inlaying wood,
- Power and speed.
- Plunge base.
- Depth adjustment.
Let’s talk about those specifications in detail,
Power And Speed
A router with enough power and variable speed control is crucial for inlay work.
A 1-2 horsepower router is generally sufficient for most wood inlay projects.
Variable speed control allows you to adjust the router’s speed based on the material you’re working with, ensuring clean cuts and minimizing the risk of burning or chipping.
Plunge Base
A plunge router base is ideal for inlay work, as it allows you to lower the bit into the material with precision and control.
A plunge base is useful when making wood inlays and embedding them with high precision. Accurate depth control is a must for clean and professional-looking result without messing this up.
Depth Adjustment
Look for a router with a fine depth adjustment feature, which allows you to make small, precise changes to the cutting depth.
This is especially important when working with different material thicknesses or when creating multi-level inlays.
Importance of Guide Bushings
Guide bushings are useful to create inlays. Guide bushes come inside the router inlay kit with screws.
Guide bushings play a very important position in inlay routing since they ensure that the router follows the template accurately.
They attach to the router base and guide the bit along the template’s edge, helping you achieve precise and consistent cuts.
Choosing the Right Guide Bushing
Selecting the appropriate guide bushing size is vital for proper inlay work.
The bushing should fit snugly in your router base and be compatible with your chosen template.
Make sure to choose a bushing that accommodates the specific bit size you plan to use for your inlay project.
Recommended Router Models For Inlaying Wood
- Bosch Colt Palm Router (PR20EVS)
- DeWalt DWP611PK
- Makita RT0701CX7
Let’s have a look at the specifications and features of each of the above router which are important when inlaying wood.
Bosch Colt Palm Router (PR20EVS)
The Bosch Colt Palm Router is a compact and powerful option for inlay work.
It comes with a 1-HP motor, variable speed control, and precise depth adjustment.
Therefore, it has all the essential features needed for successful inlay routing.
DeWalt DWP611PK
The DeWalt DWP611PK is a versatile and reliable choice for inlay projects.
DeWalt DWP611PK comes with a 1.25-HP motor, variable speed control, and a plunge base with fine depth adjustment.
The router also has an LED light for better visibility while working.
Makita RT0701CX7
The Makita RT0701CX7 is another excellent option for inlay routing.
It comes with a 1.25-HP motor, variable speed control, and a plunge base with fine depth adjustment.
It’s slim design and ergonomic handle provide comfort and control during extended use.
Selecting the right type of router with all the required specifications is important to get excellent results when inlaying wood.
What Router Bit To Use For Inlay – Inlay Router Bit
Selecting the suitable router bit for your inlay work is essential to make clean, smooth, and precise cuts and to get professional-looking results.
There’re many different types of router bits available with different properties and applications.
Here’re some of the best inlay router bits,
- Straight bits
- Spiral bits
Let’s have a look at them in detail.
Straight Bits
Straight bits are the bit type that mostly uses for inlay woods.
Here’re some properties of straight bits,
- Have a straight cutting edge.
- Ideal for cutting grooves, dados, and mortises.
- Use for removing materials within the boundaries of the inlay cavity of the wood.
Spiral Bits
Spiral router bits come as spiral up-cut or spiral down-cut bits. They have twisted cutting edge that pulls chip away from the material being cut.
Here’re some properties of spiral bits,
- Make cleaner cuts.
- Reduce chances of burning or chipping.
- Great for inlay work in hardwoods.
- Provide smoother cuts with less tear-outs.
Router Bit Sizes And Materials
Router bit size is an essential factor you should consider before starting to inlay wood with a router.
The bit size should be compatible with the width of the inlay material you’re going to use.
Common bit sizes for inlay works are 1/8 inch, ¼ inch, and ½ inch.
Other sizes are great for more detailed and specific applications.
In terms of materials, router bits are mostly made from high-speed steel (HSS) or carbide.
Carbide bits are more durable and maintain their sharpness longer than HSS bits. Therefore, carbide bits are great for inlay wood in hardwoods or other dense materials.
HSS bits are less expensive and dull quickly and need regular sharpening.
Selecting the Appropriate Bit for Wood Inlays
When choosing a router bit for your inlay project, take into account the type of material you’re working with, the design of your inlay, and the level of detail required.
For example, if you’re working with hardwoods or intricate designs, a spiral bit made from carbide may be the best choice.
Make sure to test the router bit you selected on scarp wood first before starting your inlay project.
This will help you determine if the bit is appropriate for your specific needs and give you a chance to practice your technique before committing to your final piece.
Before heading into the inlay process, let’s see what tools and materials you need to gather.
Tools You Need For Inlaying Router
- Router
- Router bits (straight and spiral bits in 1/8 inch, ¼ inch, and ½ inch sizes)
- Guide bushings
- Templates
- Clamps
- Double-sided tape
- Chisels
- Gouges
- Inlay router guide set
Select tools from reputable brands and check the quality of the tools before purchase to get promising results.

Enough chit chats! Let’s head into the main project of inlaying wood with a router step by step.
How To Inlay Wood With A Router
Inlaying wood with a router is a rewarding process that can significantly enhance the beauty and value of your woodworking projects.
Here’re the steps you need to follow when inlaying wood with a router,
- Choose your design and materials.
- Create or acquire a template.
- Prepare the workpiece and inlay material.
- Secure the template and workpiece.
- Route the inlay cavity.
- Prepare the inlay piece.
- Clean up and test fit the inlay.
- Glue and clamp the inlay.
- Sand and finish the wood.
Let’s discuss each of the above steps in detail to inlay wood with a router properly without making any mistakes.
Step 1: Choose Your Design and Materials
Before you begin, select the design you wish to inlay and the materials you’ll be using.
Consider the type of wood for both the workpiece and the inlay itself, as different woods have unique characteristics that can impact the final result.
Additionally, think about the router bit and guide bushings you’ll need for the specific design you’ve chosen.
Step 2: Create or Acquire a Template
Next, create or acquire a template for your design.
Templates can be purchased pre-made or custom-designed using various methods, such as drawing, computer-aided design (CAD) software, or even 3D printing.
Make sure your template is sturdy and accurate, as it will guide your router throughout the inlay process.
Read my latest comprehensive guide to know more about How to make router inlay templates properly!
Step 3: Prepare the Workpiece and Inlay Material
Prepare your workpiece and inlay material by cutting them to size and ensuring their surfaces are flat and smooth.
Sand any rough spots and remove any debris that may interfere with the routing process.
Step 4: Secure the Template and Workpiece
Attach the template to the workpiece using double-sided tape, making sure it is properly aligned with your desired inlay position.
Then, clamp the workpiece to your workbench to prevent movement during the routing process.
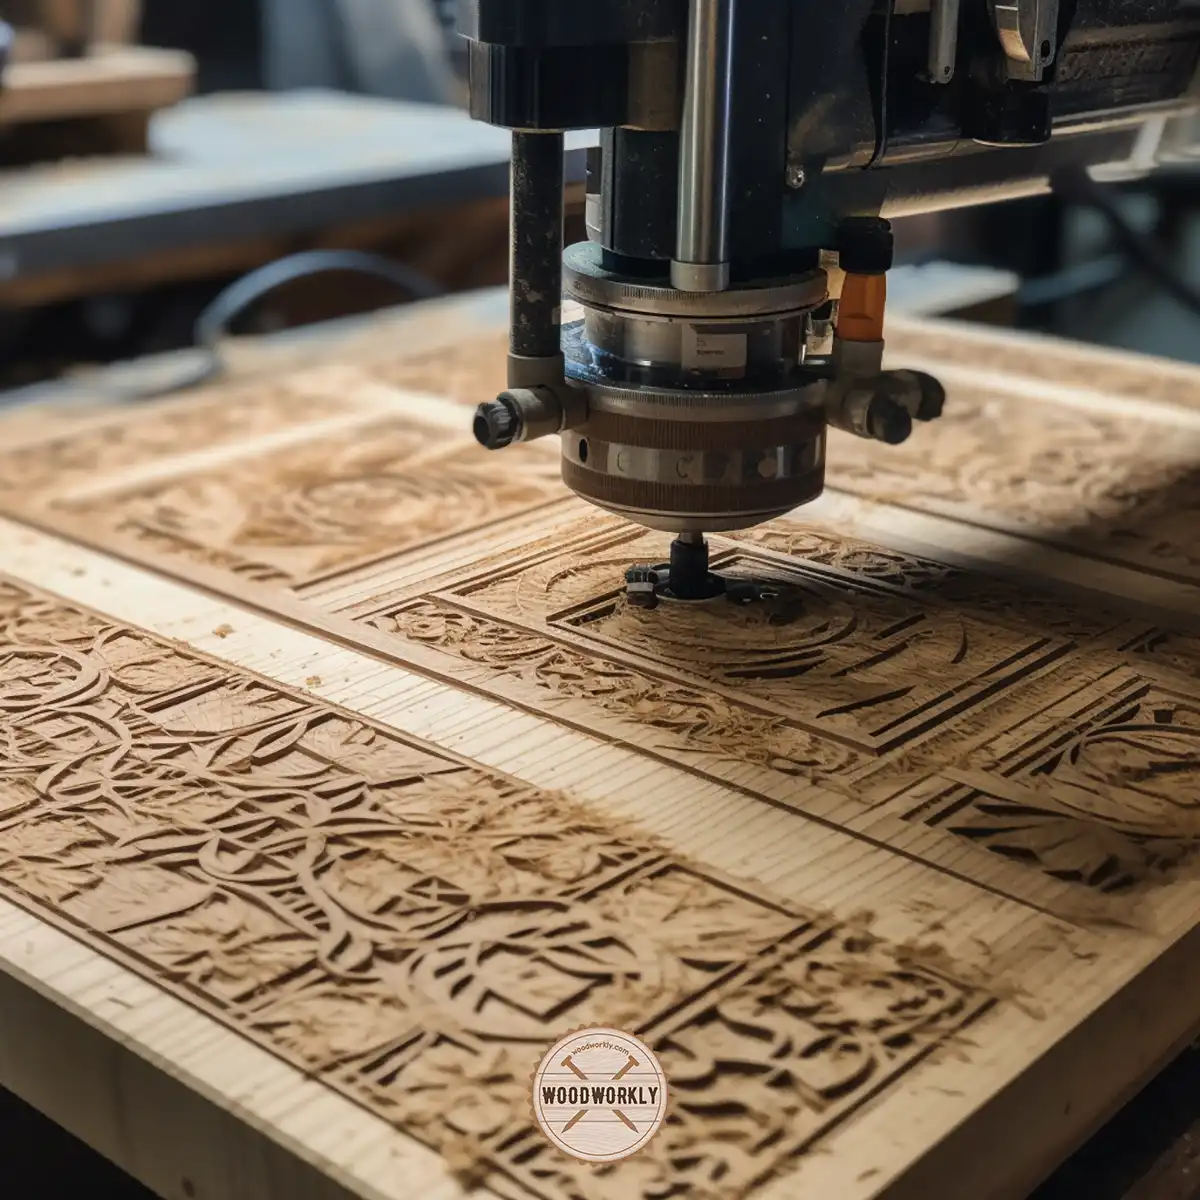
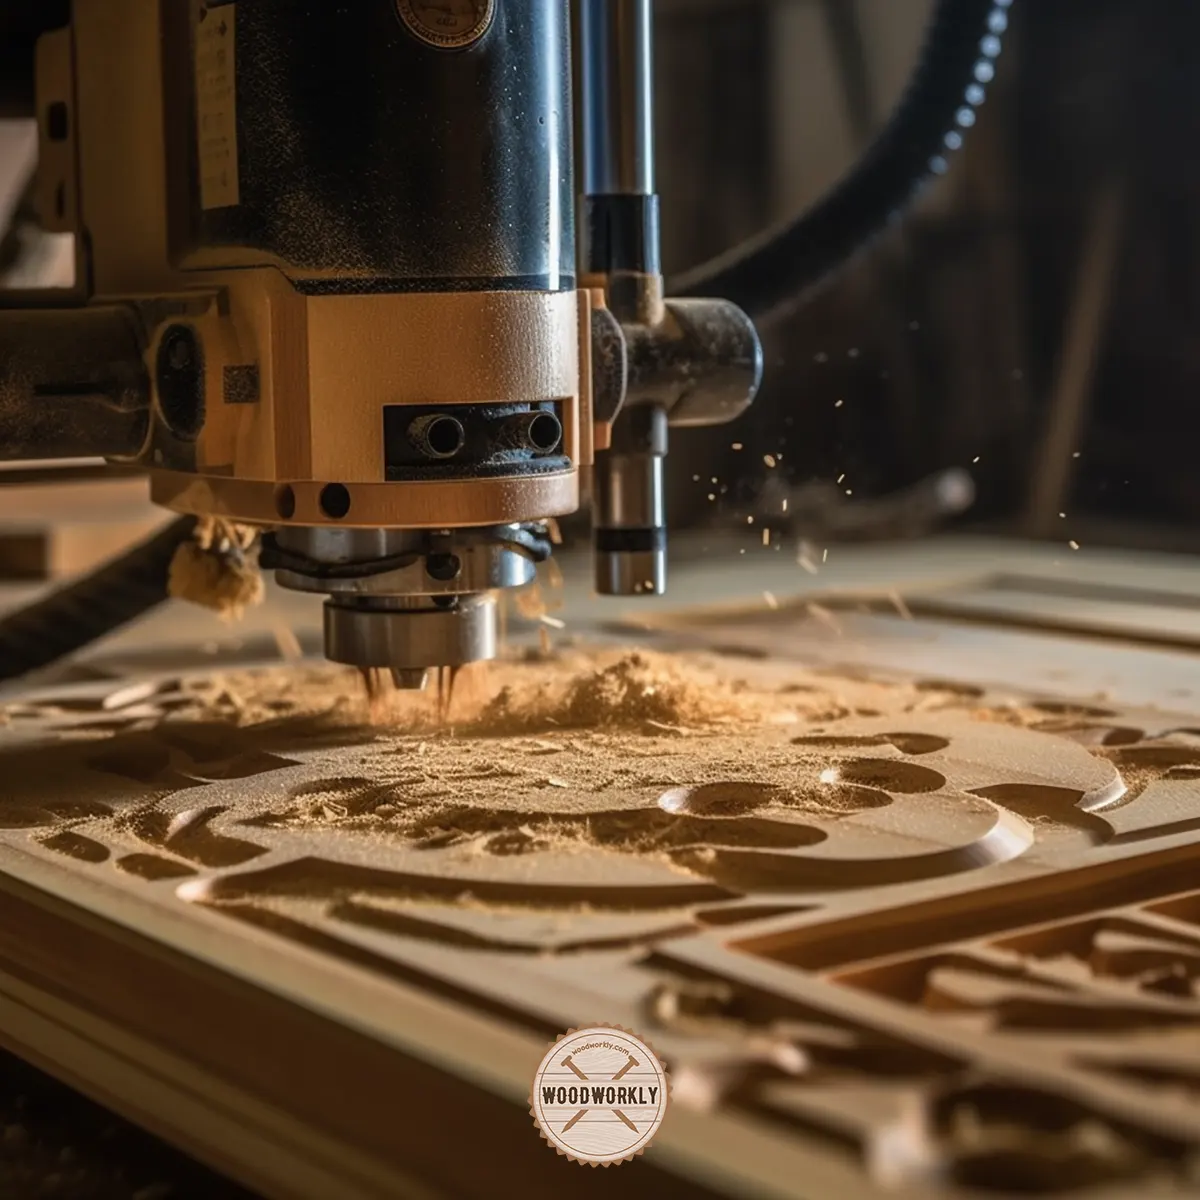
Step 5: Route the Inlay Cavity
Install the appropriate router bit and guide bushing for your project. Adjust your router’s depth of cut to match the thickness of your inlay material.
Carefully route the inlay cavity, following the template and applying even pressure to maintain consistent depth.
Rout the cavity in multiple passes, removing a small amount of material with each pass to minimize the risk of tear-out and maintain control.
Step 6: Prepare the Inlay Piece
Using the same template, route the inlay piece from your chosen material. It’s crucial to be precise and accurate, as any discrepancies between the cavity and inlay piece will be noticeable in the final result.
Step 7: Clean Up and Test Fit The Inlay
Clean up any rough edges or imperfections in the cavity and inlay the piece using chisels, gouges, or sandpaper. Test fit the inlay piece into the cavity to ensure a snug, precise fit. If necessary, make any adjustments to achieve the perfect fit.
Step 8: Glue and Clamp the Inlay
Apply wood glue to the cavity and the inlay piece, then press the inlay into the cavity.
Use clamps to hold the inlay in place while the glue dries, ensuring even pressure to prevent gaps or misalignments.
Step 9: Sand and Finish The Wood
Once the glue is fully cured, remove the clamps and sand the inlay flush with the workpiece surface.
Apply your desired finish to the workpiece, taking care to properly seal and protect the inlay.
By following the steps and incorporating the tips shared throughout, you can create stunning wood inlays using a router.
The process may require practice and patience, but the result will be a beautiful, professional-looking piece that showcases your woodworking skills.
Congrats folks! Now you know how to inlay wood with a router properly to get promising results as you wish.
Let’s have a look at some useful tips and tricks that are important to follow to make the overall process lot easier.
Tips For Inlay Routing
Here’re some useful tips gathered from experts in woodworking to make your inlay routing process a lot easier,
- Practice makes you perfect.
- Choose the right materials.
- Maintain sharp router bits.
- Take your time, don’t rush the process.
- Use a template.
- Consider using a plunge router.
- Test fit before gluing.
- Clean up as you go.
Let’s discuss each of those tips in detail to help you to achieve stunning results when inlaying wood with a router.
1. Practice Makes Perfect
Before diving into a complex inlay project, practice on scrap pieces of wood to hone your skills and get familiar with your router and bits.
As with any woodworking technique, practice is essential to perfecting your craft and reducing the risk of errors in your final project.
2. Choose the Right Materials
Selecting the appropriate materials for your inlay project is crucial. Choose contrasting woods for both the workpiece and inlay to create a striking visual effect.
Also, consider the hardness and grain structure of the woods to ensure they’ll work well together during the routing process.
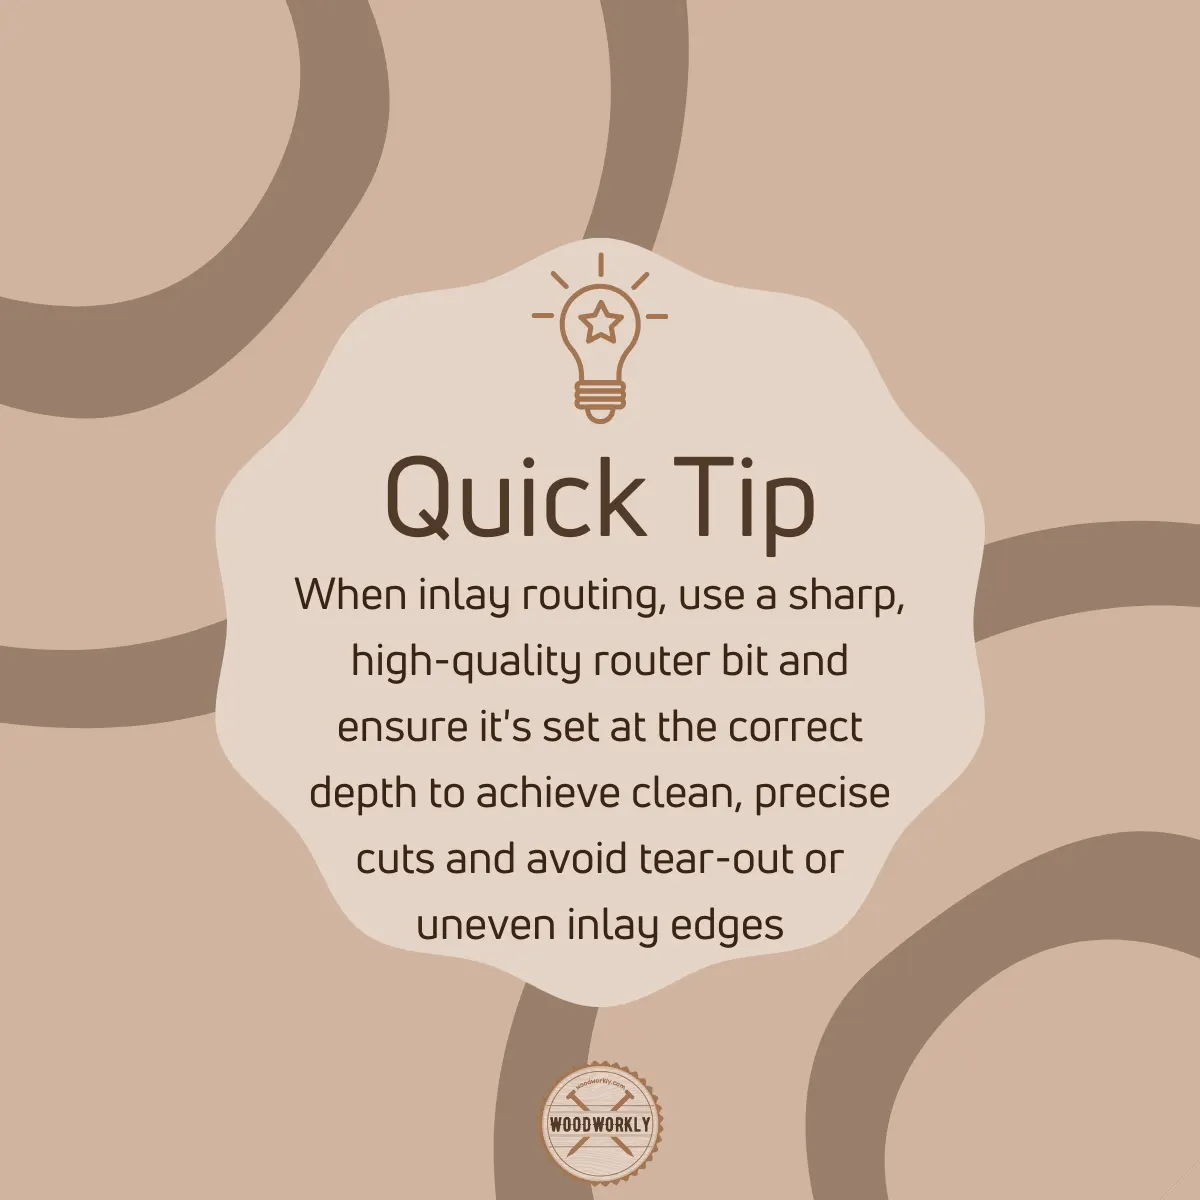
3. Maintain Sharp Router Bits
Using sharp router bits is essential for clean, precise cuts. Dull bits can lead to tear-out, rough edges, and inaccurate results.
Regularly inspect your router bits for wear and sharpen or replace them as needed.
4. Take Your Time
Patience is key when inlay routing. Take your time to accurately measure, align, and secure your workpiece and template.
While routing, make multiple shallow passes to remove material gradually, rather than trying to remove too much at once.
This approach will help you maintain control and achieve a cleaner, more precise result.
5. Use a Template
Templates are invaluable for achieving consistent, precise inlays. Whether you create your own or purchase a pre-made template, using one will ensure that your inlays are accurate and professional-looking.
6. Consider Using a Plunge Router
A plunge router allows for greater control and precision when routing inlay cavities, as you can set a specific depth and make adjustments more easily.
If you have access to a plunge router, consider using it for your inlay projects.
7. Test Fit Before Gluing
Always test fit your inlay piece into the cavity before applying glue.
This step will help you identify and correct any fitting issues before they become permanent.
8. Clean Up as You Go
Keep your work area clean and free of debris throughout the inlay routing process.
Regularly vacuum or brush away sawdust and wood chips to maintain visibility and ensure accurate cuts.
By following these tips and taking a patient, methodical approach to inlaying routing, you’ll be able to create stunning, professional-quality woodworking projects that showcase your skills and craftsmanship.
Safety Precautions
Safety first. Therefore, follow below safety precautions carefully when you’re working with router for wood inlaying projects.
Safety precautions are as follows,
- Wear personal protective equipment (PPE) like a mask, gloves, and ear protection, goggles.
- Keep your working area clean and well-lit.
- Secure your workpiece and template.
- Inspect your tools and equipment to avoid accidents.
- Use the correct router speed.
- Unplug your router when changing bits.
- Maintain a firm grip and proper body position.
- Never force the router.
Follow these safety precautions to minimize the risk of accidents and injuries while enjoying the creative process of inlay routing.
That’s it, folks! Hope you were able to know all you wanted to know about how to inlay wood with a router with my step-by-step guide.
Let’s answer some frequently asked questions.
Can I Create Custom Inlay Patterns And Templates?
Yes, you can create custom inlay patterns and templates. Creating custom inlay patterns and templates allows you to add a personal touch to your woodworking projects.
You can design your patterns using drawing software, or even by hand.
Once you have a design, transfer it onto template material, such as MDF or acrylic, and carefully cut out the pattern using a jigsaw, scroll saw, or laser cutter.
Can I Use A Plunge Router For Inlay Routing?
Yes, a plunge router is ideal for inlay routing.
The plunge mechanism enables you to control the cutting depth with precision, which is crucial when creating inlays.
Plunge routers also often have built-in depth stops that help maintain a consistent depth during the routing process.
What Materials Can I Use For Inlays?
There is a wide variety of materials you can use for inlays, including different types of wood, veneers, mother-of-pearl, metals, and more.
When selecting materials, consider factors such as color, texture, and workability to ensure they complement your project and can be easily shaped and fitted.
How Do I Ensure A Snug Fit Between The Inlay And The Cavity?
Achieving a snug fit between the inlay and the cavity is essential for a professional-looking result.
To ensure a tight fit, use sharp router bits, follow your template carefully, and make multiple shallow passes instead of a single deep cut.
Test-fit the inlay as you go, and make fine adjustments if necessary with sandpaper or chisels.
Can I Use A CNC Router For Inlay Routing?
Yes, CNC routers can be an excellent tool for inlay routing. They offer high precision and can create intricate designs with ease.
However, CNC routers can be expensive and require some programming knowledge.
If you’re interested in using a CNC router for inlay work, consider investing in software designed specifically for creating inlays, as well as researching the necessary programming techniques.
How To Create Custom Inlay Wood With A Router?
Here’re the steps you need to follow when creating custom inlay wood with a router,
- Design your inlay pattern using drawing software or by sketching it by hand.
- Transfer the design onto template material, such as MDF or acrylic, and cut it out using a jigsaw, scroll saw, or laser cutter.
- Secure the template to your workpiece with double-sided tape or clamps.
- Set up your router with the appropriate bit and guide bushing.
- Rout the cavity in your workpiece, following the template and making shallow passes until you reach the desired depth.
- Prepare the inlay material by cutting it to size and shaping it to match the cavity.
- Test-fit the inlay, making any necessary adjustments for a snug fit.
- Glue the inlay into the cavity, clamp it in place, and allow it to dry.
- Sand and finish the inlay and workpiece to achieve a seamless appearance.
How To Inlay Wood With A Stuart Mcdonald Router Base?
The Stuart McDonald router base is designed specifically for inlay work and features a built-in guide bushing system.
To inlay wood using this router base, follow these steps:
- Design and create your inlay template as described in the previous answer.
- Attach the Stuart McDonald router base to your plunge router according to the manufacturer’s instructions.
- Set up your router with the appropriate bit and depth setting.
- Secure the template to your workpiece using double-sided tape or clamps.
- Rout the cavity in your workpiece, following the template and making shallow passes until you reach the desired depth.
- Proceed with the steps for preparing, fitting, gluing, and finishing the inlay as mentioned in the previous answer.
How To Make Router Inlay Templates?
Here’re the steps you need to follow when making router inlay templates,
- Design your inlay pattern using drawing software or by sketching it by hand.
- Print or transfer the design onto a sturdy template material, such as MDF, plywood, or acrylic.
- Carefully cut out the pattern using a jigsaw, scroll saw, or laser cutter. Ensure that the edges are smooth and accurate to achieve a precise fit when routing.
- Drill any necessary holes for internal shapes, and use a coping saw or scroll saw to cut out these areas.
- Sand the edges of the template to remove any imperfections and achieve a smooth, clean surface.

Did I cover all you wanted to know about How To Inlay Wood With A Router?
In this article, I have deeply discussed the step-by-step process of how to inlay wood with a router. I have taken every step and explained how it should be done with tips and proper techniques.
You can inlay wood with a router by creating a design, transferring it onto a template, and cutting it out. Then, Secure the template to the workpiece, set up the router with the appropriate bit, and route the cavity. Prepare the inlay material, test-fit it, glue it into the cavity, and sand and finish the piece.
Furthermore, I’ve answered some frequently asked questions as well.
Hope you were able to learn everything you wanted to know about how to inlay wood with a router with inlay routing tips and techniques.
Practice makes you perfect. Therefore, practice the procedure that I have deeply discussed above with several scarp woods and gain some experience before moving into the main project.
With enough knowledge and experience, you’ll be able to make a beautiful inlay creation with wood like a pro!