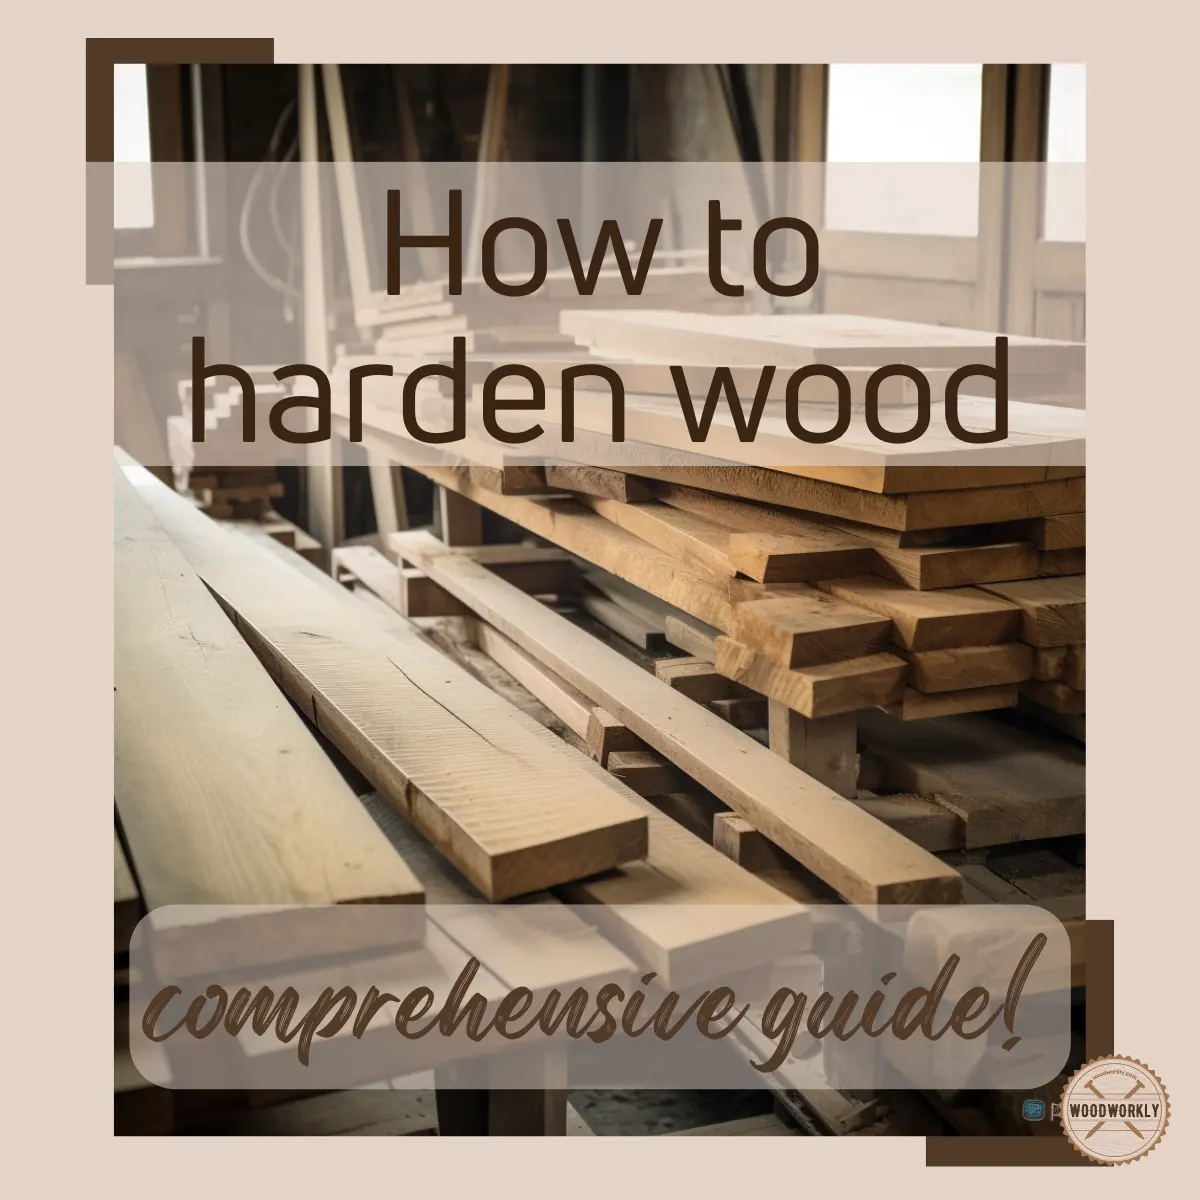
Looking for ways to make your wooden projects sturdier and more durable? Discover the secrets of hardening wood and level up your woodworking skills! Ready to dive in?
You’ll be able to preserve and protect lots of old and rotted wood pieces by hardening them. Hardening wood piece helps to improve its dimensional and structural strength with excellent durability.
It basically stops your wood from damaging by moisture, pests, harsh chemicals, and many other elements.
But how exactly it should be done? I was curious about this as well and got experts’ advice about wood hardening.
As per my knowledge, there’re different ways you can follow to harden wood. Each method has its unique techniques, and it is your job to select the one that matches you and your wood the most.
So, let’s figure out, How to harden wood?
You can harden wood by heating over a fire or applying epoxy, Polycrylic fortifier, wood hardener, oil, protective topcoat, acrylic resin, or Pentacryl stabilizer. To harden wood, first, clean the wood surface and apply the wood hardener. Then, inspect its hardness and apply a protective topcoat over it.
But that’s just the tip of the iceberg!

In this comprehensive article, we’ll explore how to harden wood in 8 different methods with pros and cons of each. Plus, I’ll explain the importance of hardening a wood with useful tips, tricks, and techniques.
Furthermore, I’ll answer some frequently asked questions as well.
Let’s jump in!
Can You Harden Wood?
Yes, you can harden wood using several different methods. Hardening helps to preserve the wood by protecting wood from moisture, pests, insects, harsh chemicals, and weather elements.
Hardening basically can improve the wood’s durability, wood’s strength and partially give a unique attractive look to your furniture, tools, or artwork.
Therefore, the overall quality of the wood will dramatically increase due to the wood hardening process.
Before heading into the hardening processes, let’s have a look at a brief knowledge about the importance of hardening wood.
Importance Of Hardening Wood
Hardening of wood is important due to several reasons. Basically, it helps to enhance the lifetime of your loving wood, furniture, or woodwork.
Here’re the reasons why wood hardening is important,
- Increases wood durability and strength.
- Protect wood from moisture, pests, and fungal growth.
- Enhance the wood appearance.
So, let’s discuss each of the above importance of hardening wood in detail for a better view.
1. Increases Wood Durability And Strength
Hardening changes the physical and chemical structure of wood fibers and prevent wood from insect and bug attacks.
Therefore, wood will be less susceptible to insect attacks and have good resistance to wear and tear due to its enhanced structural strength.
This indicates your handcrafted wooden furniture, tools, or other objects will last longer and maintain their functionality with hardening.
2. Protect Wood from Moisture, Pests, And Fungal Growth
As a result of wood hardening, the porous structure of wood fibers will shrink, and small water particles won’t get a chance to penetrate the wood.
Therefore, wood won’t rot and decay if left untreated after hardening is done.
Plus, fungal, mold, and mildew growth won’t happen, and you don’t need to pressure wash the wood occasionally to remove mold and clean the wood.
Overall, hardening gives the wood an extra layer of protection against these detrimental factors.
3. Enhance The Wood’s Appearance
Hardening gives a richer and more polished color to the wood surface. This will dramatically increase how the wood looks and give a luxurious look even for a cheap kind of wood.
This is a bonus advantage you’ll get by hardening the wood. It will enhance the natural wood appeal and help to make your furniture, artwork, and other decorative wood items look attractive.
So, let’s have a look at the things you should consider before hardening wood for promising results.
Factors Affecting the Hardness Of Wood
There’re several factors you should consider before starting the hardening process for optimal results.
Here’re the factors you should consider before hardening wood,
- Type of the wood
- Grain structure of the wood
- Moisture content of the wood
- Hardening technique
- Age and Status of the wood
So, let’s have a brief look at each of the above factors in detail for better understanding.
1. Type Of The Wood
Wood species type is an essential factor you should look at before hardening a wood. the natural hardness of wood varies upon the wood species.
For example, hardwoods like oak, maple, and walnut are naturally harder than softwoods like pine, spruce, and cedar.
Therefore, you need to have a good understanding about which hardening method serves the best for each hardwood and softwood based on their natural hardness factor.
2. Grain Structure Of The Wood
The arrangement of grain texture is an important factor you should have a look at before starting the hardening process.
The arrangement of wood fibers and the presence of knots, burls, and other irregularities can affect the hardness of wood.
Woods with tighter grain structures are harder, denser, and stronger than other woods.
3. Moisture Content Of The Wood
Moisture content is a critical factor when hardening wood. Woods with high moisture content typically have less hardness and you need to consider that when hardening the wood.
You’ll have to wait for a long until the wood hardens completely during the hardening process.
Drier woods already have a good amount of hardness, and they are less prone to warping or splitting.
Properly kiln-drying or air-drying wood without cracking before use can significantly improve its hardness.
4. Hardening Technique
You cannot use any hardening technique to harden any wood. you should consider the wood type, application type, and other factors when hardening a wood.
These techniques include fire-hardening, epoxy treatment, oil treatment, and the use of wood hardeners or stabilizers.
The effectiveness of the hardening process depends on the method you choose and the wood type.
5. Age And Status Of The Wood
Upon wood aging, the natural resins and oils inside the wood get hardened and this will make the wood more durable and steadier.
Therefore, aged woods tend to have high hardness and durability than fresh ones which is important to consider before hardening them.
Plus, you need to inspect the wood carefully to identify the status of the wood.
For example, if the wood is rotted already, you’ll have to use different methods to harden the wood. If the wood is fresh as new you can do the hardening with a regular process.
Likewise, the status of the wood is a crucial factor to consider before starting the hardening process.
Now you know everything you need to look for before starting the hardening job. Hardening wood is not only possible but also essential for enhancing the longevity, strength, and beauty of wooden items.
As let’s head into the hot topic of discussing the hardening process of the wood.
How To Harden Wood?
There’re several methods you can use to harden wood. you can select the one that you like most based on the wood type, application type, and your other requirements.
Here’re the methods to harden wood properly,
- Hardening wood with fire.
- Hardening wood with epoxy.
- Hardening wood by applying Polycryl fortifier.
- Hardening with wood hardener.
- Hardening wood with oils.
- Hardening wood with a topcoat.
- Hardening wood with acrylic resin.
- Hardening wood with Pentacryl wood stabilizer.
Yes, that’s a lot. But don’t worry! I’ll walk you through each and every method of hardening wood deeply. That helps you to decide which method suits you the most.
Let’s dig in!
1. Hardening Wood With Fire
Hardening wood with fire is the most popular and oldest method of hardening wood. In this method, wood is heated over a fire to make it hard.
Fire hardening is also known as the heat-treating method which is an old technique that is used to strengthen and harden wood.
Hardening wood with fire is mostly used for wooden tools and weapons.
Heat flames remove the excess moisture from the wood surface and make them dry which results in the right wood grain and helps to strengthen the weak wood areas.
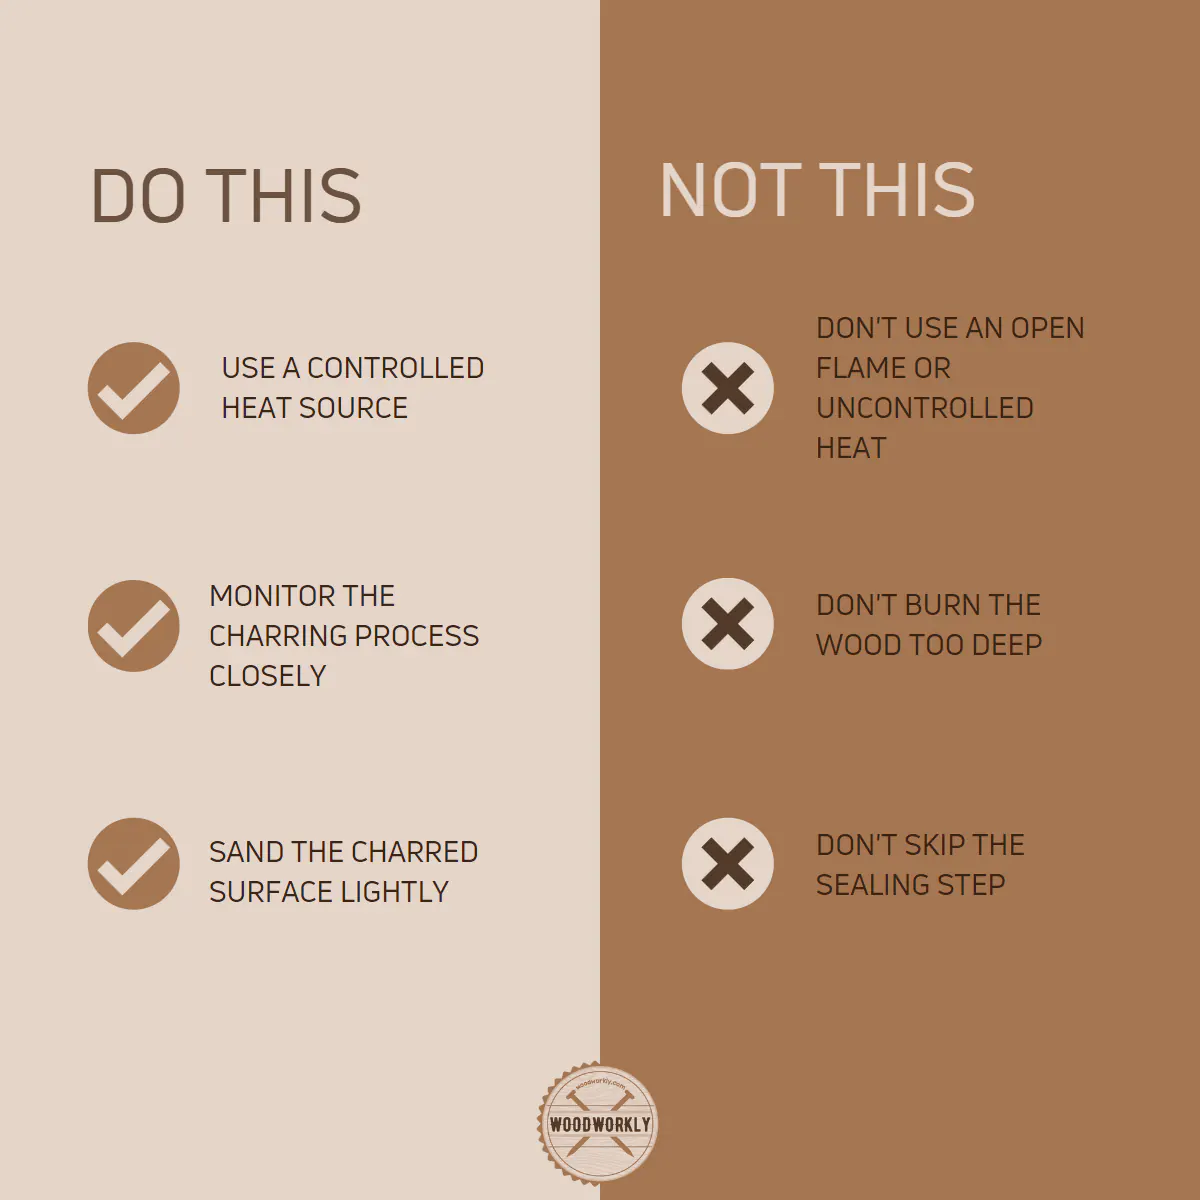
As per my experience, hardening wood by exposure to fire is a little bit challenging since you’re dealing with high-temperature levels.
With good focus, practice, and patience, you can master the skill of hardening wood with fire so well.
Please note that, in the fire hardening process, we use heat, not fire to harden the wood. The heat that comes from the fire flames is used to tighten the wood grain and eventually leads to hardening the whole wood by resulting harder and stronger surface.
You need to be extra careful to avoid getting damage to your skin and the wood since the exposure of wood to the fire for so long or holding wood too close to the fire can cause wood to scorch or burn.
Overheating will weaken the wood and ruin the appearance of your furniture and beautiful woodwork.
Therefore, proper attention is a must to get the desired results.
You need to have good patience and practice to harden wood with fire since one single mistake is enough to ruin and weaken your whole furniture or woodwork.
Tools and Materials To Harden Wood With Fire
- Charcoal or wood
- Lighter
- Wood you want to harden
- Safety gloves
- Googles
- Stones
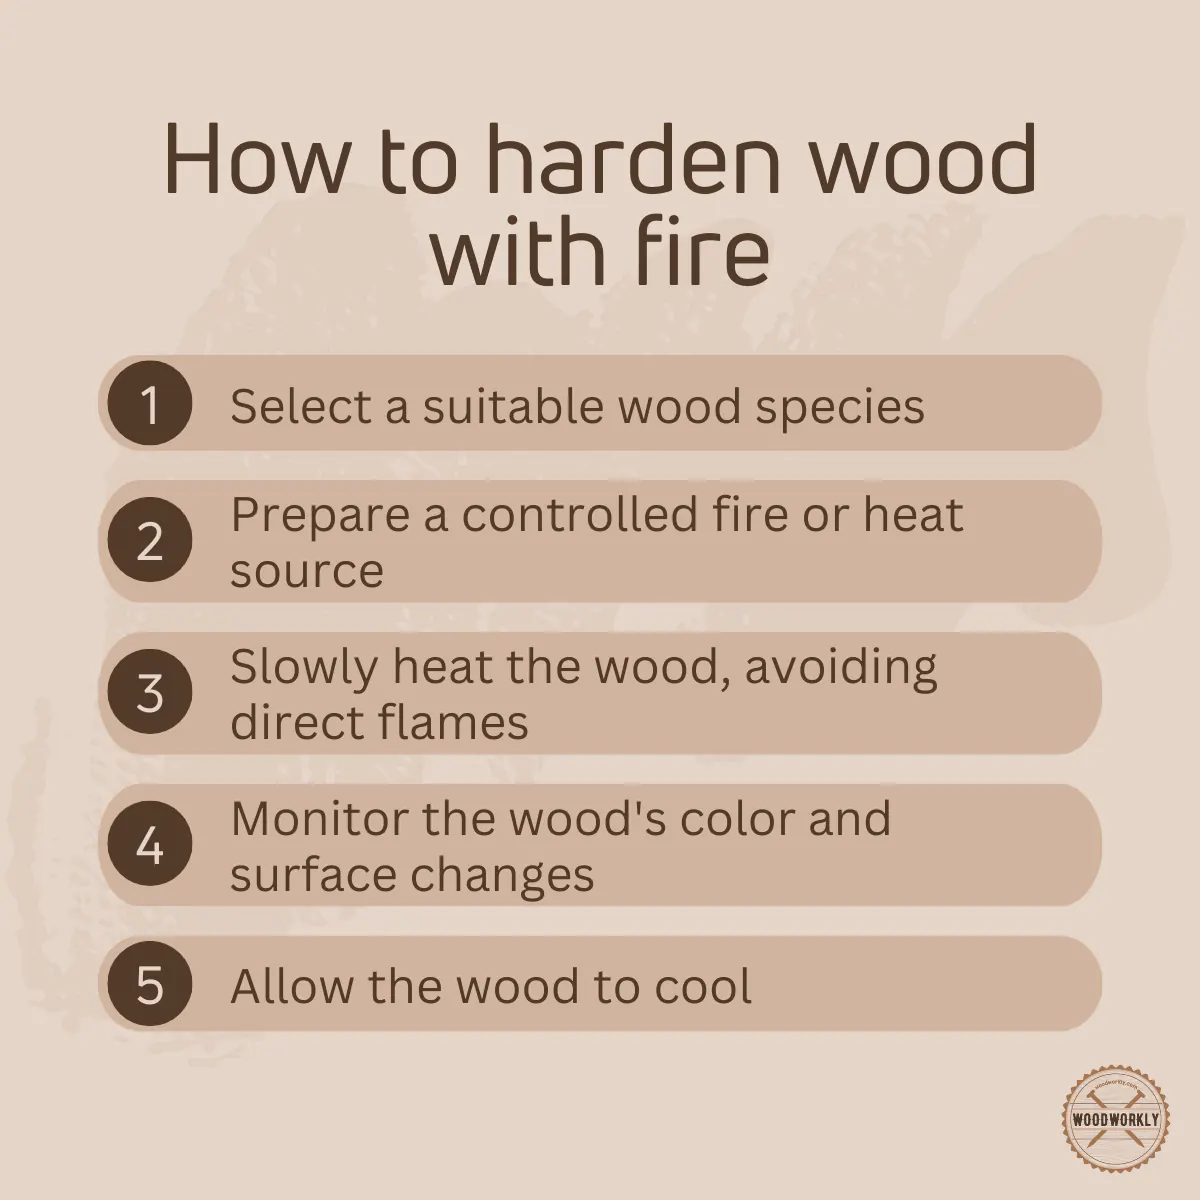
How To Harden Wood With Fire?
Here’re steps you need to follow when fire hardening wood,
- Prepare the fire pit.
- Ignite the fire.
- Heat the wood.
- Check the hardening progress.
- Let the wood cool.
Let’s discuss each of the above fire hardening processes in detail for excellent results.
1. Prepare The Fire Pit
First, you need to dig a hole in the ground about a half foot deep and two feet wide and surround the area with stones in a circular shape to make the fire pit for the fire hardening process.
Then add some rocks, wood pieces, and charcoal in the middle to start the fire.
2. Ignite The Fire
After filling the middle area with charcoal and wood pieces, ignite the fire using the lighter. Try to increase the flames amount to get enough heat.
Blow gently until the entire pyramid is aflame.
Add charcoal and wood pieces to get a steady, 6-inch high flame with a blue center. This flame indicates the ideal heat for fire-hardening.
3. Heat The Wood
Hold your wooden object (e.g., bow, arrowhead, spear) about 3 inches above the highest flame.
This helps to prevent the wood from burning due to too much heat.
Keep the wood in constant motion, turning it gently to distribute the heat evenly and prevent scorching.
4. Check The Fire Hardening Progress
Examine your wood frequently. When the surface appears dull and dry, all moisture has been removed, and the wood is hardened.
For larger objects, move on to the next section and harden it similarly.
You can repeat the same process several times until the surface appears fully dull and feels tough.
5. Let The Wood Cool
Once you feel the wood is tough, dry, and hardened enough, let it cool for 5 to 10 minutes in a cool, dry place before using it to decrease the internal temperature levels.
Congrats! Now your wood is completely hardened and ready to use with good strength.
Let’s have a look at some useful tips that are important to follow during the fire hardening process.
Tips for Successful Fire-Hardening
- Always monitor the flame’s height and color. If the flame turns orange or yellow, it’s too cool. If it becomes excessively large or unruly, it’s too hot.
- When working with larger or oddly shaped objects, consider using tongs or pliers to hold and rotate the wood for an even, controlled application of heat.
- Practice makes perfect. Don’t be discouraged if your first few attempts aren’t successful. With patience and persistence, you’ll eventually master fire-hardening.
With careful attention to detail, patience, and practice, you can harness the power of heat to create durable and robust wooden items.
Remember to experiment and learn from your experiences to achieve the best results.
2. Hardening Wood With Epoxy
Applying epoxy is an effective method to make your wood furniture, woodwork, and wooden tools strong, steady, and hard.
Generally, epoxy is a useful material that uses for lots of tasks in woodworking such as hardening, sealing, and repairing wood.
It is a versatile and durable material with powerful adhesive properties.
Epoxy makes a strong bond with the wood surface creating a protective layer over wood to protect the wood from moisture, pests, insect attacks, and other elements.
Likewise, epoxy hardens the wood to protect it from external damage.
Epoxy consists of two components: resin and hardener. When they are mixed together, they undergo a chemical reaction creating a rigid, durable, hard, and water-resistant material.
This material makes the wood harden. As per my experience, epoxy is an excellent material to harden softwoods with enhanced strength.
There’re lots of epoxy products that can be seen with different formulations, working times, curing times, and viscosity levels.
So, your duty is to select the right epoxy for your specific project to achieve the best results.
Tools and Materials To Harden Wood With Epoxy
- Water
- Epoxy
- Putty knife
- Clean rags
- Wood you need to harden
- Brush or suitable applicator
- Safety mask
How To Harden Wood With Epoxy?
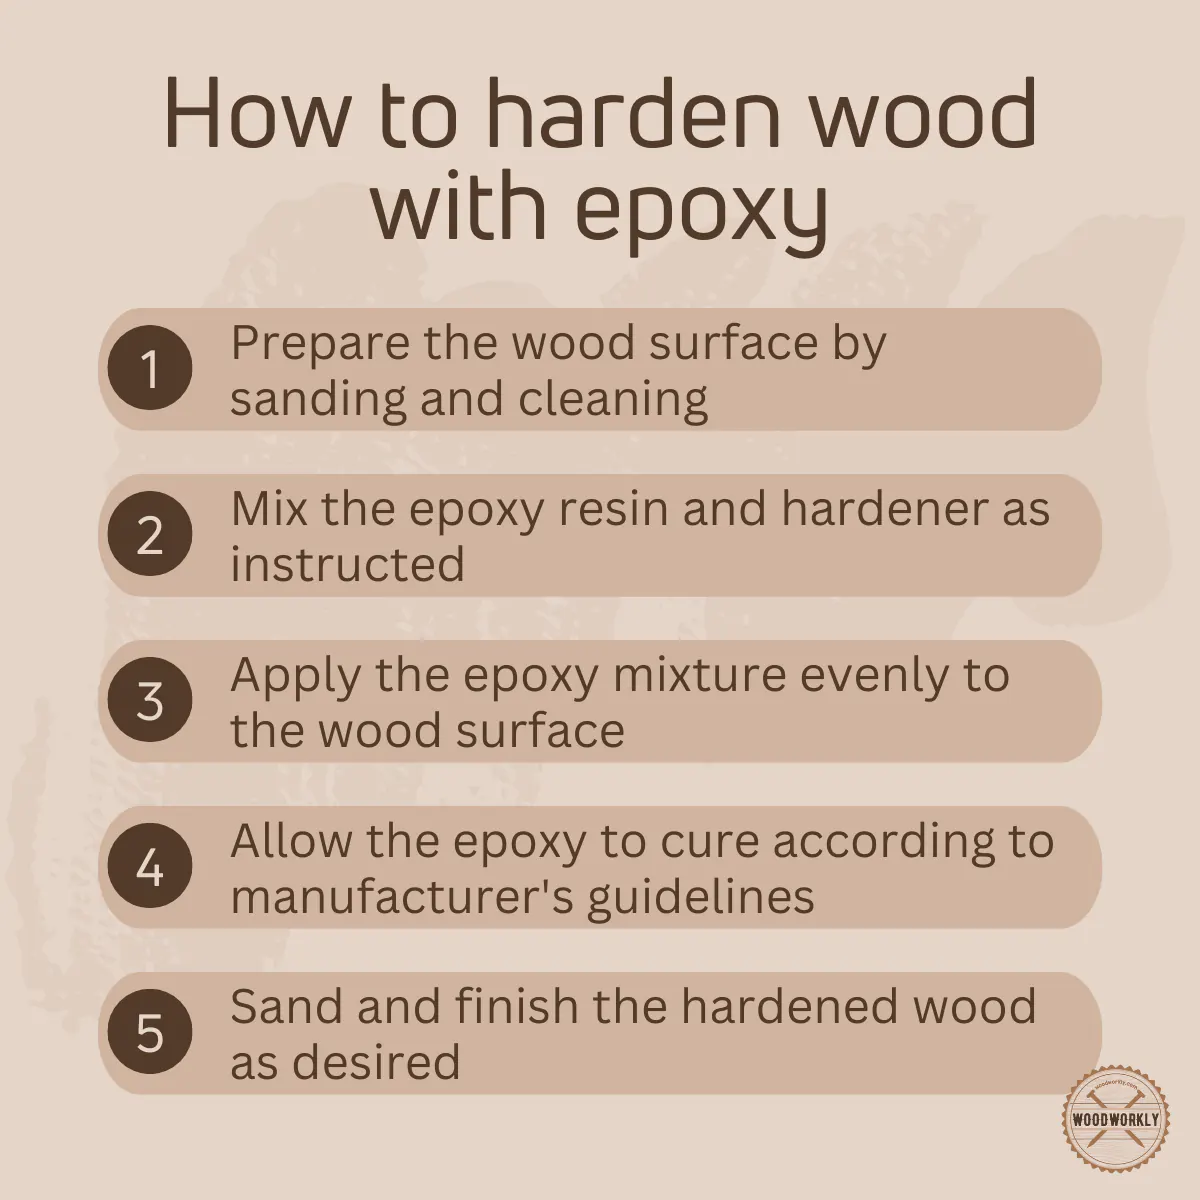
Here’re the steps you need to follow when hardening wood with epoxy,
- Select the right epoxy.
- Prepare the wood.
- Mix the epoxy.
- Apply the epoxy.
- Drill a hole in the wood to harden from the inside.
- Let the epoxy dry.
- Apply more epoxy layers.
- Let the epoxy dry and cure.
Let’s discuss each of the above steps in detail to harden wood correctly with epoxy.
1. Select The Right Epoxy
Choose an epoxy product suitable for your project. Pay attention to factors like viscosity, working time, and curing time.
For hardening wood, a penetrating epoxy with low viscosity is recommended.
2. Prepare The Wood
Now, clean the wood surface with a clean rag to remove dust, dirt, and debris before hardening the wood.
You can use a putty knife to remove all the stubborn dirt and loose fibers from the surface.
Leaving dust and dirt on the surface when applying epoxy weakens the strength of the bond. Therefore, the surface must be super nice and clean when applying epoxy.
3. Mix The Epoxy
Mix the epoxy resin and the hardener in a clean container according to the manufacturer’s instructions on the label.
Stir slowly and thoroughly to avoid introducing air bubbles to get a thick mixture.
4. Apply The Epoxy On Wood
Pour a necessary amount of thick mixture of epoxy onto the wooden surface you want to harden. Then apply epoxy over the wood along the direction of the wood grain with a paintbrush or suitable applicator.
Apply a uniform coat of epoxy over the surface without making random bumps.
Use a brush, roller, or squeegee, to apply a thin layer of epoxy to the wood surface.
Ensure the entire surface is covered, and the epoxy penetrates deeply into the wood. If necessary, apply additional coats as per the manufacturer’s recommendations.
5. Drill A Hole In Wood To Harden From Inside
Once you apply epoxy to the wood, let it be as it is for several minutes and inspect the surface. If the wood is still too soft or dull, you should give try to harden the wood from the inside.
In order to do that, drill a hole in the middle of your wood board and fill the hole with prepared epoxy mixture.
The epoxy will penetrate the wood through the drilled hole and harden the wood properly achieving excellent results.
6. Let The Epoxy Dry
After applying a thin coat of epoxy over the wood, allow the epoxy to dry according to the product’s guidelines.
Generally, epoxy dries within 3 to 4 hours of application. But this can take longer depending on the thickness of the coat and the mixed formula of epoxy and hardener.
Sometimes, this process may take anywhere from a few hours to several days, depending on the specific epoxy used.
7. Apply More Epoxy Layers
Repeat the same procedure above and apply 3 to 5 layers of epoxy to cover up the wood surface fully to get a better hardening process.
Make sure to apply a thin layer of epoxy and et each coat of epoxy to dry well for several hours between the layers.
Avoid bubbling, streaks, and runs when applying epoxy for a smoother and nicer surface.
After applying 2 to 3 layers, your wood will be waterproof and able to get protected from moisture and weather elements.
8. Let The Epoxy Dry And Cure
After applying 3 to 5 coats of epoxy on the wood, let it dry and cure for 3 to 5 days as per the manufacturer’s guidelines.
Drying and curing time can vary on the number of epoxy layers applied, the thickness of the coat, and environmental humidity levels.
After 5 days, inspect the hardness and toughness of the surface and take the wood for application.

Tips for Hardening Wood with Epoxy
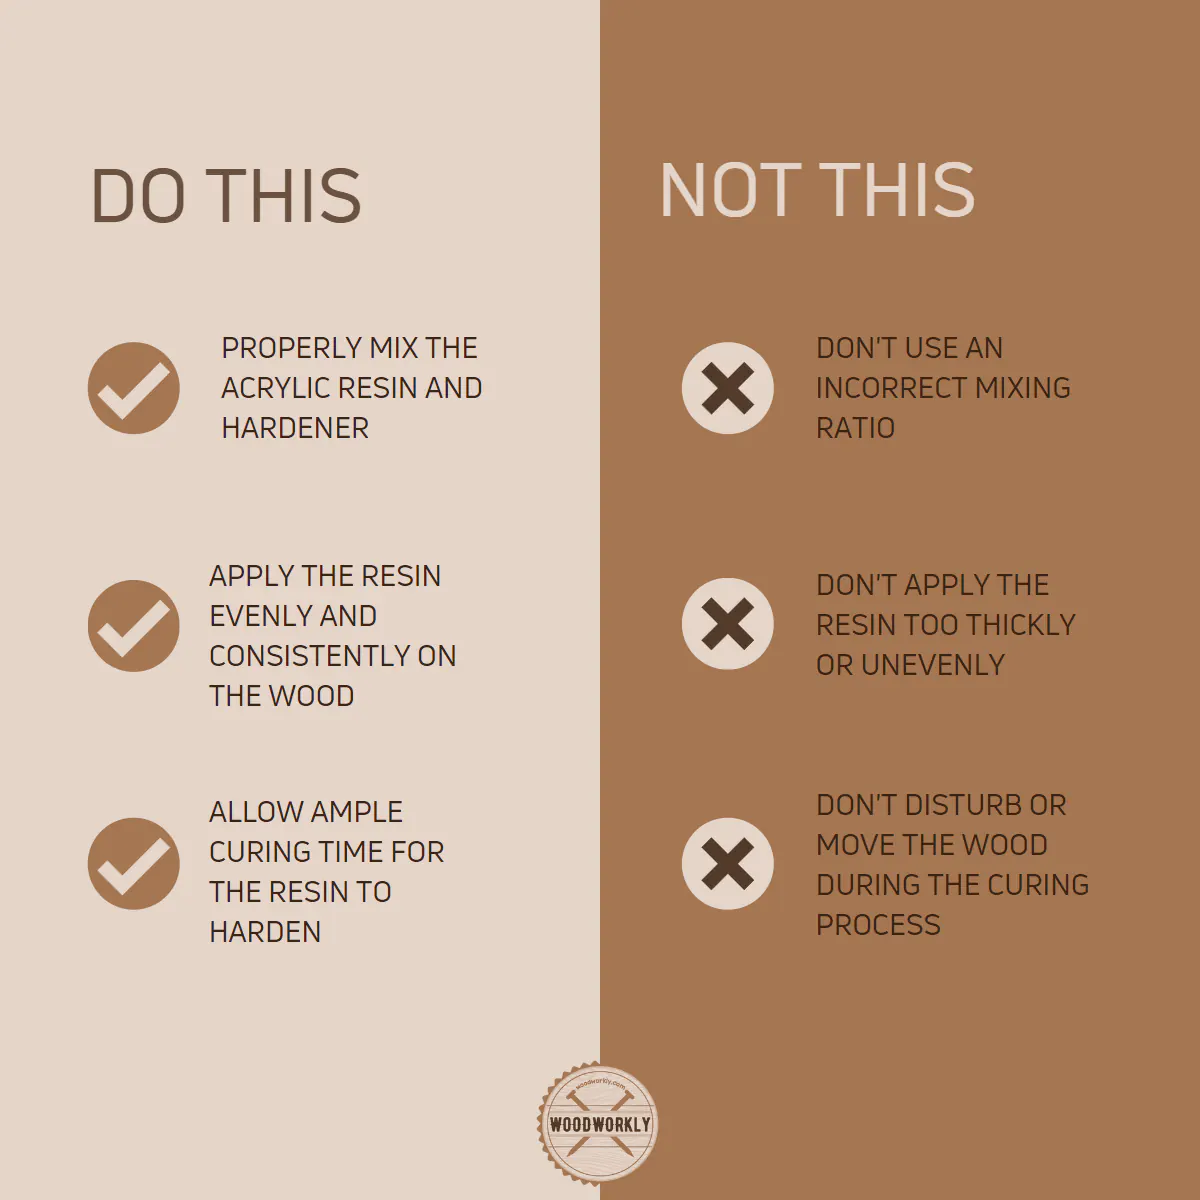
- Always follow the manufacturer’s instructions for mixing, applying, and curing the epoxy.
- Work in a well-ventilated area and wear appropriate protective gear, such as gloves and safety glasses.
- For large projects, mix and apply epoxy in small batches to avoid wasting material or having it cured too quickly.
- If the wood is particularly porous or damaged, consider using a wood hardener before applying epoxy to enhance its strength further.
Epoxy is an excellent option for hardening wood, providing strength, durability, and protection.
By following these steps and tips, you can effectively harden wood with epoxy and achieve a professional-looking finish.
3. Hardening Wood By Applying Polycryl Fortifier
Polycryl fortifier is a wood stabilizer. It is a water-soluble, concentrated, high-molecular-weight acrylic polymer that is designed to harden softwoods and punky woods.
Once the Polycryl fortifier is applied on wood surface, it will make a polymerized layer over the wood to protect wood from moisture, and weather elements while improving the wood’s strength.
Polycryl fortifier stabilize and preserve wood with irregular grain patterns, such as splatted wood or woods that are damaged due to insect attacks.
Tools And Materials To Harden Wood With Polycryl Fortifier
- Polycryl fortifier
- Clean rags
- Soft brush
- Bristle brush or suitable applicator
- Clean mixing plastic container
- Water
- Safety gloves
How To Harden Wood With Polycryl Fortifier?
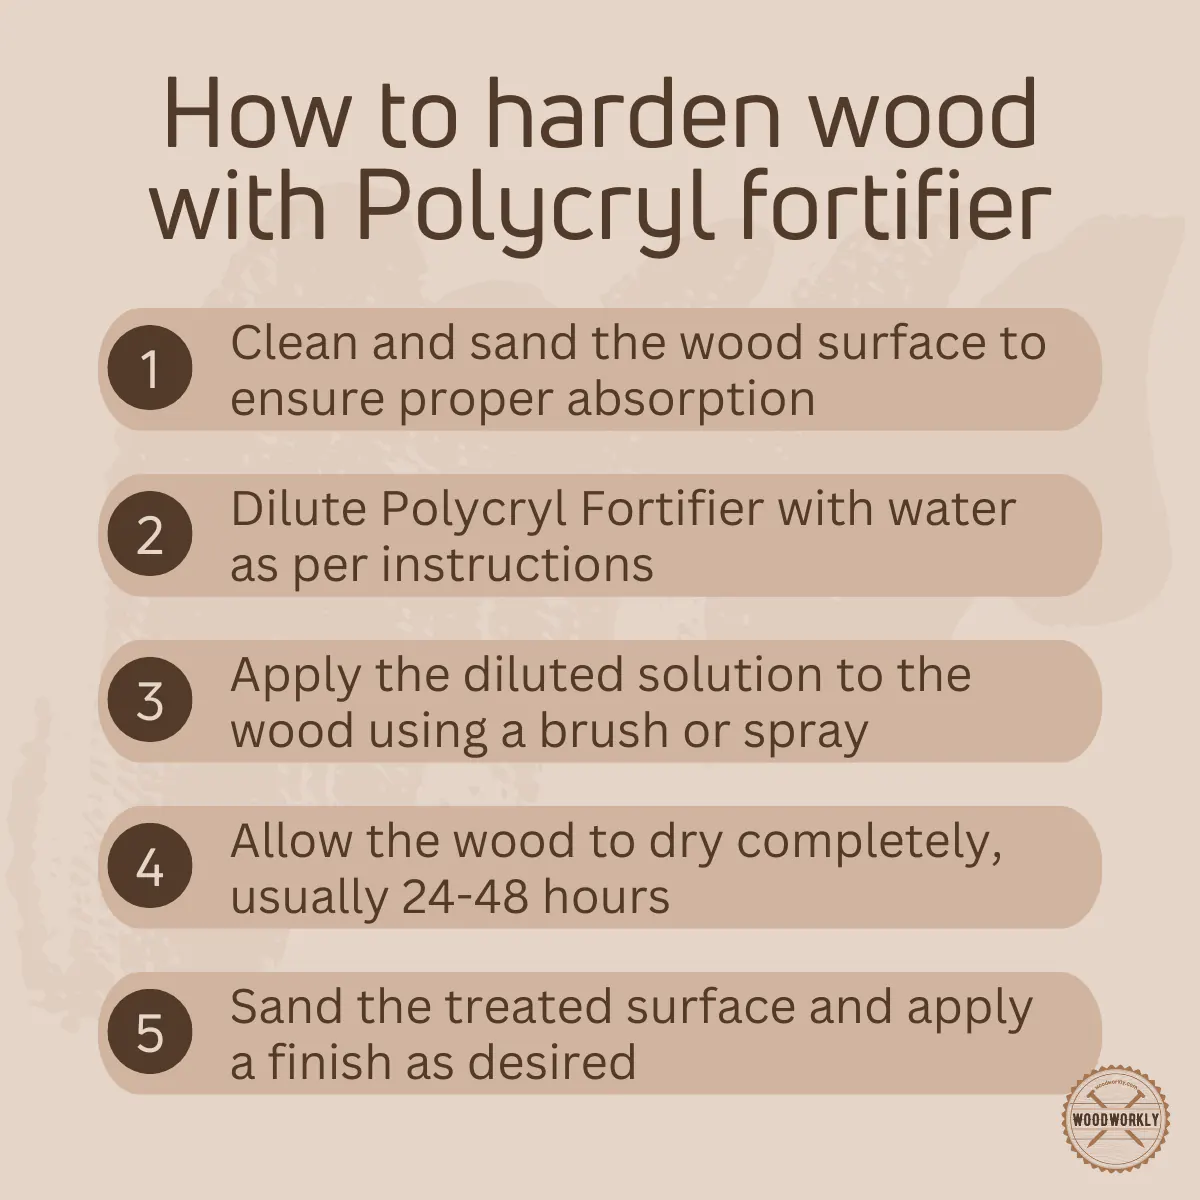
Here’re the steps you need to follow when hardening wood with a Polycryl fortifier,
- Clean the wood surface.
- Remove bark.
- Let the wood dry.
- Dilute Polycryl
- Apply Polycryl on wood.
- Soak the wood.
- Remove excess Polycryl.
- Let the wood dry.
- Check the wood hardness.
- Finish The Surface.
Let’s discuss each of the above application procedures of Polycryl fortifier in detail for better understating.
1. Clean the Wood Surface
Remove any dirt, dust, or debris from the wood surface. A soft brush or compressed air can be helpful in cleaning intricate or irregular surfaces.
Dust and dirt can interact with Polycrylic fortifier and prevent it from making a strong bond with wood to harden it.
Therefore, keeping your wood surface nice and clean is essential for promising results.
2. Remove Bark
If the wood piece still has bark attached, remove it to ensure better penetration of the Polycryl Fortifier.
3. Dry the Wood
Make sure the wood is dry before applying Polycryl Fortifier.
If the wood is damp or freshly cut, it may need to air dry for several weeks or be dried in a kiln.
Plus, make sure there are no water spills on the wood surface of your floor and walls. Otherwise, the strength of the Polycryl will be reduced.
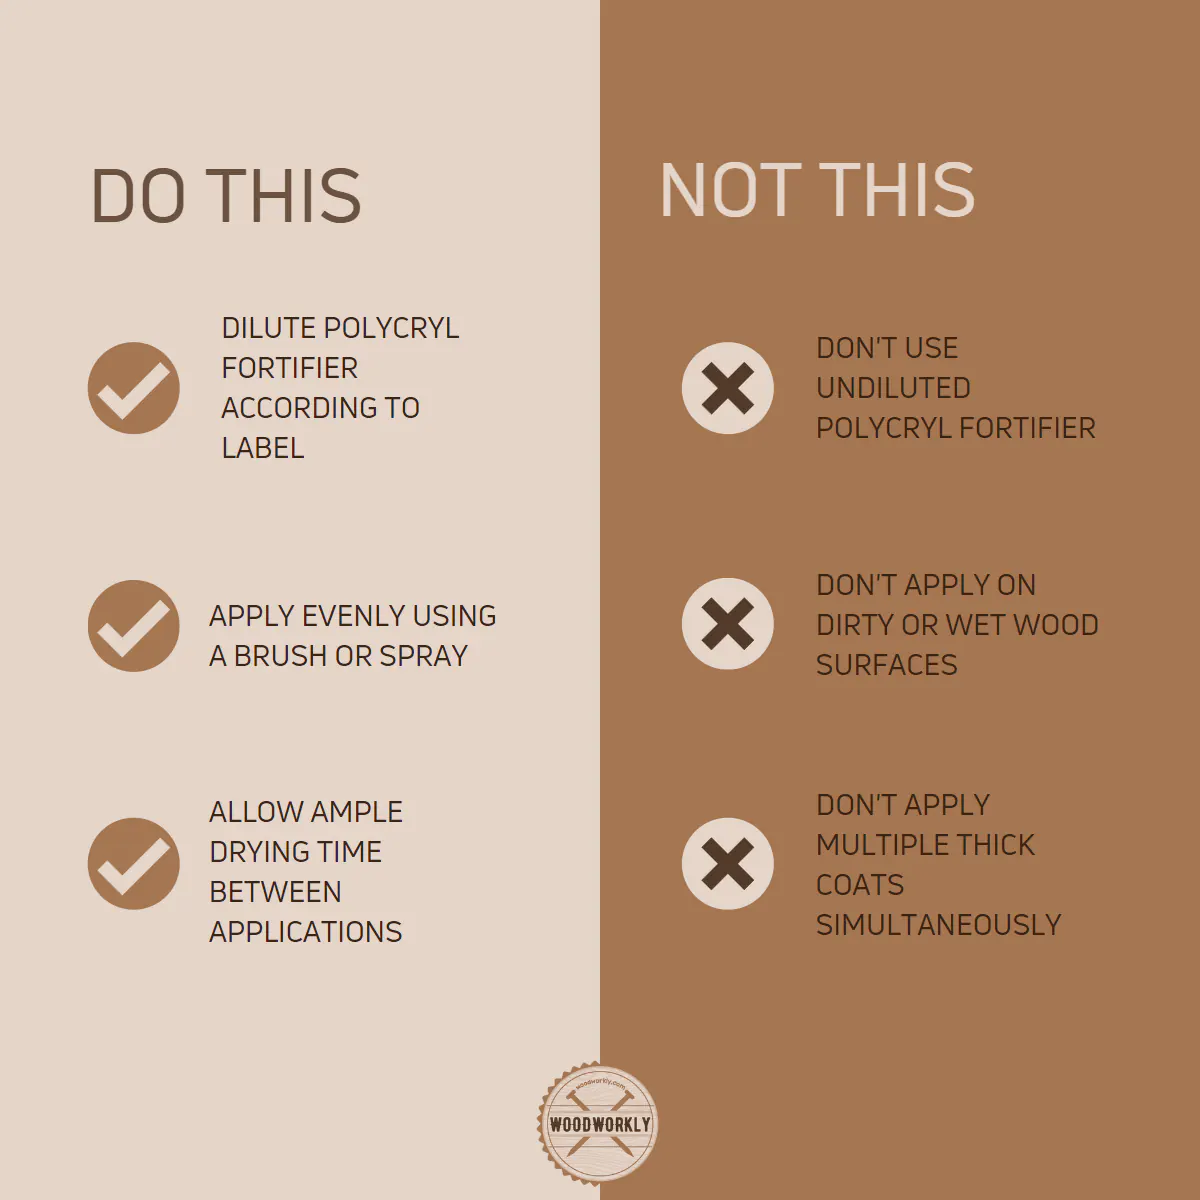
4. Dilute Polycryl
Dilute Polycryl Fortifier with water according to the manufacturer’s instructions.
The recommended dilution ratio is typically 1 part Polycryl to 4 parts water, but this may vary depending on the specific product.
5. Apply Polycryl On Wood
Submerge the wood in the diluted Polycryl solution, ensuring it is fully immersed.
Alternatively, you can apply the solution using a brush or spray bottle, saturating the wood thoroughly.
Apply a thin coat of Polycryl layer on the wood evenly without missing any spots to harden all areas of the wood equally.
6. Soak the Wood
Allow the wood to soak in the solution for an appropriate amount of time.
The duration will depend on the wood’s thickness and density, but it typically ranges from 1-24 hours.
7. Remove Excess Polycryl
After soaking, remove the wood from the solution and allow any excess Polycryl to drain off.
8. Let The Wood Dry
Place the treated wood in a well-ventilated area to dry.
Drying times will vary depending on the wood’s size and density but can take anywhere from a few days to several weeks.
You can speed up the process by using a fan or dehumidifier.
9. Check The Wood Hardness
After 2 to 3 days check the hardness of the wood. If the wood feels tough and strong, you can use it for the application.
But if the wood still looks wet with the dull surface, better to leave it as it is for couple more days.
Reapply more Polycryl fortifier coats if needed when you’re not satisfied with the level of hardness of the wood surface.
10. Finish the Surface
Once the wood is completely dry, you can sand, shape, and finish it as desired with a protective coat to protect wood further from water damage, UV light, and weather elements.
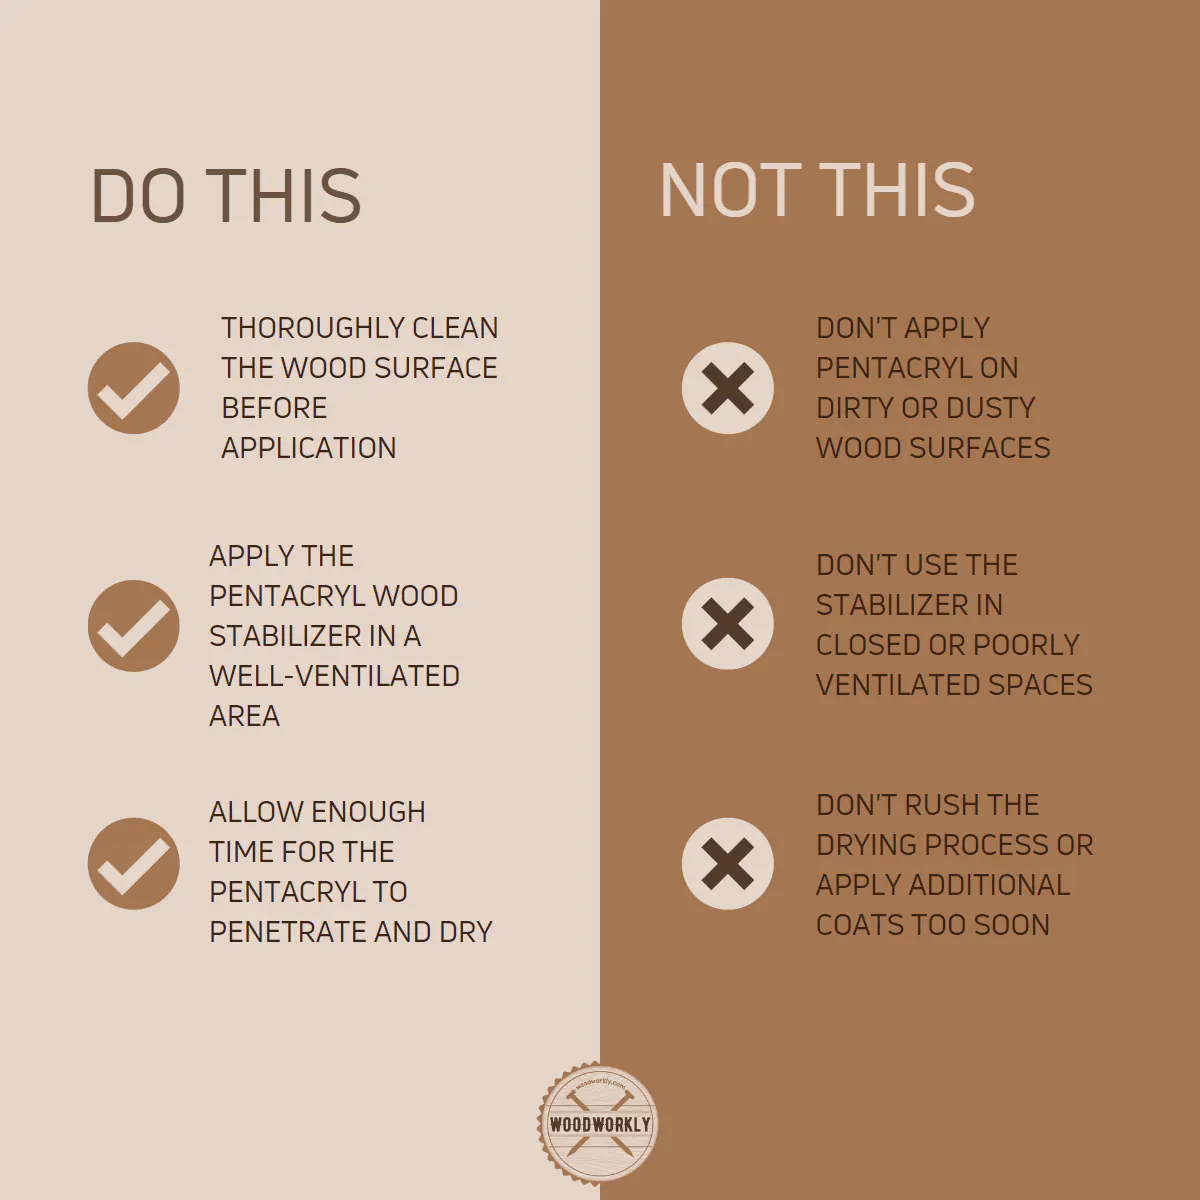
Tips for Hardening Wood with Polycryl Fortifier
- Always follow the manufacturer’s instructions for diluting and applying Polycryl Fortifier.
- Monitor the drying process closely, as drying too quickly can cause the wood to crack or warp.
- If the wood is exceptionally soft or punky, you may need to apply multiple coats of Polycryl Fortifier to achieve the desired level of hardness.
- Store any unused Polycryl solution in a sealed container for future use.
4. Hardening Wood With Wood Hardener
Hardeners are specialized for hardening woods. Hardening wood by applying a wood hardener is the easiest and most effective method to use.
Mostly, wood hardeners are used to harden rotten wood. Hardeners can restore rotten wood and able to make them strong and dense and prevent the wood from rotting any further.
Wood hardener is a liquid chemical solution that penetrates the wood and reinforces rotten, decayed, or damaged softwood fibers.
Wood hardeners strengthen wood by penetrating deep into the pores and creating a solid, durable surface that can be sanded, painted, and stained.
Therefore, you don’t have to worry about staining or painting, or sanding the wood after it is hardened. Having wood hardeners is not an issue for finishing the wood.
There’re various types of wood hardeners are available in local stores with different formulations and properties.
To harden the wood, Minwax, Rust-Oleum, and J-B weld are the popular brands that I personally recommend using.
To select the right wood hardener for your project, consider the drying time, ease of application, and compatibility with your desired finish.
Tools And Materials To Harden Wood With Hardener
- Wood you want to harden (rotted or decayed wood)
- Clean rags
- Face mask
- Gloves
- Bristle brush or suitable applicator
- Scraper or chisel
- Sandpaper
How To Harden Wood With Wood Hardener?
Here’re the steps you need to harden wood with wood hardener,
- Clean the wood surface.
- Remove or loose wood fibers.
- Dry the wood.
- Stir the wood hardener.
- Apply wood hardener.
- Let the wood hardener cure.
- Sand the surface.
- Finish the wood.
So, let’s discuss each of the above steps to harden your wood properly with a hardener.
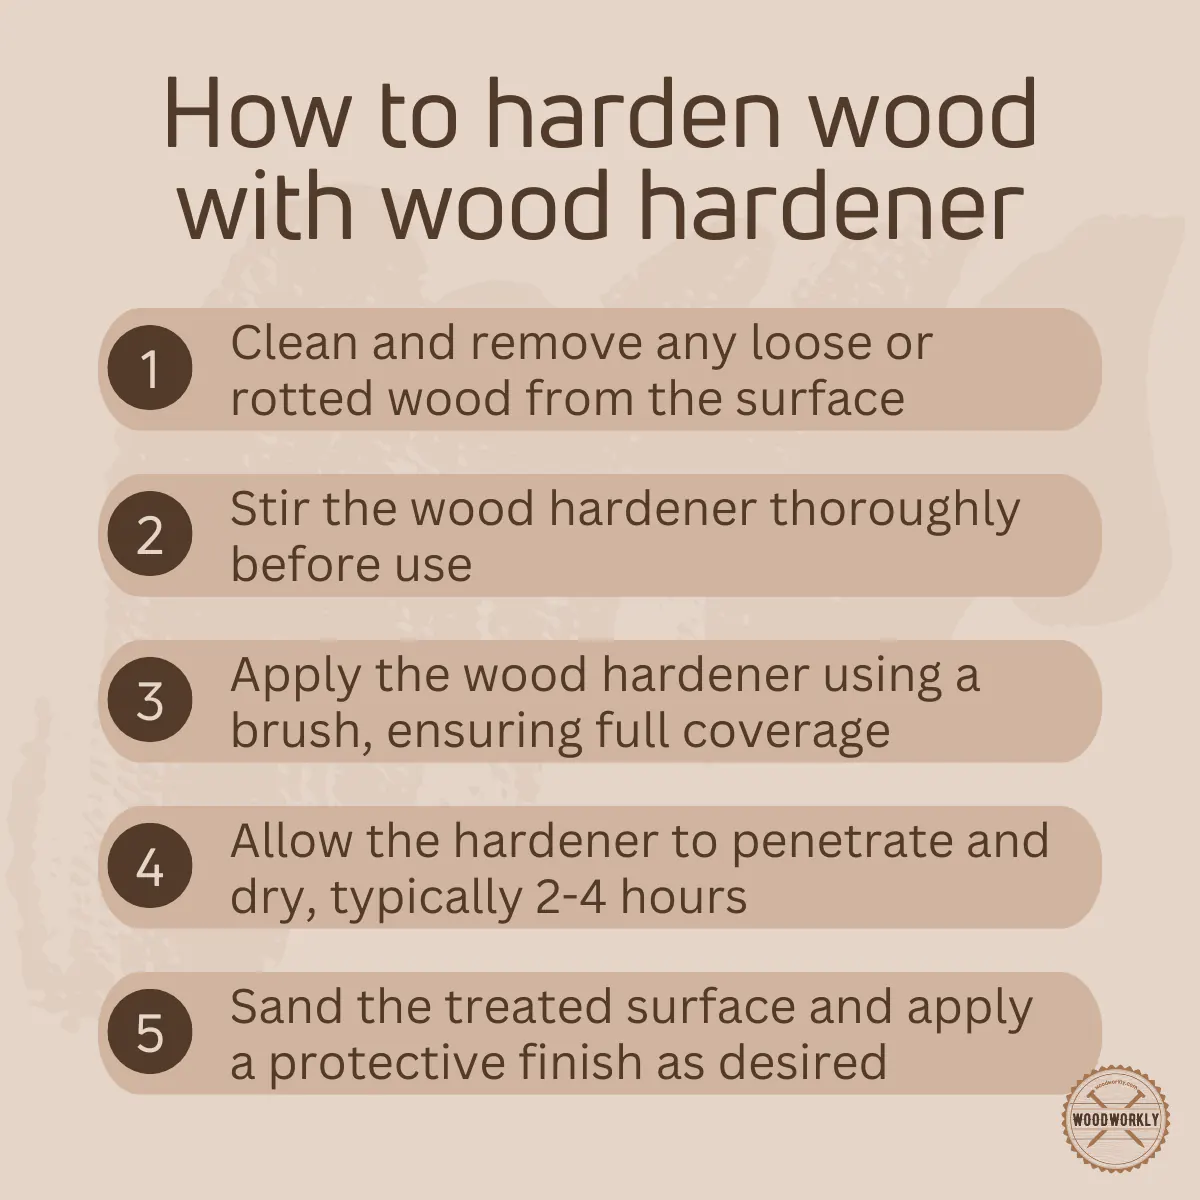
1. Clean The Wood Surface
Remove any dirt, dust, or debris from the wood surface using a soft brush or compressed air.
Dust and debris can react with wood hardeners and weaken the bond between the wood and the wood hardener. Therefore, make sure to clean the surface well before applying the hardener.
2. Remove Or Loose Wood Fibers
If the wood is damaged or decayed, use a scraper or chisel to remove any loose wood fibers, leaving a stable surface for the wood hardener to penetrate.
The rotted area of the wood should be removed before applying a hardener to re-stabilize the wood as the original one.
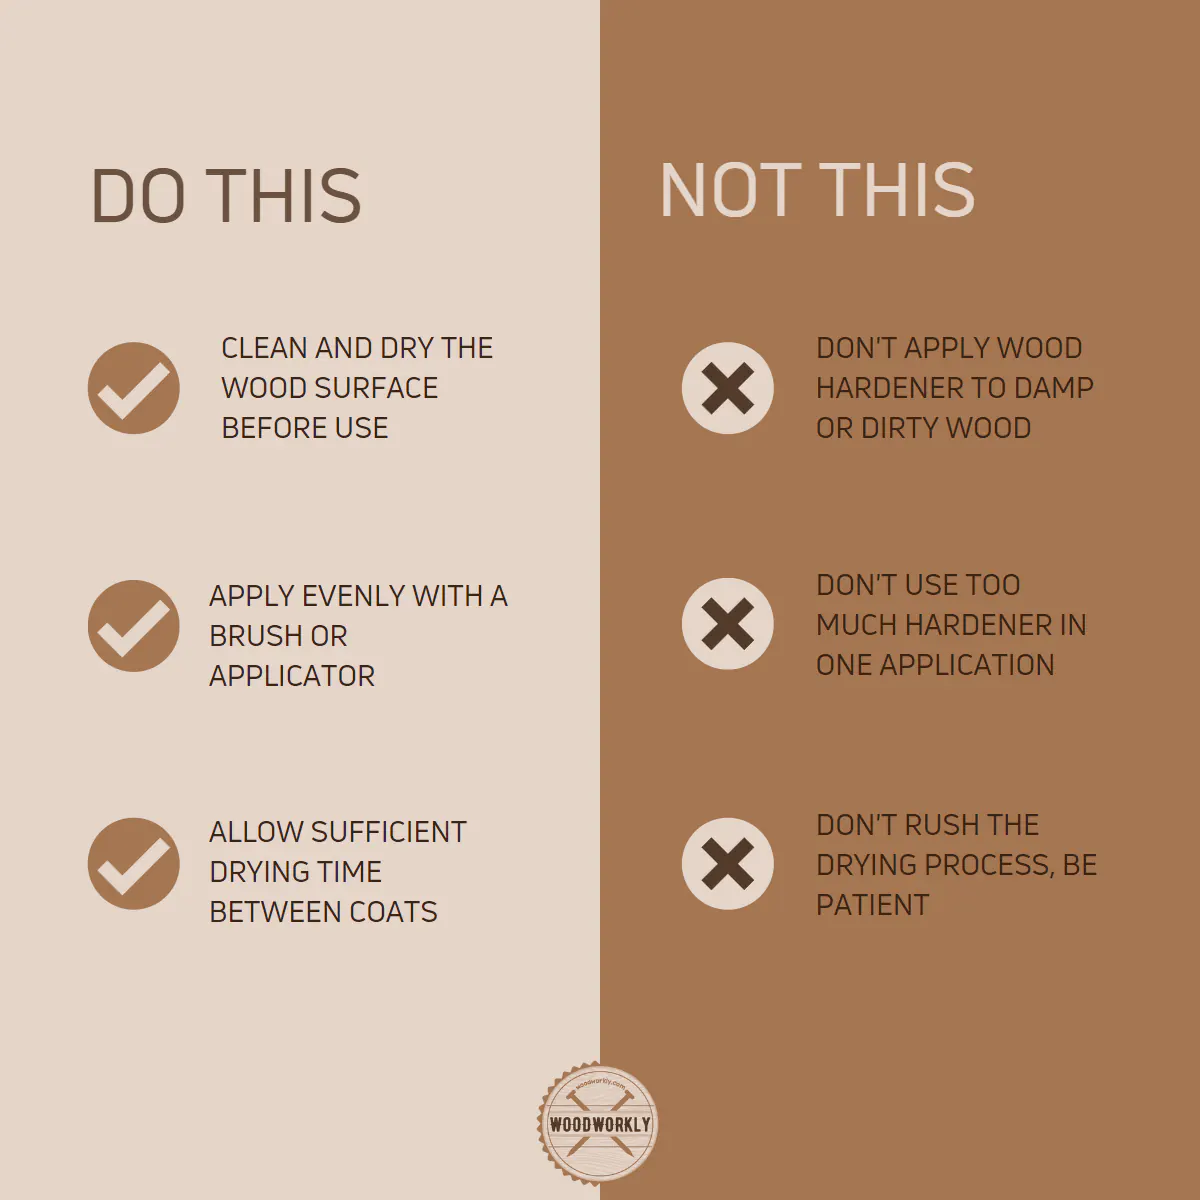
3. Dry The Wood
After cleaning the wood surface properly, let the wood dry completely before applying the wood hardener.
Ensure the wood is completely dry before applying the wood hardener, as moisture can interfere with the hardening process.
4. Stir The Wood Hardener
Stirring the hardener is a must before the application for an even finish.
Gently stir the wood hardener to ensure a consistent mixture. Avoid shaking the container, as this may introduce air bubbles.
5. Apply Wood Hardener
Using a brush or sponge applicator, generously apply the wood hardener to the wood surface, ensuring full coverage.
Make sure to apply a thin coat of wood hardener over the wood for fast and efficient drying.
Apply wood hardener along the direction of the wood grain without missing any spots until the surface is saturated.
For deep penetration, apply multiple coats, allowing each coat to dry according to the manufacturer’s instructions.
6. Let The Wood Hardener Cure
Allow the wood hardener to cure for the recommended time specified by the manufacturer, typically 2-4 hours.
The wood should feel hard and solid once the hardener has cured.
If it’s not, reapply more layers of wood hardener using the same procedure above. Apply 3 to 5 coats of wood hardeners until you feel the wood is hardened enough with good toughness and strength.
7. Sand The Surface
After the wood hardener has cured, sand the surface to remove any excess hardener and create a smooth, even finish.
Make sure to sand with fine-grit sandpaper without damaging the wood hardener coat and the wood underneath.
Sand with even pressure on sandpaper for a uniform finish.
8. Finish the Wood
Once sanded, the hardened wood can be painted, stained, or sealed according to your preference.
As you can see sanding, staining, painting or sealing is possible over wood hardener. That’s a benefit useful especially when hardening furniture.
Tips for Hardening Wood with Wood Hardener
- Always follow the manufacturer’s instructions for applying and curing the wood hardener.
- Work in a well-ventilated area, as wood hardeners may emit strong fumes.
- Use gloves and eye protection to avoid contact with the skin and eyes.
- Apply the wood hardener generously, ensuring full coverage to achieve the best results.
By following these steps and tips, you can successfully harden wood with a wood hardener, restoring strength and durability to rotted, damaged, or decayed wood.
5. Hardening Wood With Oils
You can use different types of wood finishing oils to harden the wood. Some of the oils are natural oils and some are made by combining different types of wood finishers.
By applying those oils you’ll not only be able to harden wood, but also enhance the wood’s appearance.
Wood finishing oils such as tung oil, linseed oil, Danish oil, and teak oil have their own properties to harden the wood properly.
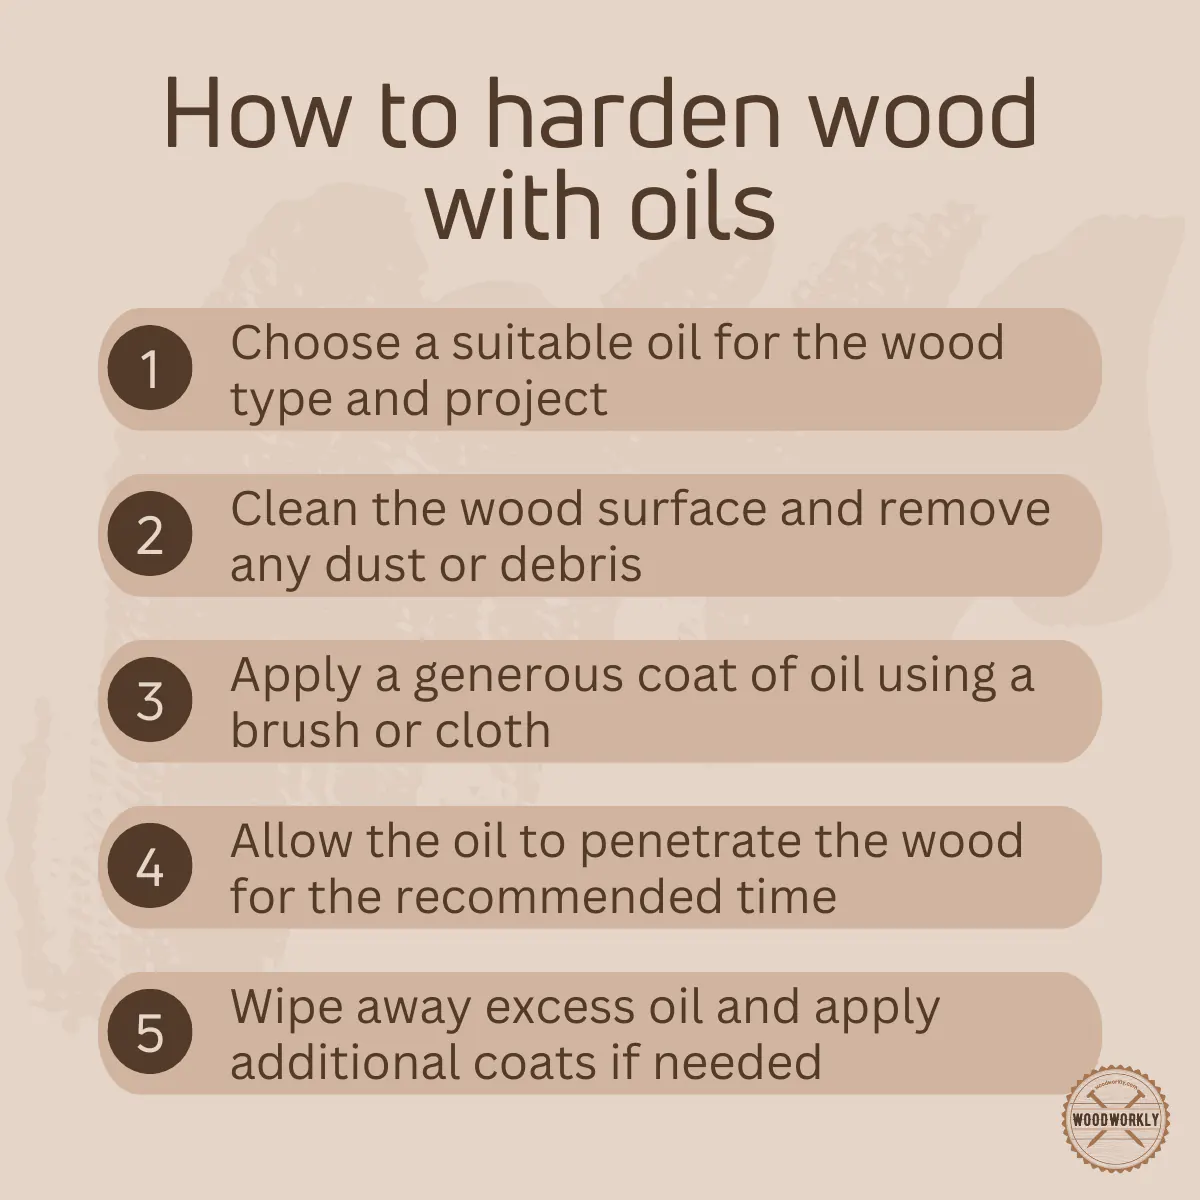
First, you need to select the right type of oil to harden the wood according to your wood type and the application.
Choosing The Right Oil For Hardening Wood
Here’s a brief overview of some popular oil options,
- Linseed Oil: Linseed oil is extracted from flaxseed, linseed oil is a traditional choice for hardening wood. It penetrates deeply, providing a rich, warm finish. However, it may take longer to dry compared to other oils.
- Tung Oil: Tung oil, extracted from the nut of the tung tree, creates a water-resistant and durable finish. It dries faster than linseed oil and offers a more matte appearance.
- Danish Oil: A blend of oil and varnish, Danish oil provides a balance between penetration and surface protection. It dries relatively quickly and results in a low-luster finish.
- Teak Oil: Ideal for dense or oily woods like teak and rosewood, teak oil penetrates deeply and offers excellent protection against moisture and UV damage.
You can select the oil that suits your wood type the most to harden it. Mostly each of the above oil work well with almost any kind of wood when hardening.
Tools And Materials To Harden Wood With Oil
- Wood finishing oil (tung oil, linseed oil, Danish oil, teak oil)
- Wood you need to harden
- Clean rags
- Suitable applicator (bristle brush, foam applicator)
- 120 grit and 220 grit sandpaper
- Mixing container
How To Harden Wood With Oil?
Here’re the steps you need to harden wood with oils,
- Sand the surface.
- Clean the surface.
- Stir the oil.
- Apply the oil.
- Wipe off excess oil.
- Apply more oil on the surface.
- Buff the surface.
Let’s discuss each of the above steps in detail.
1. Sand The Surface
First, sand the entire wood surface you need to harden starting with 120-grit sandpaper and finishing with 220-grit sandpaper.
Sand along the direction of the wood grain with even pressure for a smooth surface.
Sanding helps to remove surface randomness, streaks, and bumps on the surface and helps the oil to penetrate more efficiently.
2. Clean The Surface
After sanding the wood, wipe the surface with a clean tack cloth to remove dust and debris. You can remove sawdust that was collected due to sanding using a proper dust collection pipe system.
Now your wood surface is super nice, clean, smooth, and ready to take on finishing oil evenly.
3. Stir The Oil
Before applying it to wood, you need to stir the oil gently without letting it make air bubbles.
Avoid shaking the can since that can cause to occur air bubbles which can trap inside the finishing oil.
4. Apply The Oil
Apply a thin coat of finishing oil over the entire wood surface using a lint-free tack cloth along the direction of the wood grain with even pressure.
After applying let each coat absorb and settle on the wood surface for 10 to 15 minutes.
5. Wipe Off Excess Oil
After the oil has penetrated the wood, use a clean cloth to remove any excess oil from the surface. This helps prevent a sticky, uneven finish.
6. Repeat the Process
Allow the oil to dry according to the manufacturer’s instructions, usually between 8-24 hours.
Apply additional coats, following the same process, until the desired finish is achieved.
Apply 3 to 5 coats of finishing oil on the wood surface for an even finish with a proper hardening process.
7. Buff the Surface
After the final coat has dried, gently buff the surface with a clean, soft cloth to enhance the sheen and smoothness.
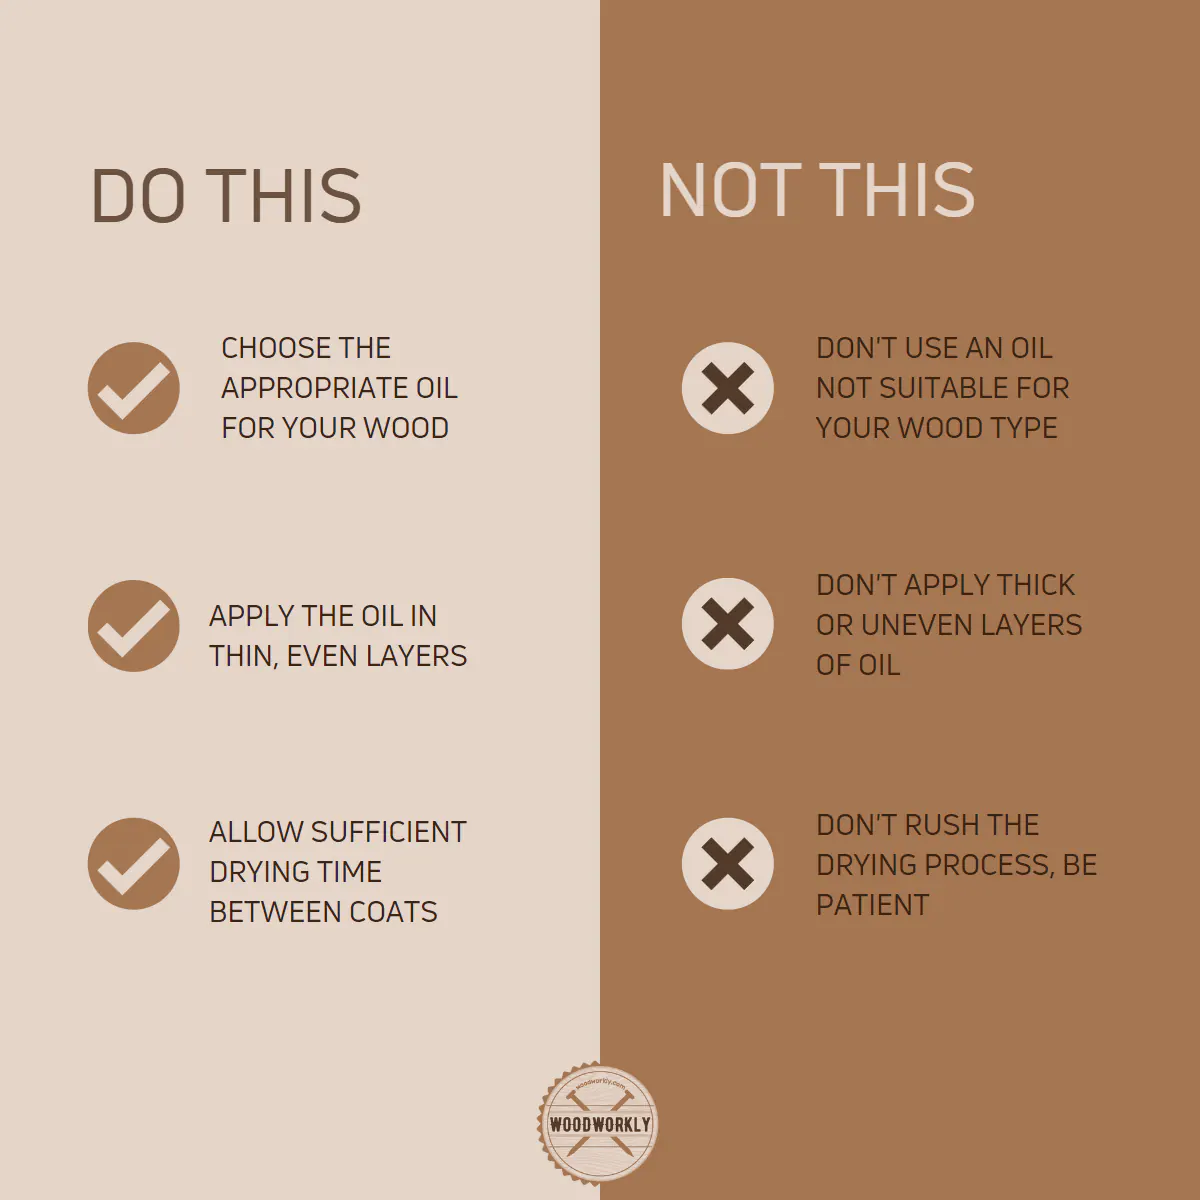
Tips for Hardening Wood with Oil
- Always follow the manufacturer’s instructions for applying and drying the oil.
- Work in a well-ventilated area, as some oils may emit strong fumes.
- When applying multiple coats, consider using progressively finer grit sandpaper between coats to create an even smoother finish.
- Maintain your oil-finished wood by periodically applying a fresh coat of oil to restore its luster and protection.
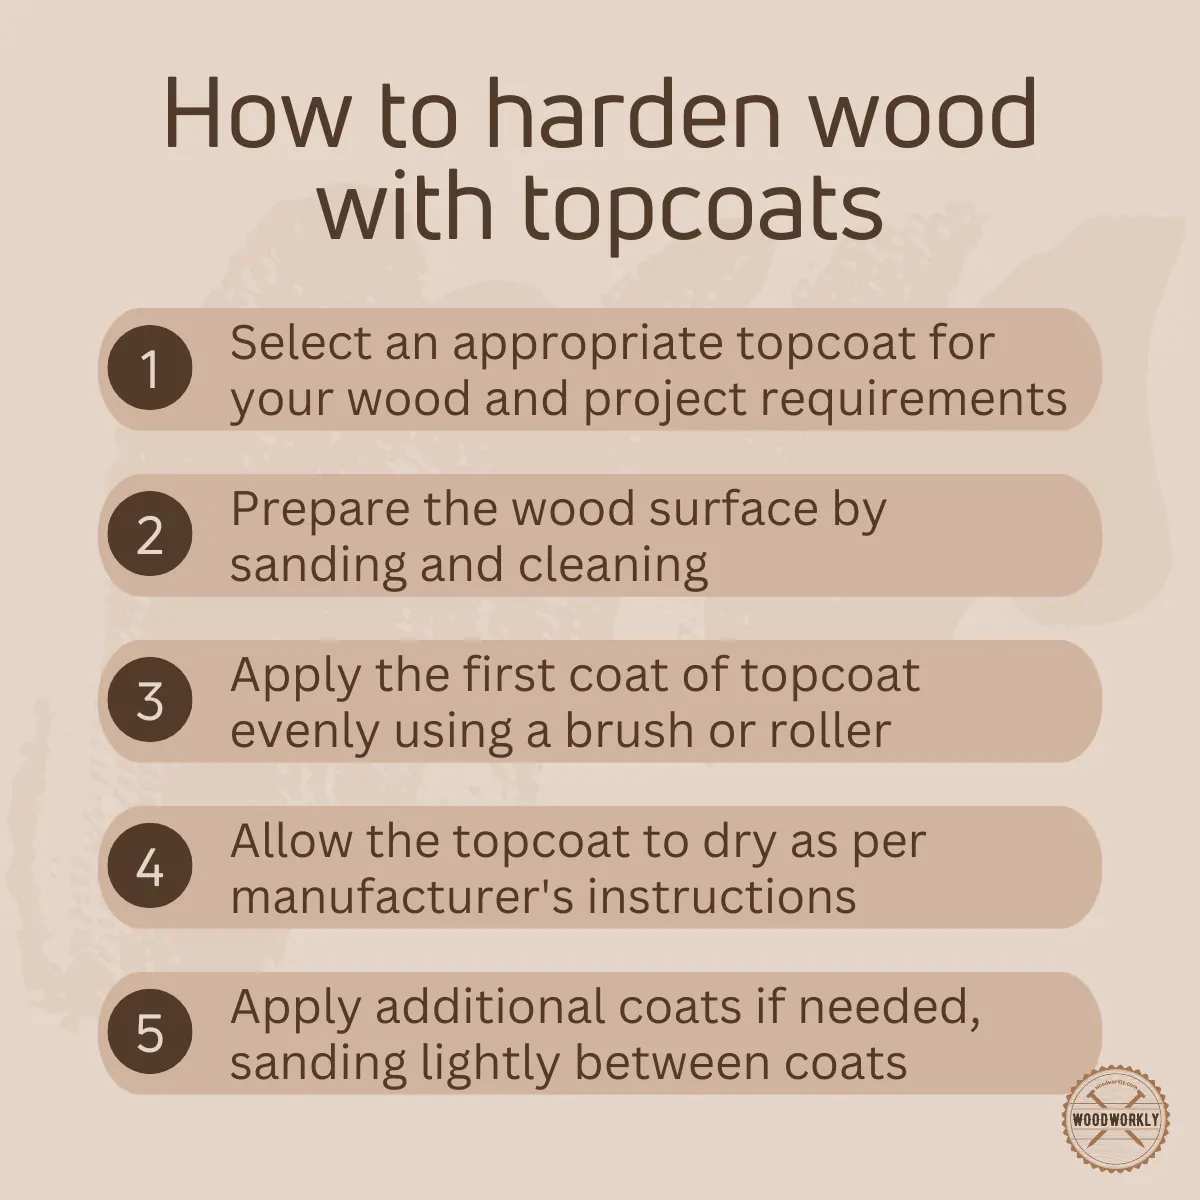
6. How To Harden Wood With A Topcoat
You can harden wood by applying a protective topcoat easily without applying anything further.
Topcoat makes a shield over the wood and faces all the environmental elements, humidity variations, temperature variations, pests, and insect attacks that come from the outside world.
With topcoat, the durability of your furniture or woodwork will be increased while enhancing wood’s appearance.
A topcoat is an added protection for the wood o protect against scratches, UV damage, and moisture.
Topcoat comes in different forms such as polyurethane, varnish, lacquer, shellac, and wax.
Each topcoat has its own characteristic features that influence the final appearance of the wood species.
So, let’s have a look at the in-detail view of topcoats that can be used for hardening wood.
Types Of Topcoats For Hardening Wood
- Polyurethane: Polyurethane is a versatile and durable topcoat. It is available in water-based and oil-based formulations. It offers excellent protection against moisture and wear, making it suitable for high-traffic areas and surfaces.
- Varnish: Varnish made from a blend of resin, oil, and solvent, varnish provides a hard, glossy finish that enhances the wood’s natural color and grain. It’s highly resistant to moisture and UV damage.
- Lacquer: Quick-drying and easy to apply, lacquer offers a lustrous finish and robust protection. However, it may require more maintenance than other topcoats, as it tends to be more susceptible to chipping and cracking over time.
Tools And Materials To Harden Wood With Topcoat
- Wood you need to harden
- Topcoat (polyurethane, lacquer, varnish, shellac, or wax)
- Sandpapers (120 grit, 220 grit, 320 grit, or 400 grit)
- Wood primer or sealer
- Bristle brush or suitable applicator
- Facemask
- Safety goggles
- Gloves
How To Harden Wood With Topcoat?
Here’re the steps you need to follow when hardening wood by applying a topcoat,
- Sand the wood surface.
- Clean the surface.
- Apply a sealer or primer.
- Stir the topcoat.
- Apply the topcoat.
- Allow the topcoat to dry.
- Sand between coats.
- Apply additional coats.
- Buff the surface.
Let’s discuss each of the above steps in detail to get a good view of how hardening should be done.
1. Sand The Wood Surface
Sanding helps to make the surface nice, smooth, and free from bumps and surface randomness.
Basically, sanding helps the wood to take the topcoat so well since it gives adhesive properties to the wood surface.
Sand along the direction of the wood grain starting with 120-grit sandpaper and finishing with 220-grit sandpaper.
Sand with an even pressure without missing any spot covering the entire wood surface that you want to harden.
2. Clean The Surface
Once you’re done with the sanding, clean the entire wood surface with clean rags to remove dust and debris.
Dust particles can interact with topcoats like polyurethane, and they trap inside the topcoat. It is so difficult to remove them once they got stuck in.
Therefore, when it comes to the application step your wood surface needs to be super nice and clean with no dust and dirt.
You can remove stubborn dirt by rubbing the surface with a tack cloth after dipping it in a trisodium phosphate solution (TSP). TSP is a cleaning agent for wood.
3. Apply A Sealer Or Primer
Applying a sealer or primer before the topcoat is an optional step. But applying a sealer or primer helps to build a good adhesion between the surface and the topcoat.
Therefore, I highly recommend applying sealer or primer before topcoat for a consistent finish.
Follow the manufacturer’s directions for drying times before applying the topcoat.
4. Stir The Topcoat
First, stir the topcoat gently without shaking it to ensure a consistent mixture.
Shaking the container may introduce air bubbles which are hard to remove.
5. Apply The Topcoat
Apply a thin coat of topcoat over the entire wood surface along the direction of the wood grain using the bristle brush or suitable applicator without missing any spots.
Apply an even pressure to the paintbrush to even out the color and be mindful of drips and runs to maintain a smooth finish.
Work in a well-ventilated area with fast and efficient drying to avoid harsh chemicals and fumes get contact with the skin and eye which can cause irritations.
6. Allow The Topcoat To Dry
After covering the entire surface, let the topcoat dry for 2 to 24 hours. Follow the manufacturer’s guidelines for the drying times of different topcoats.
Thick coats dry slower and when the environmental humidity is high, you’ll probably have to wait for so long until the surface gets dried completely.
However, never apply another coat of topcoat until the existing one dried completely since applying another coat over the wet surface can result in tacky layers which won’t dry so easily.
7. Sand Between Coats
Once the surface is fully dried, lightly sand the entire surface along the direction of the wood grain with 320 grit or 400 grit, or finer sandpaper with even pressure.
Make sure not to damage the existing finish during sanding and this helps to remove any imperfections and ensure proper adhesion between subsequent topcoats.
8. Apply Additional Topcoats
Now, apply more coats following the same procedure above along the direction of the wood grain until you get the desired level of protection and appearance.
Apply 2 to 4 coats of topcoat over the wood to make it harden with extra protection from outside elements.
9. Buff The Surface
Once the final coat is fully dried, buff the surface gentile with a clean cloth or fine steel wool to enhance the surface sheen and smoothness.
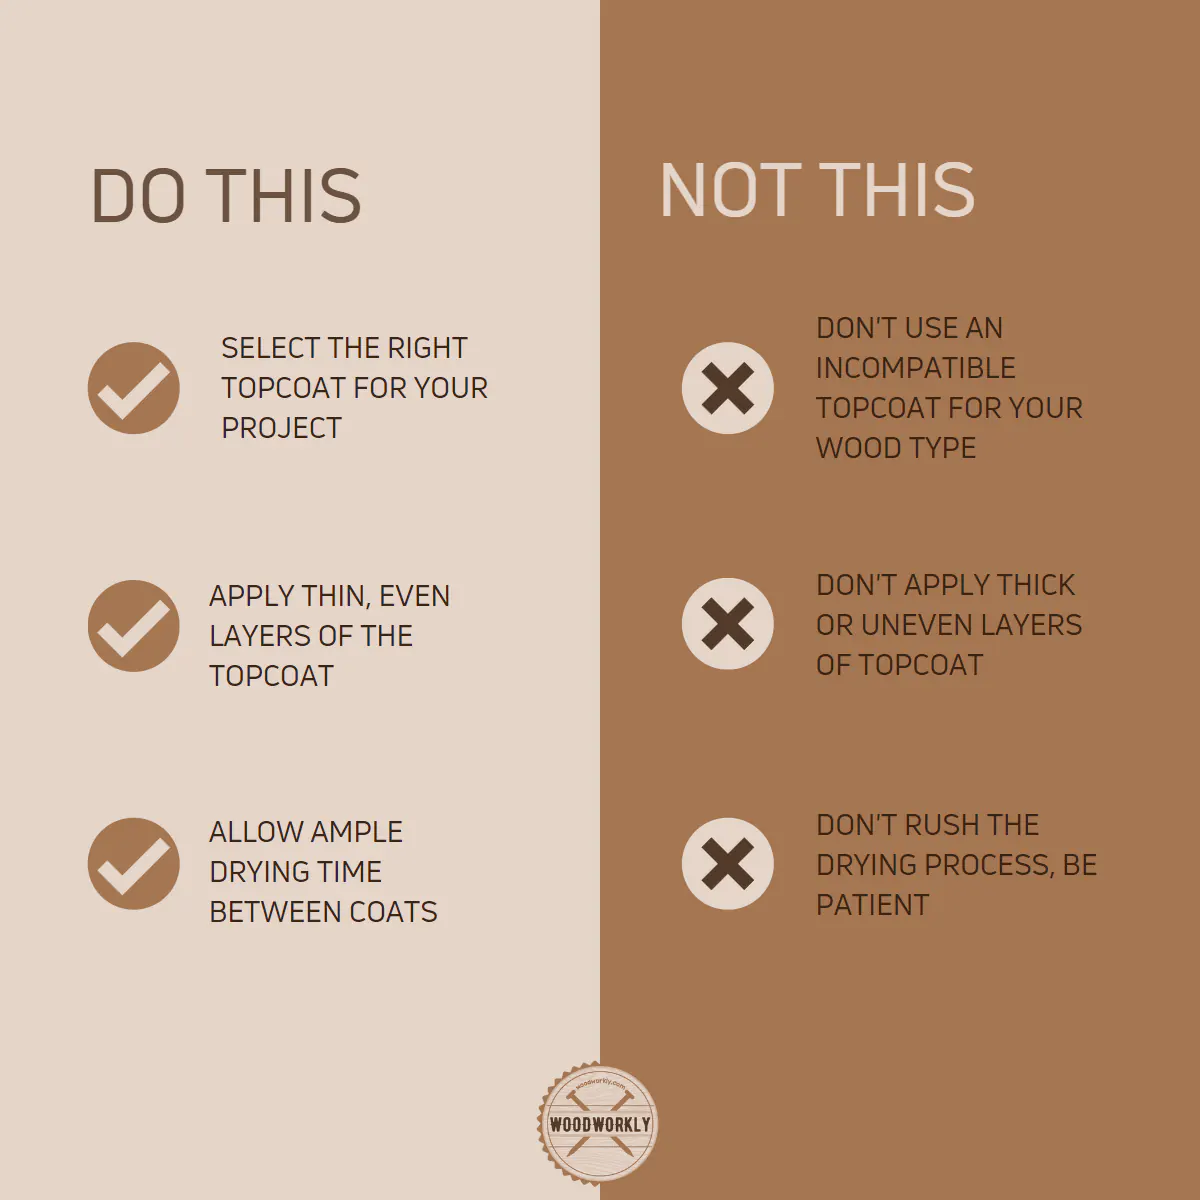
Tips For Hardening Wood With A Topcoat
- Always follow the manufacturer’s instructions for application and drying times.
- Choose a well-ventilated area for your project, as some topcoats may emit strong fumes.
- Use a high-quality brush or sprayer to ensure a smooth and even application of the topcoat.
- When sanding between coats, use a light touch to avoid removing too much of the topcoat or damaging the wood surface.
- Consider using a tack cloth to remove dust and debris before applying each coat, ensuring a clean, blemish-free finish.
- Be patient and allow sufficient drying time between coats. Rushing the process can lead to a subpar finish or decreased durability.
- To maintain the beauty and protection of your topcoat-finished wood, clean the surface regularly with a soft, damp cloth, and avoid using harsh chemicals or abrasives.
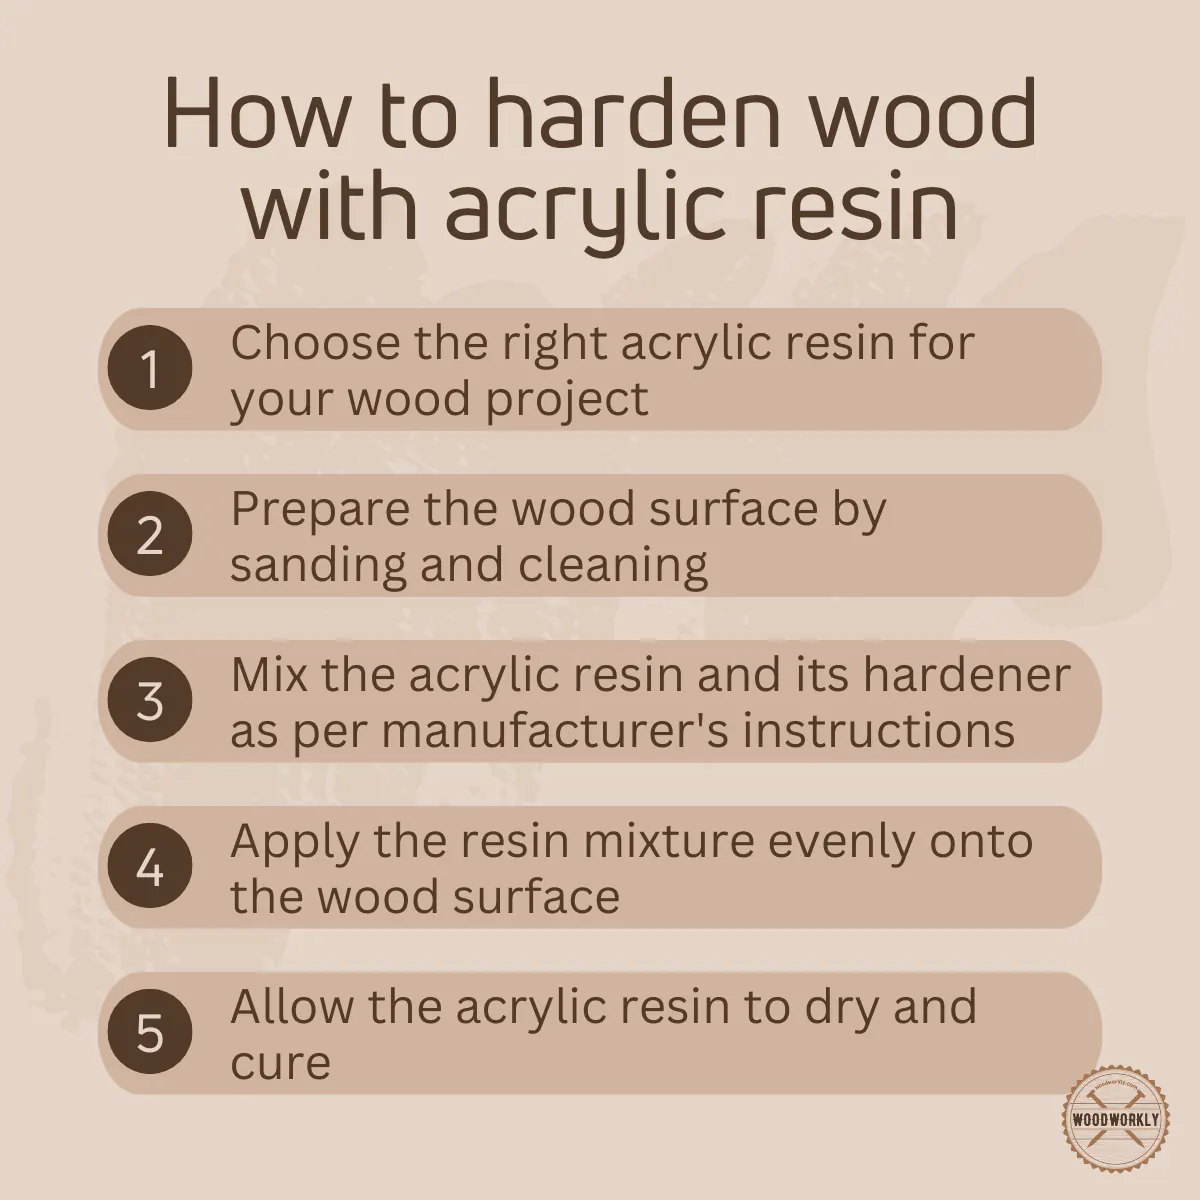
7. Harden Wood With Acrylic Resin
Acrylic resin is a versatile and durable material that can use to protect the wood surface from weather elements, moisture, UV damage, and a lot more.
It can harden the wood while improving the wood’s strength in the long run.
Acrylic resin provides a crystal-clear, high-gloss finish that enhances the natural beauty of the wood while adding an extra layer of protection.
Tools And Materials To Harden Wood With Acrylic Resin
- Acrylic resin
- Wood you need to harden
- Clean rags
- Bristle brush or suitable applicator
- Sandpapers (120 grit, 220 grit, and 320 grit or 400 grit)
How To Harden Wood With Acrylic Resin?
Here’re the steps you need to follow when hardening wood using acrylic resin,
- Sand the wood surface.
- Clean the wood.
- Choose the right acrylic resin.
- Mix the resin and hardener.
- Apply the acrylic resin.
- Remove air bubbles.
- Let the resin dry.
- Sand and polish (optional).
Let’s have a look at each of the above steps in detail.
1. Sand The Wood Surface
First, you need to select the right grit of sandpaper and sand the entire wood surface along the direction of the wood grain without missing any spots.
Start sanding with 120-grit sandpaper and end up with 220-grit sandpaper. apply even pressure to the sandpaper for an even surface.
Ensure the surface is smooth and free of imperfections while sanding.
2. Clean The Wood
Remove dust and debris on the wood surface using clean rags. Dust can trap inside the acrylic resin and cause many troubles.
Therefore, make sure the surface is well-cleaned when it comes to the application step.
3. Choose The Right Acrylic Resin
Go for high-quality, clear acrylic resin which is designed for woodworking projects.
Some products may include a catalyst or hardener while others may require separate purchases.
Ask professionals in the local store about the acrylic resin types available and select the one that suits you the most as per your needs.
4. Mix The Resin And The Hardener
After selecting the right acrylic resin type, carefully measure the necessary amount of acrylic resin and hardener and mix them in a mixing container.
You can use a clean plastic or glass bowl for the mixing step. Follow the manufacturer’s instructions when mixing.
Stir the mixture thoroughly ensuring it’s free of any air bubbles or lumps which can ruin the finishing coat.
5. Apply The Acrylic Resin
Evenly apply a thin coat of prepared acrylic rein over the entire wood surface you want to harden along the direction of the wood grain with a brush or suitable applicator.
Work in a small section to maintain control and prevent resin from setting too quickly.
Make sure to pay close attention to edges and corners.
6. Remove Air Bubbles
After applying the resin, gently tap or use a heat gun to remove any air bubbles that may have formed during application. This step ensures a smooth, glossy finish.
7. Let The Resin To Dry
Now let the resin layer dry for 4 to 6 hours without any outside interference. Follow the manufacturer’s guidelines for the recommended drying times.
Drying process may take anywhere from a few hours to several days depending on the product type, thickness of the coat, environmental humidity, and temperature variations.
8. Sand And Polish The Surface
You can sand and polish the surface with super fine grit 320-grit or 400-grit sandpaper if necessary to achieve a specific sheen or to remove any small imperfections.
Start with finer grit sandpaper and work your way up to a higher grit or polishing compound for a glossy and attractive finish.
8. Hardening Wood With Pentacryl Wood Stabilizer
Pentacryl wood stabilizer is a popular product designed to harden and preserve wood.
It is mostly used to harden green woods that are prone to cracking, warping, and shrinking as it dries due to humidity variations.
However, the Pentacryl wood stabilizer has the ability to improve the wood’s toughness, and strength while enhancing the wood’s appearance.
Tools And Materials To Harden Wood With Pentacryl Wood Stabilizer
- Pentacryl wood stabilizer
- Chisel or drawknife or bark spud
- Brush
- Clean rags
- Sandpapers
- Mixing container
- Facemask
- Gloves
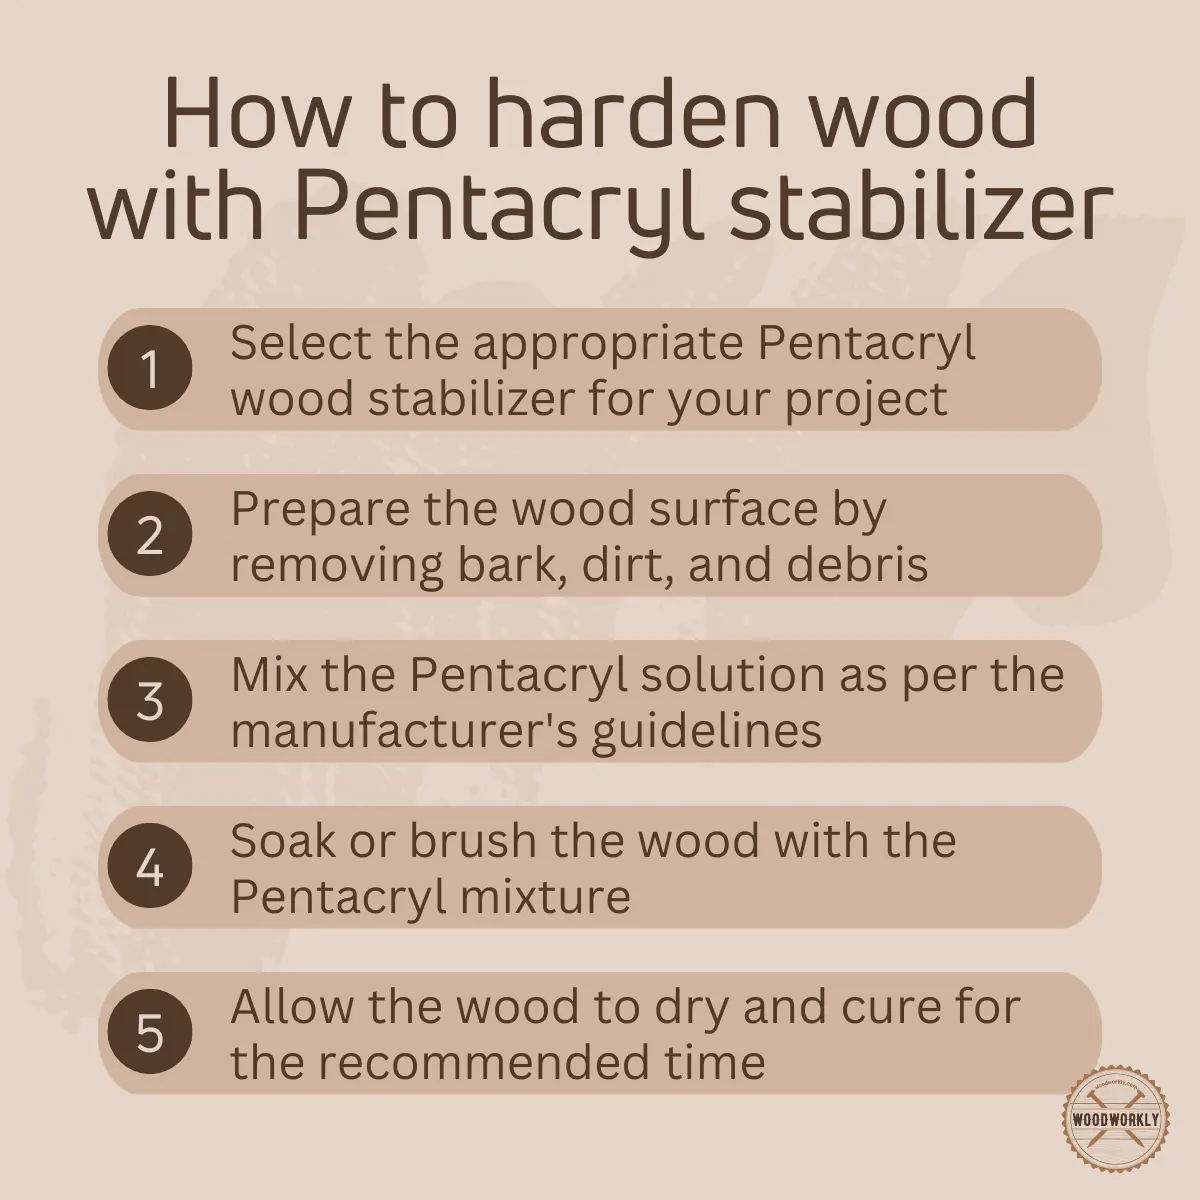
How To Harden Wood With Pentacryl Wood Stabilizer?
Here’re the steps you need to follow when hardening wood with Pentacryl wood stabilizer,
- Remove bark.
- Trim and shape the wood.
- Clean the wood surface.
- Choose the right application method.
- Mix Pentacryl.
- Apply Pentacryl on wood.
- Soak the wood.
- Remove the wood from the solution.
- Air dry the wood.
- Monitor the drying process.
- Finish the wood.
Let’s discuss each of the above steps in detail to know how to work with Pentacryl wood stabilizer when hardening wood,
1. Remove Bark
If the wood piece still has bark, carefully remove it using a bark spud, drawknife, or chisel.
This step exposes the wood’s surface, allowing the Pentacryl to penetrate effectively.
2. Trim And Shape The Wood
Depending on your project, you may need to trim and shape the wood to the desired size and form.
3. Clean The Wood Surface
Brush off any debris, sawdust, or dirt from the wood surface, ensuring it’s clean and ready for treatment.
4. Choose The Right Application Method
Pentacryl can be applied by immersion, brushing, or spraying. Immersion is the most effective method, as it allows the stabilizer to penetrate the wood evenly and deeply.
However, for larger pieces, brushing or spraying may be more practical.
5. Mix Pentacryl
If required, dilute the Pentacryl with water according to the manufacturer’s instructions.
Some wood species may need a more concentrated solution for better absorption.
6. Apply The Pentacryl
Immerse the wood in the Pentacryl solution, ensuring it’s completely submerged.
If brushing or spraying, apply a generous amount of Pentacryl to the wood surface, ensuring even coverage.
7. Soak The Wood
Allow the wood to soak in the Pentacryl solution for the recommended time, which may vary depending on the wood’s size and density.
The wood should be soaked until it no longer absorbs the solution.
8. Remove The Wood From The Solution
Carefully lift the wood out of the Pentacryl solution and allow the excess stabilizer to drain off.
9. Air Dry The Wood
Place the wood in a well-ventilated area, preferably outdoors or in a shed, to air dry.
Drying time varies depending on the wood’s size and density but can range from a few weeks to several months.
10. Monitor The Drying Process
Regularly check the wood for signs of cracking or warping. If needed, adjust the drying environment or reapply Pentacryl to the problem areas.
11. Finish The Wood
Once the wood is completely dry, you can sand, paint, stain, or apply a clear finish to protect and enhance the wood’s appearance.
Congrats! Now you know the best methods to harden wood without making a mess.
Follow the method that suits you the most to get the desired results for your woodwork.
What Is the Best Way To Harden Wood?
The best way of hardening wood depends on many factors such as type of the wood, the intended use of the hardened wood, and the tools and materials available.
Each method has its own advantages and disadvantages. You need to research about each of those factors when selecting the best method to harden the wood.
Different types of wood have different characteristics, affecting how they respond to hardening treatments.
For example, some woods may absorb epoxy or oil better while some might be more suited for the fire-hardening method or using a wood stabilizer method.
Research about the properties of the wood you’re working with to determine the effective wood hardening method for it.
The purpose of the wood project is also a critical factor when deciding the best hardening method.
For example, the fire hardening method is ideal for wood tools, equipment, and weapons, while epoxy or acrylic resin is more suitable for hardening woodworking projects like furniture which require high durability with a polished enhanced looking surface.
In order to make your decision-making a lot easier, I’ve listed some benefits and drawbacks you’ll receive by following all the methods that I’ve mentioned above.
| Method | Advantages | Disadvantages |
| Fire-hardening | Cost-effective, Accessible | Challenging method, Durability is relatively low |
| Epoxy | Strong and durable bond, Fill voids and cracks | Expensive, Need specialized equipment |
| Polycryl fortifier | Stabilize and harden wood | Results vary on wood type |
| Oil | Enhance the wood’s appearance, Easily harden wood | Durability is relatively low |
| Topcoat | Protect and harden wood | Not effective in strengthening |
| Acrylic resin | Durable | Expensive, Challenging to work with |
Refer above factors carefully and decide the best hardening method for you before starting the project to achieve your goal with ease.
The best way to harden wood will depend on your specific needs and circumstances.
By considering the type of wood, the intended use, available tools and materials, and the advantages and disadvantages of each method, you can make an informed decision that leads to a successful and durable wood project.
If you’re unable to find any material that we discussed above to harden wood, don’t worry! some alternatives for wood hardening also do a great job.
Let’s have a look at them.
Wood Hardener Alternatives
Wood hardeners provide an excellent solution for stabilizing and hardening wood, but they cannot be used for every situation.
That’s where alternatives come in.
Here’re some wood hardener alternatives you can use to harden wood effectively,
- Shellac
- Varnish
- Polyurethane
- Wax
- Homemade wood hardening solutions
Let’s have a look at each of the above wood hardening alternatives and discuss them in detail.
Shellac
Shellac is a natural resin by the lac bug and use for centuries for various wood finishing projects.
It forms a protective coat over wood that helps to protect the wood from moisture damage, UV damage, and weather elements.
Plus, shellac help to harden wood to some extent.
It is a non-toxic compound that dries quickly. You can apply shellac with a brush.
Overall, shellac is a versatile finish you can use to harden any wood.
Varnish
Varnish is consisting of oil, resin, and solvent. As you know, oil and resin are great for hardening wood. Therefore, as a material made from those ingredients, varnish is also suitable for hardening wood.
It makes a protective coat over wood that lasts for so long. Varnish hardens the wood by forming a tough, clear layer that can withstand moisture, UV rays, and wear.
Plus, the varnish is available in various colors and is able to apply using a brush, roller, or spray gun.
Varnish is great for hardening both interior and exterior wood projects.
Read to know: How To Apply Varnish Without Brush Marks?
Polyurethane
Polyurethane is a synthetic finish that can use to protect and enhance furniture and other woodworking projects.
Polyurethane hardens wood by making a clear film that is resistant to chemicals, water, and abrasion. Therefore, polyurethane is great for hardening floors and tabletops.
They are available in both oil-based and water-based formulas.
Wax
Wax is a natural easy-to-apply wood finishing product that can use for hardening wood furniture and other wood projects.
It makes a thin, protective layer over wood which helps to protect the wood from weather elements while enhancing the wood’s appearance with a smooth, satin, and sheen finish.
Wax finishes are not durable as other finishes but they are easy to repair and reapply.
You can use wax to harden furniture, carvings, and other woodworking projects that don’t need heavy protection.
Homemade Wood Hardening solutions
In some cases, you may want to experiment with homemade wood hardening solutions.
These can include mixtures of linseed oil, turpentine, and beeswax, or other combinations of natural ingredients.
While these solutions may not be as effective as commercial wood hardeners, they can still provide some hardening and protective benefits, especially for smaller projects or situations where a more natural approach is desired.
As you can see, wood hardener alternatives like shellac, varnish, polyurethane, wax, and homemade solutions can still offer various degrees of hardening and protection for your wood projects.
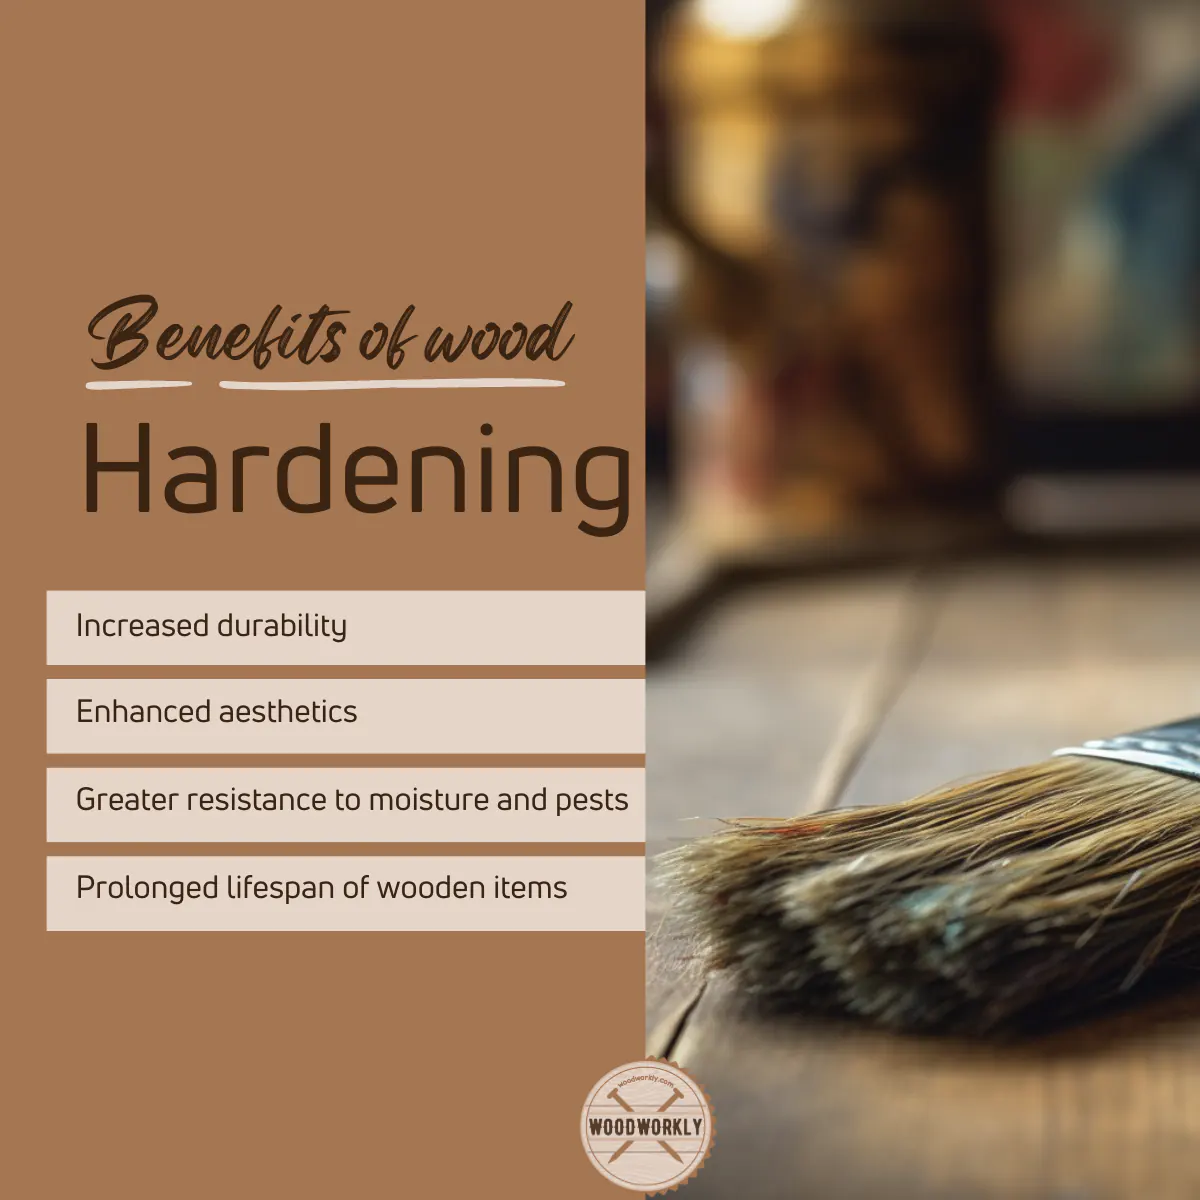
Benefits Of Hardening Wood
- Increases the wood’s durability.
- Improve the structural integrity of the wood.
- Enhance the wood appearance.
- Provide greater resistance to moisture and pests.
- Improve wood’s stability and reduce warping.
- Provide prolonged lifespan of wooden items.
Let’s have a look at some tips which are important during wood hardening.
Tips To Harden Wood Effectively
Here’re some useful tips that are important in wood hardening,
- Proper surface preparation.
- Choosing the right hardening method.
- Safety precautions and best practices.
- Testing hardening methods on scrap wood.
- Allow adequate drying and curing time.
- Monitor the hardening process closely.
- Regular maintenance and reapplication.
Let’s have a look at each of the above tips in detail which are useful in wood hardening,
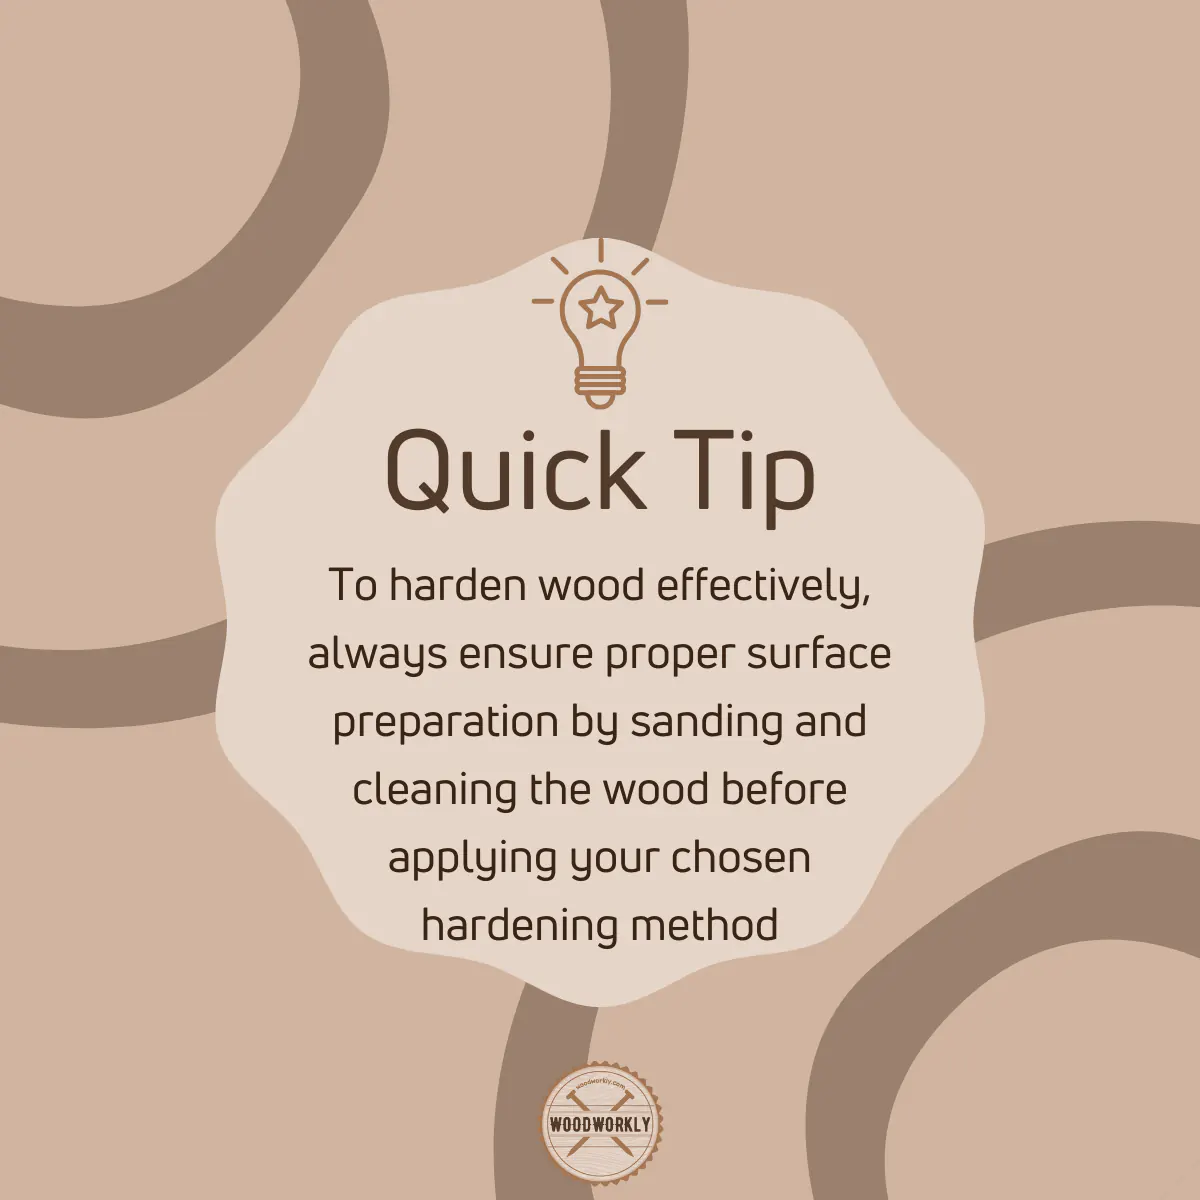
Proper Surface Preparation
First things first: don’t underestimate the importance of prepping your wood surface!
Grab some sandpaper and smooth out any rough spots, ensuring a clean, debris-free surface.
This simple step paves the way for your hardening treatment to penetrate the wood effectively and deliver a top-notch finish.
Choose The Right Hardening Method
Different projects call for different hardening techniques, so put some thought into choosing the one that’s just right for your masterpiece.
Weigh factors like wood type, intended use, and your desired finish to make an informed decision.
There’s no one-size-fits-all approach here, so do your research and choose wisely!
Safety Precautions and Best Practices
When working with wood hardeners, take safety precautions seriously. Suit up with gloves, goggles, and a mask to keep yourself protected from chemicals and dust.
Don’t forget to work in a well-ventilated area, too. And, of course, always follow the manufacturer’s instructions for your specific hardening project.
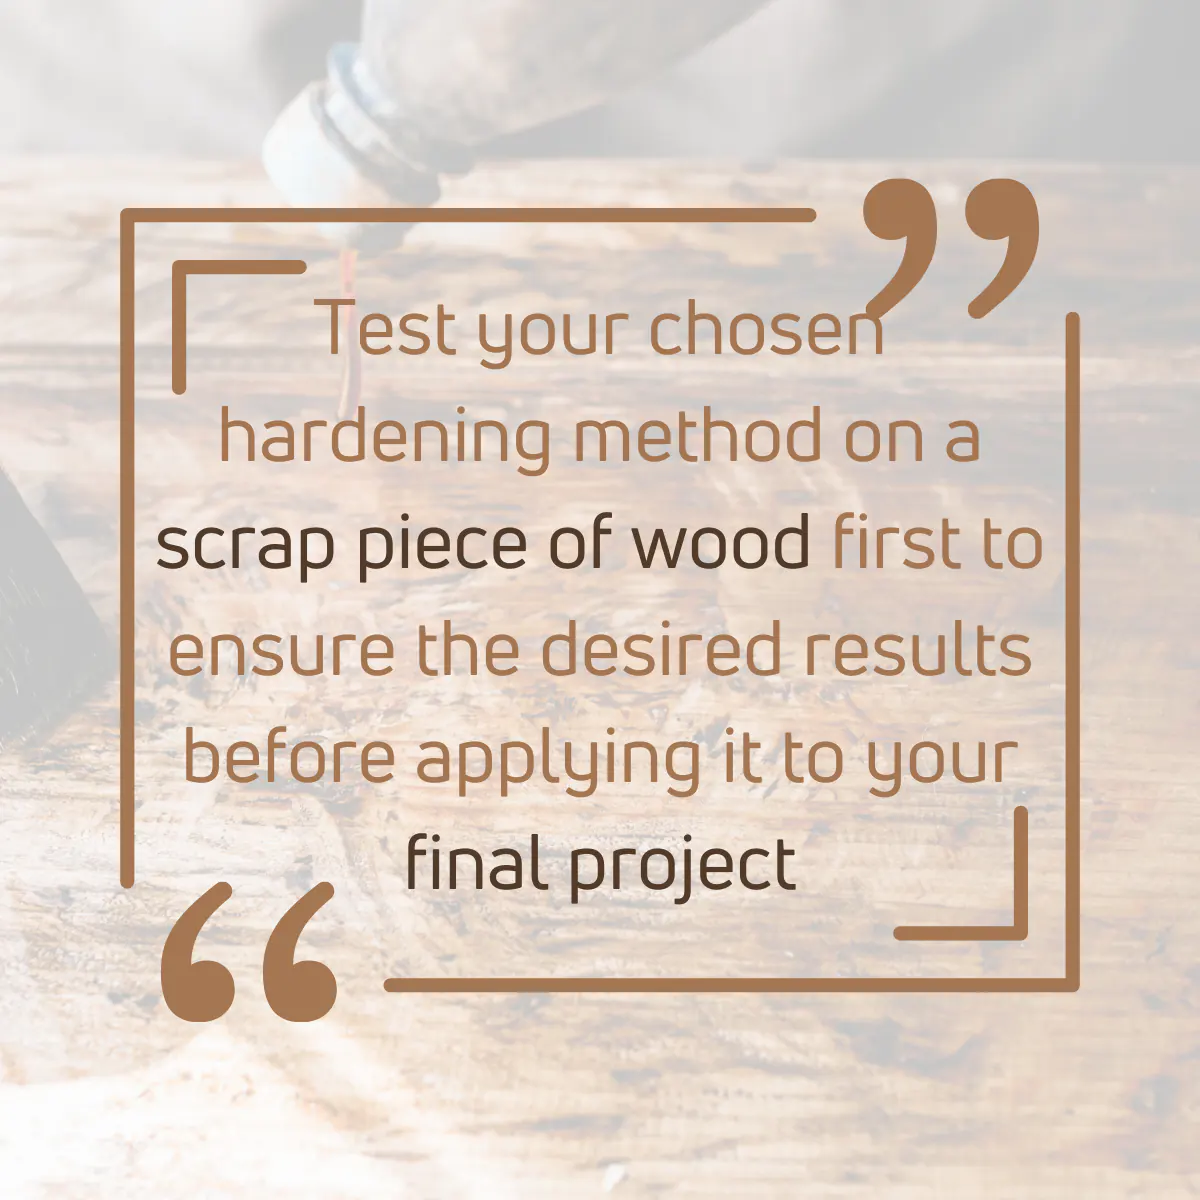
Testing Hardening Methods On A Scrap Wood
Before you go all-in on your project, give your chosen hardening method a test run on a piece of scrap wood.
This helps you get a feel for how the product works, fine-tune your technique, and ultimately achieve a more polished result.
Allow Adequate Drying And Curing Time
Rome wasn’t built in a day, and neither is a perfectly hardened piece of wood.
Allow enough time for drying and curing, as recommended by the product manufacturer.
Skipping this step might lead to a less-than-stellar finish, and we don’t want that, do we?
Monitor The Hardening Process Closely
As your hardening treatment does its magic, stay vigilant!
Monitor the process closely and address any issues that pop up along the way.
Being proactive ensures you get the best possible outcome.
Regular Maintenance And Reapplication
Some hardening treatments may require regular maintenance and reapplication to maintain their effectiveness.
Follow the manufacturer’s recommendations for maintaining your hardened wood items, and reapply the treatment as needed to ensure continued protection and durability.
That’s it, folks! Now you know how to harden wood properly using the most accurate methods with ease.
Follow the methods, guidelines, tips, and tricks carefully, and harden your wood effectively like a pro!
Let’s answer some frequently asked questions as well.
Can All Types Of Wood Be Hardened?
Yes, all types of wood be hardened. But the effectiveness of the hardening process may vary depending on the wood species and its natural properties.
It is essential to research and test the chosen hardening method on a specific type of wood to ensure optimal results.
How Long Does It Take For Wood To Harden After Treatment?
Mostly it takes 2 to 3 days for the wood to harden after the treatment. The drying and curing time for wood hardening treatments can vary significantly depending on the method used and the wood’s properties.
Always follow the manufacturer’s recommendations for drying and curing times to achieve the best results.
Can I Use A DIY Wood Hardening Method, Or Should I Consult A Professional?
While many wood hardening techniques can be performed as DIY projects, some methods may require specialized equipment or expertise.
You just have to follow the procedures carefully that I have mentioned above.
If you are unsure about a specific technique or have limited experience with wood hardening, it may be beneficial to consult a professional woodworker or seek advice from authoritative sources, such as woodworking journals or online forums.
Are Wood Hardeners Safe For Indoor Use?
Yes, most wood hardening products are safe for indoor use when applied correctly and in a well-ventilated area.
However, it is essential to follow the manufacturer’s safety guidelines and take necessary precautions, such as wearing protective gear and ensuring proper ventilation, to minimize risks.
How Often Should I Reapply Wood Hardening Treatments?
The frequency of reapplication depends on the specific hardening method and the wood item’s intended use.
Some treatments may require regular maintenance and reapplication, while others may provide long-lasting protection.
Consult the manufacturer’s guidelines for maintenance and reapplication recommendations.
Can Wood Hardening Treatments Change The Wood’s Appearance Or Color?
Some wood hardening treatments may alter the wood’s appearance or color, while others may be more subtle.
It’s essential to test the chosen method on a scrap piece of wood to determine how it will affect the wood’s appearance before applying it to the final project.
Are There Any Eco-Friendly Alternatives To Traditional Wood Hardening Treatments?
Yes, there are eco-friendly alternatives to traditional wood hardening treatments, such as using natural oils like linseed oil or tung oil.
These options can provide a more sustainable and environmentally friendly solution for hardening wood without compromising its durability or appearance.
How To Harden Wood Floors?
To harden wood floors, you can apply a durable topcoat like polyurethane or an oil-based finish that can tolerate foot traffic and wear.
These coatings can provide long-lasting protection against wear and tear while also enhancing the wood’s appearance.
Does Burning Wood Harden It?
Yes, burning wood can harden it through a process called fire hardening. This method involves carefully charring the wood’s surface to create a hardened layer that provides increased durability and resistance to moisture and pests.
But make sure not to keep the wood too close to the fire since high temperate levels can damage the wood.
Does Burning Wood Seal It? Read my comprehensive guide to know how to burn wood to seal it properly.
How To Harden Pine Wood?
Pine wood can be hardened using methods like applying wood hardeners, epoxy resin, or oil-based treatments.
These treatments can help improve the wood’s durability, moisture resistance, and structural integrity.
How Can I Harden Balsa Wood?
To harden balsa wood, you can use treatments like wood hardener or thin epoxy resin, which can penetrate the wood’s pores and provide additional strength and durability.
How Can I Harden Rotted Wood?
Rotted wood can be hardened using a wood hardener specifically designed to penetrate and stabilize decayed or rotted wood fibers, restoring the wood’s strength and preventing further decay.
How Can I Harden Cardboard Like Wood?
To harden cardboard like wood, you can use treatments such as applying multiple layers of a clear sealant or varnish, which can provide additional rigidity and moisture resistance.
Does Lacquer Harden Wood?
Yes, lacquer can harden the wood. Lacquer can provide a hard, protective finish for wood, but it does not penetrate the wood fibers to harden it like other treatments such as wood hardeners or epoxy resin.
How Can I Harden Wood Naturally?
To harden wood naturally, you can use natural oils like linseed oil or tung oil, which can penetrate the wood fibers and provide increased durability and moisture resistance.
Another option is fire hardening, which involves carefully charring the wood’s surface to create a hardened layer.
How To Harden Wood For Carving?
To harden wood for carving, you can use methods such as applying a wood hardener, oil-based treatments, or a thin layer of epoxy resin.
These treatments can help improve the wood’s durability, moisture resistance, and structural integrity, making it more suitable for carving.
Did I cover all you wanted to know about How To Harden Wood?
In this article, I have deeply discussed how to harden wood using different methods without messing things up.
I have mentioned all the pros and cons of each of the mentioned above and helped you to decide which one suits you the most as per your requirements.
To harden wood, choose a suitable method such as applying wood hardener, epoxy resin, oil-based treatments, or fire hardening. Proper surface preparation, safety precautions, and allowing adequate drying and curing time are crucial for effective results. Regular maintenance ensures long-lasting durability and protection.
Furthermore, I’ve answered some frequently asked questions as well.
Hope you were able to know everything you wanted to know about how to harden wood accurately without damaging your furniture or woodwork in the long run.
Practice makes you perfect! Therefore, practice each method I mentioned a couple of times before stepping into the main project. Happy woodworking!