Ever wondered what makes wooden furniture strong and long-lasting? Discover the secrets of strong wood joints and transform your woodworking projects today!

Joinery is a major task of woodworking that use to join wood pieces together to produce complex woodwork.
There’re so many types of wood joints used for different woodworking activities.
Wood joints need to have good dimensional stability and strength to join wood parts together. I was curious to know, what are the strongest types of wood joints.
I have researched and here’re the 21 strongest wood joint types
- Mortise and Tenon joint
- Dovetail joint
- Dowel joint
- Miter joint
- Lap joint
- Tongue and Groove joint
- Rabbet joint
- Pocket hole joint
- Finger joint (Box joint)
- Dado joint
- Bridle joint
- Biscuit joint
- Japanese Wood Joint (Kumiki)
- T-bridle Joint
- Corner Bridle Joint
- Beadlock Joint
- Scarf Joint
- Cope-and-stick Joint
- Butterfly Joint
- Birdsmouth Joint
- Butt joint
In this article, I’ll deeply discuss the strongest wood joint types with their properties, and the uses of each type of wood joint with pros and cons.

Also, I’ll talk about strong glue types you can use to build strong wood joints as well.
So, let’s get going!

Before heading into the strongest wood joint I’ll give you a brief look at, what are wood joints and their general uses.
What is a Wood Joint?
A wood joint, in the realm of woodworking and carpentry, is a point where two or more pieces of wood are joined together to create a connection.
These connections serve to create a solid, stable structure, often used in furniture, cabinetry, and construction.
Wood joints come in a variety of forms, each tailored to specific applications and demands.
Read to know Why Your Grandpa’s Chair is Stronger Than Yours!
The Importance of Wood Joints
Wood joints play a critical role in ensuring that the structures created are strong, durable, and can withstand the test of time.
By employing the appropriate joint for a given situation, woodworkers and carpenters can build structures that remain functional and aesthetically pleasing for generations.
Properly crafted wood joints also lend themselves to increased stability, enabling the creation of larger, more complex structures.

Examples of Wood Joints in Action
- Dovetail Joints: Renowned for their strength and aesthetic appeal, dovetail joints are commonly found in high-quality furniture, such as drawer boxes and cabinets. The interlocking, wedge-shaped tails and pins make for an exceptionally secure connection.
- Mortise and Tenon Joints: A tried-and-true classic, the mortise and tenon joint can be found in various applications, from heavy-duty construction projects to fine furniture making. The tenon (a protruding piece of wood) fits snugly into the mortise (a cavity in the second piece of wood), creating a robust connection.
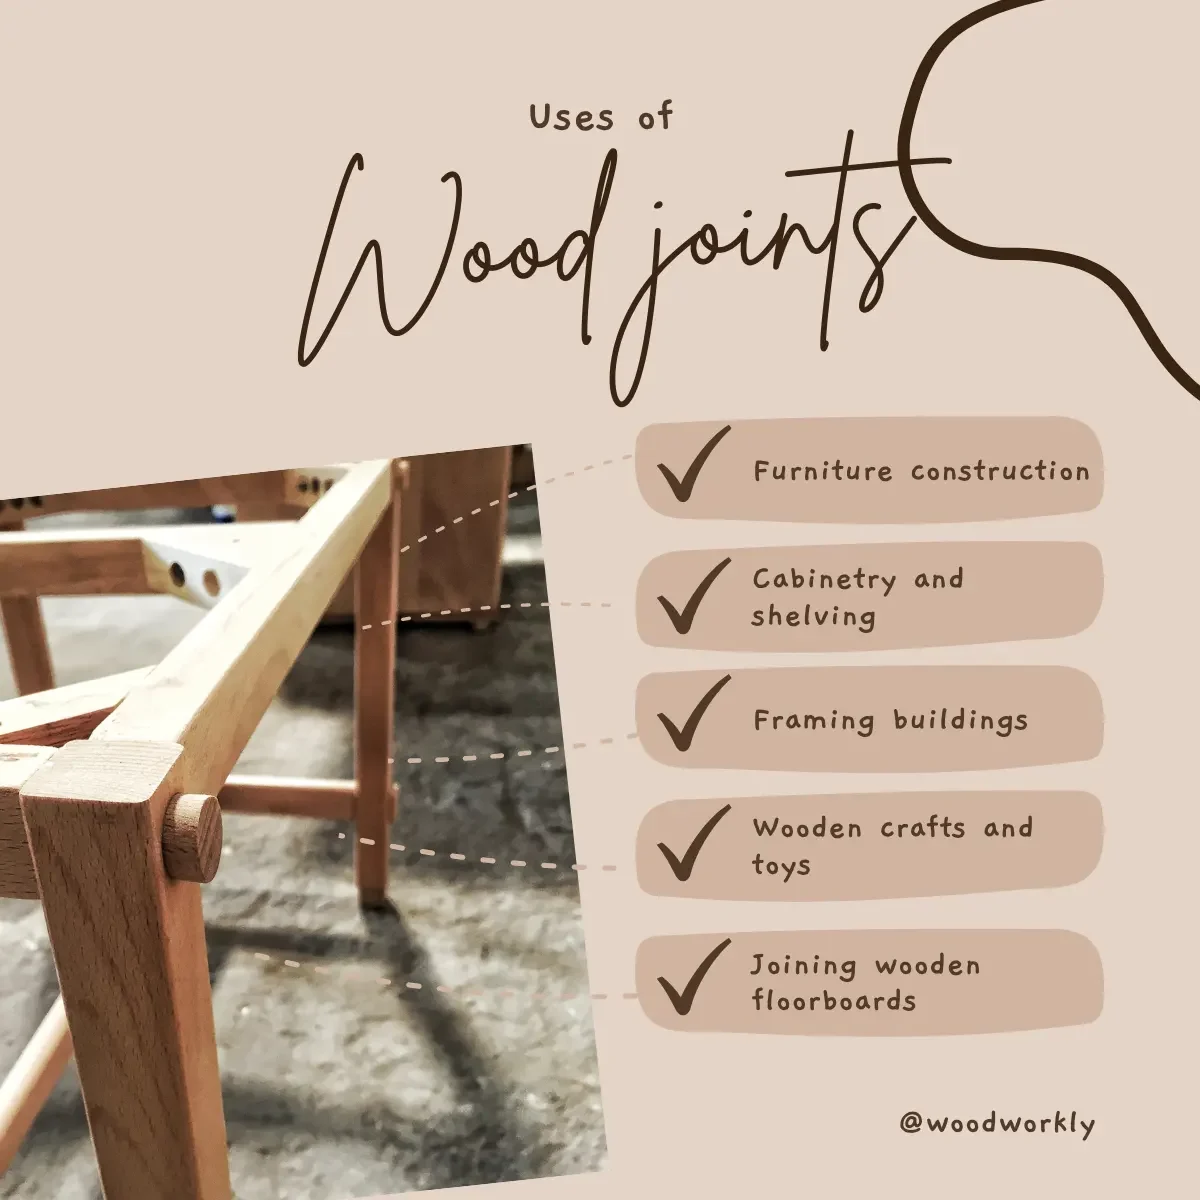
The Uses of Wood Joints
Wood joints have myriad uses, depending on the type of joint and the context in which it is employed. Some joints excel in certain applications, while others are more versatile.
Here are just a few examples of the many uses of wood joints:
- Furniture Making: From bed frames and chairs to cabinets and bookcases, wood joints are integral to the creation of functional, long-lasting, and beautiful furniture.
- Construction: Wood joints are essential when constructing wooden frames for buildings, providing strength and stability to the overall structure.
- Cabinetry: In the world of cabinetry, wood joints ensure that the final product is not only visually appealing but also able to withstand daily wear and tear.
- Decorative Art: Some wood joints, such as the intricate Japanese kumiki joint, are used for their aesthetic appeal, adding an artistic touch to wooden sculptures and other decorative pieces.

So, let’s start to look at the strongest wood joint types with their uses and benefits.
Strongest Wood Joints
Let’s discover the strongest wood joint types that can use to strengthen furniture and woodwork.
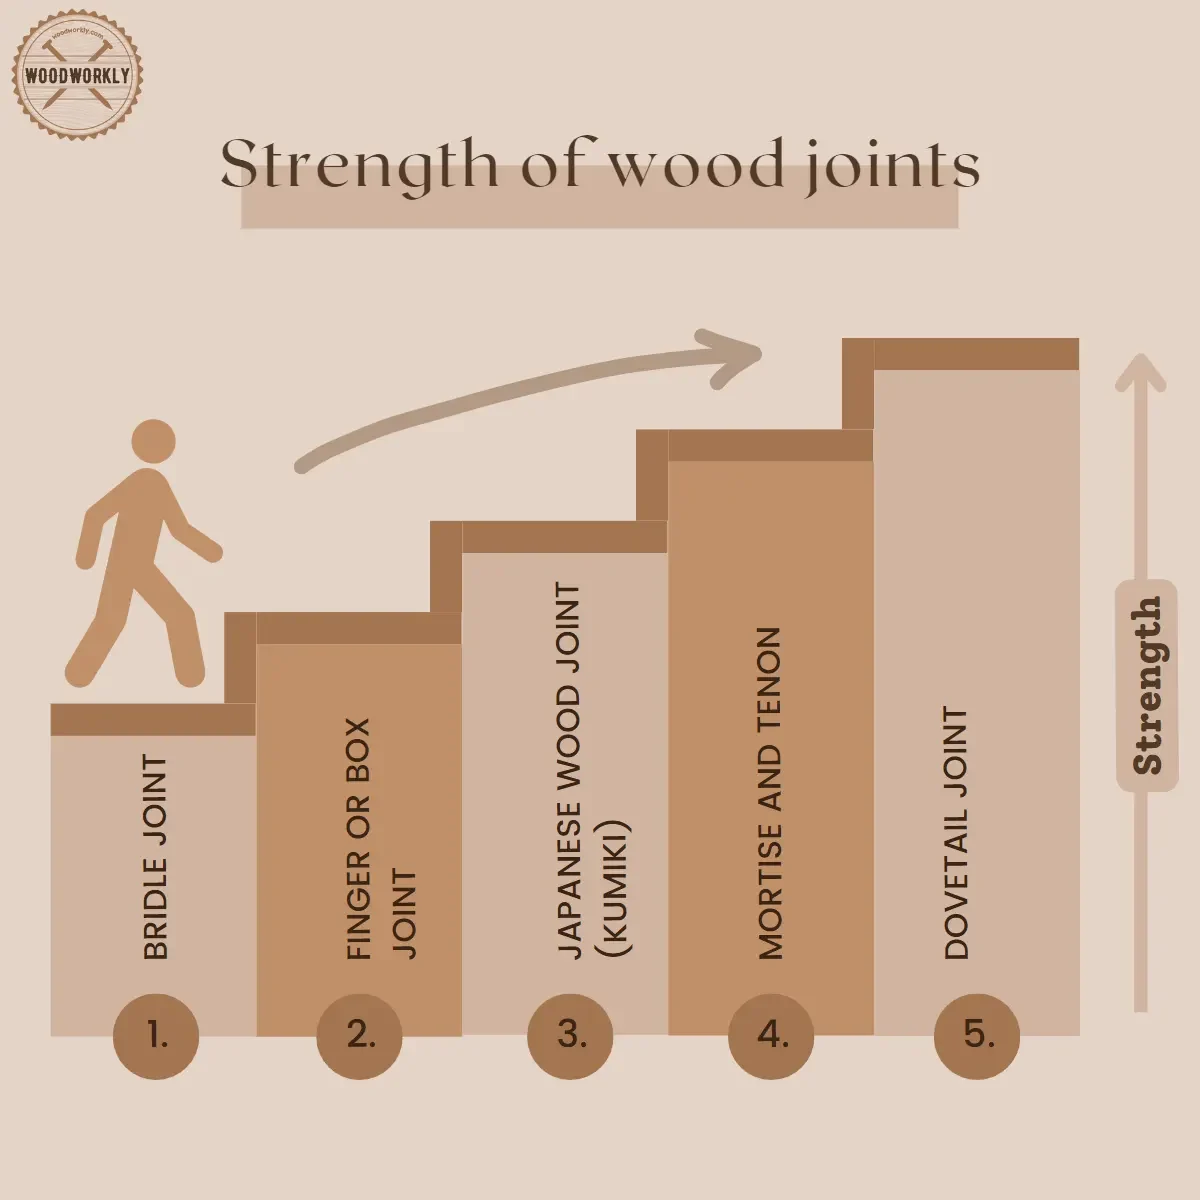
1. Mortise and Tenon Joint
Mortise and Tenon joint is one of the strongest wood joint type used for construction. It is a classical wood joint method that use since the early days of woodworking.
The mortise and tenon joint is a classic woodworking connection that’s been used for centuries.
It involves a protruding tenon (typically rectangular) fitting into a corresponding mortise (hole) to create a secure and stable connection.
This type of joint is highly regarded for its strength and durability, making it an ideal choice for many woodworking projects.
Mortise means the cavity and tenon is the wood piece that perfectly fits into the mortise.
So, the Mortise and Tenon joint method simply means tapering one end of a wood piece insert into a cavity of another wood piece at 90-degrees.
In other words, the combination of Mortise and Tenon to foam a complex wood structure.
Mortise and Tenon joint is almost similar to the Tongue and Groove method except for the large wood square and receptacle seam that foam seamless joint.
Creating Mortise and Tenon wood parts is a skill that you should develop with practice.
Because you need to have precise measuring skills to develop the 90- degree angle connection between Mortise and Tenon.
Mortise and Tenon wood joint is the strongest 90 degree wood joint.
With modern equipment, developing Mortise and Tenon parts has become much easier.
Tools Needed for a Mortise and Tenon Joint
To create a mortise and tenon joint, you’ll need a variety of woodworking tools:
- Marking tools: A marking gauge, pencil, or knife to accurately lay out the joint dimensions.
- Saws: A tenon saw or back saw for cutting the tenon shoulders, and a coping or fret saw for removing waste.
- Chisels: Bench chisels or mortise chisels for cleaning up the mortise and tenon.
- Drill and bits: A drill with Forstner or brad-point bits to remove material from the mortise.
- Clamps: For securing the workpiece during cutting and assembly.
- Mallet: For tapping chisels and helping to seat the joint during assembly.
How to Make a Mortise and Tenon Joint
Here’s a step-by-step guide on crafting a mortise and tenon joint:
- Mark the joint: Accurately measure and mark the dimensions of the mortise and tenon on the corresponding workpieces.
- Cut the tenon: Use a saw to cut the tenon shoulders and cheeks, then remove any waste with a chisel.
- Create the mortise: Drill out the bulk of the mortise material, then clean up the edges and corners using chisels.
- Test fit: Dry-fit the joint to check for a snug connection. Make any necessary adjustments with chisels or sandpaper.
- Assemble: Apply wood glue to the joint and clamp the workpieces together until the glue dries.
Uses of Mortise and Tenon Joint
The mortise and tenon joint is versatile and can be found in a wide range of woodworking projects, such as:
- Furniture: Tables, chairs, and bed frames often rely on mortise and tenon joints for their structural stability.
- Cabinetry: This joint provides strong connections for doors, face frames, and casework.
- Timber framing: Larger-scale mortise and tenon joints are used in timber framing for building construction.

Benefits of Mortise and Tenon Joint
Mortise and tenon joints offer several advantages for woodworkers:
- Strength: These joints are known for their exceptional load-bearing capacity and resistance to twisting and racking forces.
- Longevity: When properly constructed, mortise and tenon joints can last for generations.
- Customization: They can be tailored to various applications and wood types, with options like haunched, angled, or through tenons.
- Aesthetics: The joint can be hidden or showcased, depending on the desired appearance of the finished piece.
By understanding the intricacies of mortise and tenon joints, you’ll be well-equipped to incorporate this tried-and-true technique into your woodworking projects, creating robust and lasting connections.
Tips:
- Make the tenon taller than its width. Both tenon and mortise relate to the thickness of the wood pieces.
- Make mortise slightly deeper than the length of the tenon (about 1/8”). This will give enough room to apply wood glue, a fastener between Mortise and Tenon.
- Make Tenon about a 1/3 thickness of the wood piece.
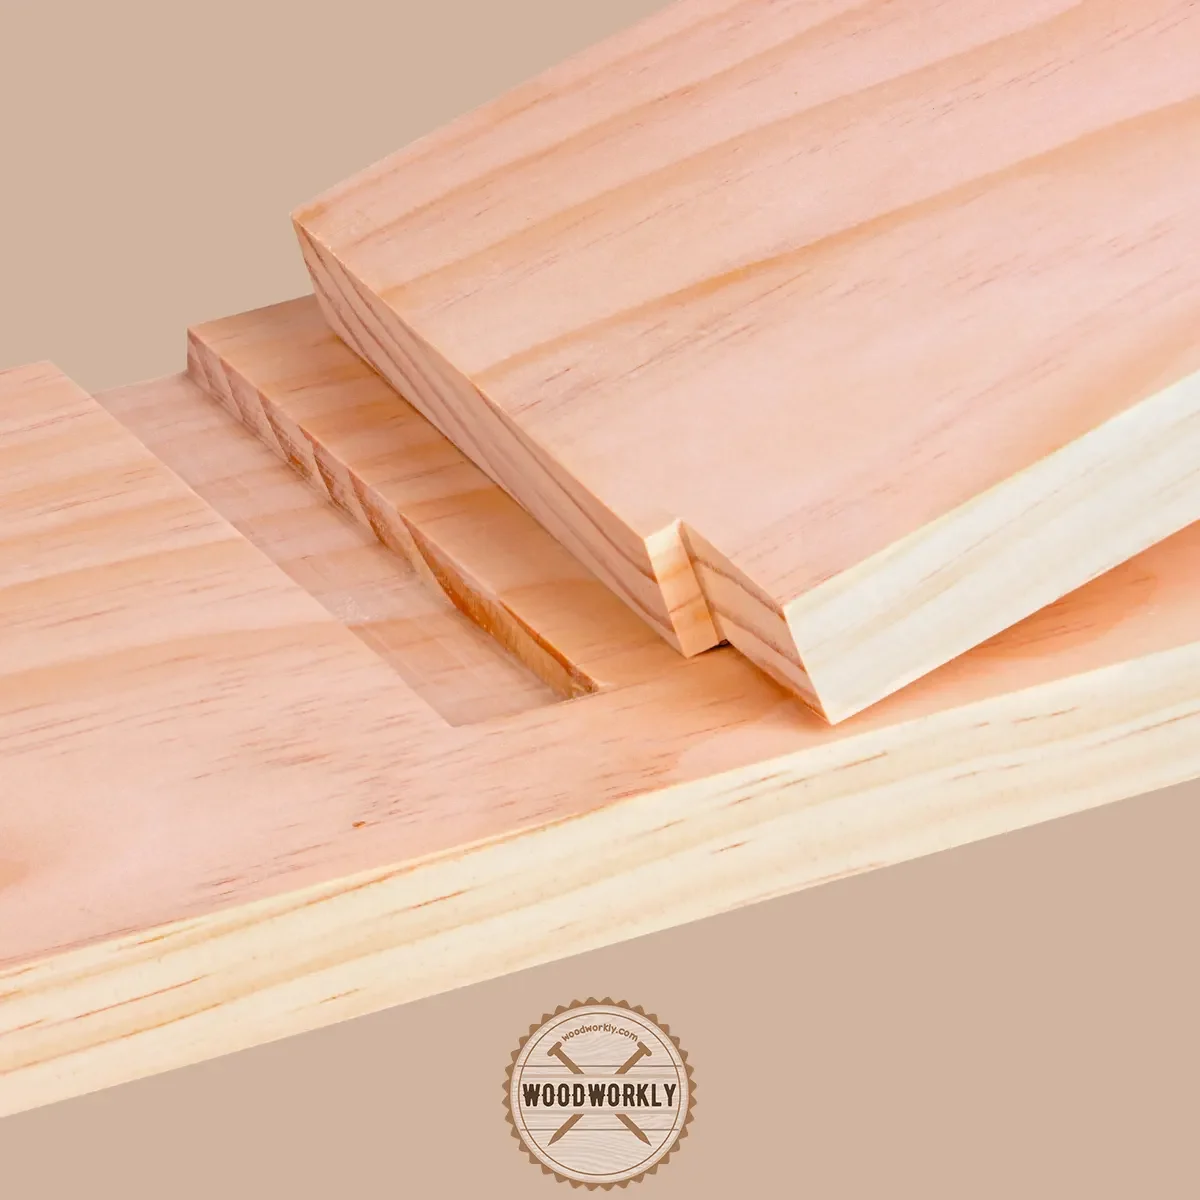
2. Dovetail Joint
The dovetail joint is one of the strongest wood joint used to strengthen the corners by resisting the pulling apart.
A dovetail joint consists of a series of interlocking wedge-shaped cuts known as “tails” and “pins.” The tails, resembling a dove’s tail in shape, are carved into one piece of wood, while the pins are cut into the second piece.
When assembled, the two pieces fit snugly together, forming a secure connection that resists being pulled apart.
It uses wedge-shaped (like the Dove’s tail) interlocking pieces that are commonly used in corners of the woodwork.
Wedge-shaped wood pieces should meet at a correct angle to fit precisely.

Tools Needed to Make a Dovetail Joint
To create a dovetail joint, you’ll need the following tools:
- Dovetail Saw: A specialized handsaw with fine teeth designed to make precise cuts.
- Chisels: Sharp chisels of various sizes to clean up the cuts and ensure a perfect fit.
- Marking Gauge: A tool used to accurately mark the depth of the cuts.
- Marking Knife: For scribing precise lines along the wood grain.
- Mallet: A wooden mallet to strike the chisels when making cuts.
- Coping Saw: An optional tool that can help remove waste between the tails and pins.
- Dovetail Jig: A helpful guide for cutting accurate dovetail joints with a router, especially for beginners.
Dovetail joint only needs wood glue and no fasteners and creating the joinery requires quality craftmanship than other wood joints.
Two wedge-shaped wood pieces combine using wood glue and clamp until they make a perfect joint by drying securely.
How to Make a Dovetail Joint
Here’s a step-by-step guide to making a dovetail joint:
- Mark the Tails: Begin by marking the tail pattern onto the end grain of one piece of wood using a marking knife and a dovetail square.
- Cut the Tails: Using a dovetail saw, carefully cut along the lines you’ve marked, keeping the saw blade on the waste side of the line.
- Remove Waste Material: With a coping saw or chisel, remove the waste material between the tails.
- Clean Up the Tails: Use a chisel to clean up the tails, ensuring they are smooth and square.
- Transfer the Tails: Place the tail board on top of the pin board, ensuring the two pieces are perfectly aligned. Use a marking knife to trace the tail pattern onto the pin board.
- Cut the Pins: As you did with the tails, use the dovetail saw to cut along the lines on the pin board, staying on the waste side of the line.
- Remove Waste Material: Again, use a coping saw or chisel to remove the waste between the pins.
- Clean Up the Pins: Carefully pare the pins with a chisel to achieve a snug fit with the tails.
- Assemble the Joint: Finally, apply wood glue to the pins and tails, and gently tap the pieces together using a mallet.
Uses of Dovetail Joint
Dovetail joints are commonly used in woodworking projects where strength and aesthetics are paramount, such as:
- Drawer boxes
- Jewelry boxes
- High-quality furniture
- Cabinetry
- Decorative woodworking
Benefits of Dovetail Joint
The dovetail joint offers several advantages:
- Strength: The interlocking tails and pins provide excellent resistance to being pulled apart.
- Durability: A well-made dovetail joint can last for generations, even without nails or screws.
- Aesthetics: The distinctive pattern of dovetail joints adds visual interest to woodworking projects.
- Customization: Dovetail joints can be tailored to suit different woodworking styles and preferences, such as through or half-blind dovetails.
- Glue Surface: The increased surface area created by the interlocking cuts provides a strong bond when glued, adding to the joint’s stability.
Tips:
- Investing in a Dovetail jig is worth it if you’re making many Dovetail joints because the machine can cut wedge pieces precisely and it is adjustable to make differently shaped cuts that fit perfectly together.
There’re main 3 types of Dovetail joints. They are,
- Through Dovetail Joint
- Half-Blind Dovetail Joint
- Sliding Dovetail Joint
Let’s have a look at each of those Dovetail joint types and get to know their properties.
1. Through Dovetail Joint
Through Dovetail is the most revered wood joint. It is classical and able to make extremely strong wood joints with a beautiful appearance.
Through Dovetail joint can make by using hand techniques and machines like Jig and router.
It adds touch to class to a wood piece by making a strong combination between them.
The through dovetail joint, also known as a full dovetail joint, is a classic woodworking joint that is widely recognized for its strength and durability.
This joint consists of a series of interlocking wedge-shaped pins and tails that fit together seamlessly, providing a strong mechanical connection.
The through dovetail joint is visible from both sides of the assembled pieces, showcasing its intricate pattern and craftsmanship.

Tools Needed for Through Dovetail Joints
To create a through dovetail joint, you’ll need the following woodworking tools:
- Dovetail saw or backsaw: For making precise cuts.
- Marking gauge and pencil: To mark the cutting lines on the workpieces.
- Chisels and mallet: For refining the joint surfaces and removing waste material.
- Dovetail jig (optional): To guide your cuts and ensure consistency.
- Woodworking clamps: To hold the pieces securely during assembly.
- Wood glue: For bonding the joint.
How to Make a Through Dovetail Joint
Follow these steps to create a through dovetail joint:
- Prepare the workpieces: Cut the wood pieces to the desired dimensions, ensuring they are square and have clean edges.
- Mark the pins and tails: Using a marking gauge and pencil, mark the positions and dimensions of the pins and tails on the workpieces.
- Cut the pins: With a dovetail saw or backsaw, carefully cut along the marked lines to create the pins on one workpiece.
- Remove the waste material: Use chisels and a mallet to carefully remove waste material between the pins.
- Cut the tails: Following the same process, cut the tails on the other workpiece.
- Refine the joint surfaces: Use chisels to fine-tune the joint surfaces for a snug fit.
- Assemble and glue: Apply wood glue to the joint surfaces, and then fit the pins and tails together. Use clamps to hold the pieces together while the glue dries.
Uses of Through Dovetail Joints
Through dovetail joints are suitable for various woodworking applications, including:
- Drawer construction: They are commonly used for connecting drawer fronts and sides, providing a strong, long-lasting joint.
- Box making: Through dovetail joints are ideal for constructing decorative boxes, as they provide both strength and visual appeal.
- Cabinetry and furniture: They can be used in the construction of cabinets, desks, and other furniture pieces, contributing to their structural integrity.
Benefits of Through Dovetail Joints
Some advantages of through dovetail joints are:
- Strength: The interlocking design provides a strong, secure connection that resists pulling apart, even without glue.
- Durability: Through dovetail joints are known for their long-lasting performance, as they can withstand the test of time and wear.
- Aesthetic appeal: The joint’s visible pattern showcases the craftsmanship and skill of the woodworker, adding visual interest to a project.

2. Half-Blind Dovetail Joint
In a half-blinded dovetail joint, not both ends of wedge-shaped wood pieces are visible. Only one piece of wood is visible.
The best example of a half-blind Dovetail joint is the drawer front.
I don’t want to see the ends of both wood parts through Dovetail on the front-facing of the drawer.
So, only the front ends are visible, and you’ll be able to build a beautiful joint without compromising the strength.
The half-blind dovetail joint is a beautiful joint that you should practice which is able to build clean and beautiful wood joinery that adds a unique appearance to your woodworks.
Tools Needed for Half-blind Dovetail Joints
To create a half-blind dovetail joint, you will need the following woodworking tools:
- Dovetail saw or backsaw: For precise cutting of the dovetail pins and tails.
- Chisels: To clean up and refine the dovetail joint surfaces.
- Marking gauge and marking knife: To accurately mark the dovetail layout on the workpieces.
- Dovetail template or jig (optional): To assist in achieving consistent and accurate dovetail spacing.
- Woodworking clamps: To secure the workpieces during cutting and assembly.
How to Make a Half-blind Dovetail Joint
Follow these steps to create a half-blind dovetail joint:
- Prepare the workpieces: Cut the wood pieces to the desired length and width, ensuring they are square and have clean edges.
- Mark the dovetails: Use a marking gauge and marking knife to accurately lay out the dovetail pins and tails on the respective workpieces.
- Cut the tails: Using a dovetail saw, carefully cut the tails along the marked lines, ensuring clean and accurate cuts.
- Cut the pins: Cut the pins on the other workpiece, taking care to match the angles and spacing of the tails.
- Remove waste material: Use chisels to clean up and refine the joint surfaces, removing any remaining waste material from the pins and tails.
- Test fit and adjust: Dry-fit the joint and make any necessary adjustments to the pins or tails for a snug and precise fit.
- Assemble and glue: Apply wood glue to the joint surfaces and assemble the joint, using clamps to secure the pieces while the glue dries.
Uses of Half-blind Dovetail Joints
Half-blind dovetail joints are often used in woodworking projects where aesthetics and strength are both essential, such as:
- Drawer construction: The joint’s hidden end grain provides a clean appearance on drawer fronts, while the interlocking design offers strength and durability.
- Cabinetry and furniture: Half-blind dovetails can be used in cabinets, desks, and other furniture pieces where a clean, professional appearance is desired.
- Decorative boxes and chests: The joint’s hidden end grain and strong connection make it ideal for creating elegant and long-lasting boxes or chests.
Benefits of Half-blind Dovetail Joints
Half-blind dovetail joints offer several advantages in woodworking projects:
- Aesthetics: The hidden end grain of the joint provides a clean, unobtrusive appearance that highlights the craftsmanship involved.
- Strength and durability: The interlocking design of dovetail joints ensures a strong and long-lasting connection, even without the use of nails or screws.
- Versatility: Half-blind dovetails can be employed in various woodworking projects where both strength and aesthetics are important.
By learning to create half-blind dovetail joints, you can add an extra level of sophistication and durability to your woodworking projects. This joint not only offers a strong and lasting connection but also showcases your skill and attention to detail as a craftsman.
3. Sliding Dovetail Joint
The sliding Dovetail joint is like the locking Dado joint. Dovetail wood piece machined in the front face of other wood pieces while the pin is cut at the edge of combining piece.
It has many different uses and considers one of the versatile wood joinery methods you should practice.
A sliding dovetail joint is a variation of the traditional dovetail joint, characterized by a single, elongated dovetail-shaped groove that slides into a corresponding slot, fitting snugly together.
This joint provides a strong, interlocking connection while allowing for wood movement in one direction, making it an ideal choice for projects where expansion and contraction of wood are a concern.

Tools Needed for Sliding Dovetail Joints
To create a sliding dovetail joint, you’ll need the following woodworking tools:
- Router and dovetail bit: For cutting the dovetail groove and slot.
- Straight edge or T-square: To ensure accurate alignment of the joint components.
- Marking gauge and pencil: For marking the cutting lines on the workpieces.
- Chisels and mallet: To clean up and refine the joint surfaces.
- Woodworking clamps: To hold the pieces securely during assembly.
- Wood glue: For bonding the joint.
How to Make a Sliding Dovetail Joint
Follow these steps to create a sliding dovetail joint:
- Prepare the workpieces: Cut the wood pieces to the desired dimensions, ensuring they are square and have clean edges.
- Mark the dovetail groove and slot: Using a marking gauge and pencil, mark the positions and dimensions of the dovetail groove and slot on the workpieces.
- Cut the dovetail groove: With a router and dovetail bit, carefully cut the dovetail groove into one workpiece, following the marked lines.
- Cut the dovetail slot: Using the same router setup, cut the dovetail slot into the other workpiece, ensuring it matches the groove’s dimensions.
- Test fit and adjust: Dry-fit the joint, making any necessary adjustments to the dovetail groove and slot for a snug fit.
- Assemble and glue: Apply wood glue to the joint surfaces, and then slide the dovetail groove into the slot. Use clamps to hold the pieces together while the glue dries.
Read to know, How to cut a groove in wood with a router with my latest comprehensive guide.
Uses of Sliding Dovetail Joints
Sliding dovetail joints are suitable for various woodworking applications, including:
- Cabinetry: For connecting shelves to cabinet sides or dividers, providing strong support and allowing for wood movement.
- Furniture: In tables, desks, and other furniture pieces, sliding dovetail joints can be used to join legs to aprons or stretchers.
- Drawer construction: They can be used to connect drawer fronts and backs to drawer sides, creating durable, long-lasting connections.
Benefits of Sliding Dovetail Joints
Some advantages of sliding dovetail joints are:
- Strength: The interlocking design provides a strong, secure connection that resists pulling apart.
- Wood movement accommodation: The joint allows for expansion and contraction of wood, making it ideal for projects subject to varying humidity levels.
- Aesthetic appeal: Sliding dovetail joints offer a visually pleasing, clean appearance when properly executed.
The sliding dovetail joint is a versatile, strong, and aesthetically pleasing woodworking joint that accommodates wood movement.
By mastering this technique, you’ll expand your woodworking skills and open up new project possibilities

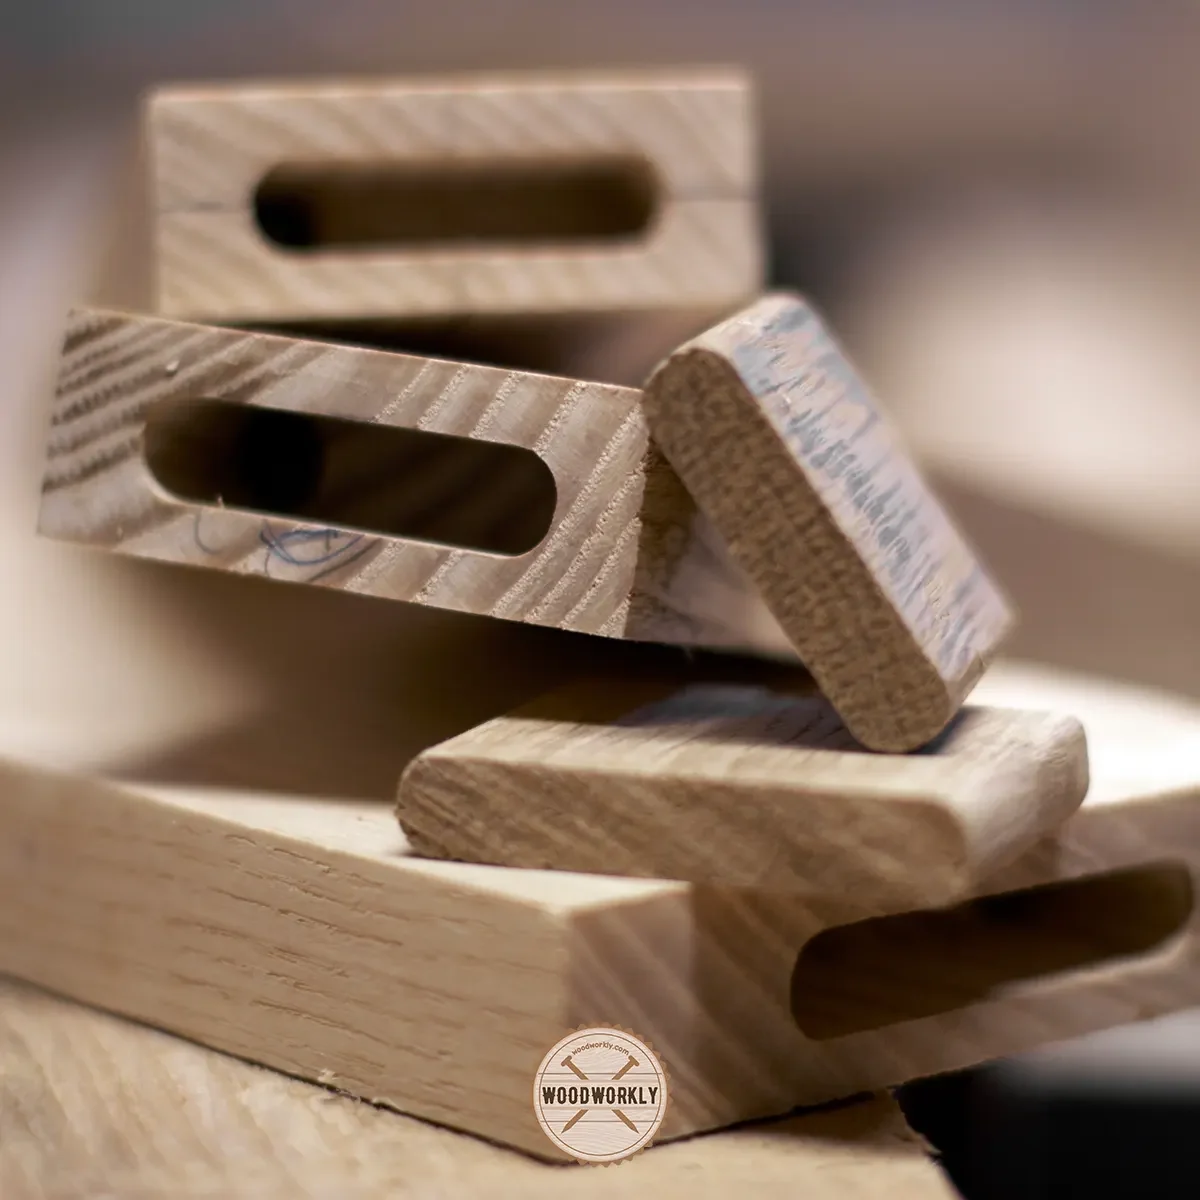
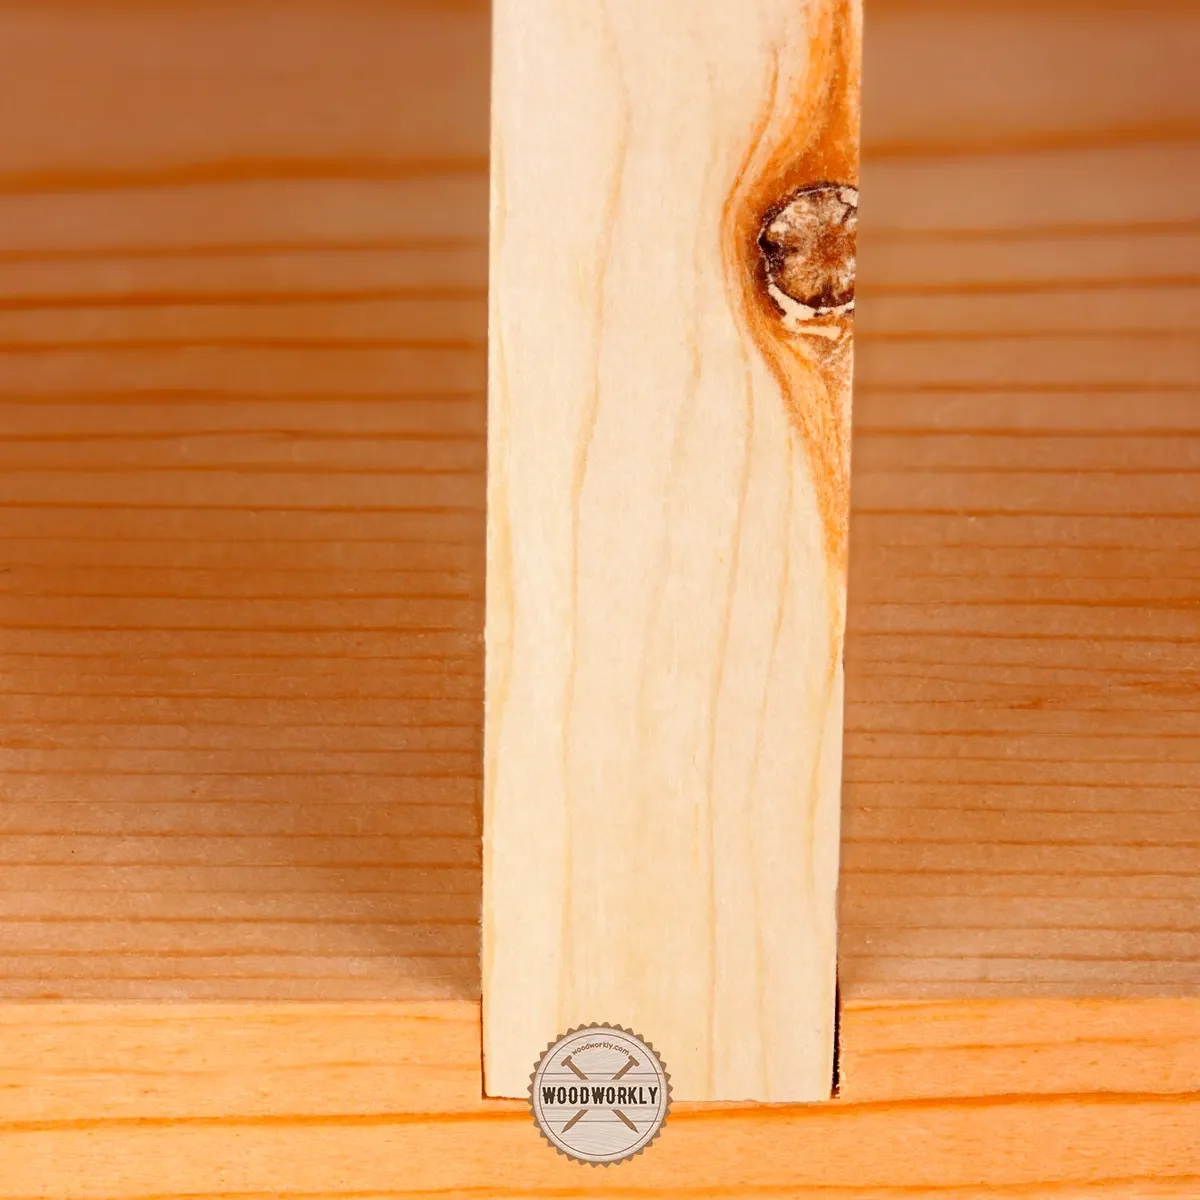
3. Dowel Joint
Dowel joint is an almost similar joint type to the Mortise and Tenon joinery. It is a strong joint that fits into a socket to strengthen a joint.
In the Dowel joint both wood, pieces need to have sockets and it is a round cylindrical shaped item that goes through wood pieces at a perpendicular 90-degree angle.
Many of the wood joints can be further strengthened by applying the Dowel joint.
When you don’t need to visible steel look of nails or screw heads, better to go with a Dowel joint that is able to create a strong attachment with wood pieces and nails do.
It gives rustic look when it contrasts with the wood. For example, walnut Dowels in oak woodwork.
Read to know, Biscuit Joint vs Dowel Joint: Which is Better?
Tools Needed for Dowel Joints
To create a dowel joint, you’ll need the following woodworking tools:
- Drill or drill press: For drilling accurate, straight holes.
- Dowel jig (optional): For precise alignment of dowel holes.
- Woodworking clamps: To hold the pieces securely during assembly.
- Wood glue: For bonding the joint.
- Doweling centers: To mark the dowel hole locations accurately.
- Wooden dowels: Cylindrical wooden rods used to connect the wood pieces.
How to Make a Dowel Joint
Follow these steps to create a dowel joint:
- Prepare the workpieces: Cut the wood pieces to the desired dimensions and ensure they have square edges.
- Mark dowel hole locations: Using doweling centers, mark the hole locations on both pieces to ensure proper alignment.
- Drill dowel holes: Using a drill or drill press, drill the holes to the appropriate depth and diameter for the dowels.
- Insert dowels: Apply wood glue to the dowel holes and then drive the dowels into one of the wood pieces.
- Join dowels and glue: Apply wood glue to the dowel holes on the other wood piece, and then fit the pieces together, ensuring the dowels align with the holes.
- Clamp and dry: Clamp the assembly securely while the glue dries, following the glue manufacturer’s recommended drying time.
Read the most effective way of cutting wooden dowels to make a dowel joint.

Uses of Dowel Joints
Dowel joints are versatile and can be used in various woodworking applications, such as:
- Furniture assembly: Dowel joints are commonly used for joining furniture components, such as table legs, rails, and aprons.
- Cabinetry: They can be used to connect cabinet carcasses, face frames, and other cabinet components.
- Shelving: Dowel joints are useful for creating strong, hidden connections between shelves and their supports.
Benefits of Dowel Joints
Some advantages of dowel joints include:
- Strength: The use of dowels creates a strong mechanical connection that resists twisting and pulling forces.
- Ease of alignment: Dowel joints simplify the alignment process, ensuring that the connected pieces are properly positioned.
- Hidden connection: The dowels are concealed within the joint, resulting in a clean, unobtrusive appearance.
- Simplicity: Dowel joints are relatively simple to create, requiring only basic woodworking tools and skills.
Tips:
- Better to glue and clamp wood pieces that you wish to join using a Dowel joint and let it sit for about 24 hours before drilling the socket to make Dowel.
- This ensures the wood will not move separately when the Dowel is inserted through the wood pieces.

4. Miter Joint
The Miter joint is a joinery method that which two ends of wood pieces are cut at angles and fitted together to get a complex item.
Miter means the angle. Most of the Miter joints are cut at 45-degree angles.
In a Miter joint two pieces of wood, ends are cut at a 45-degrees angle and combined to make a 90-degree joinery angle.
They are commonly used in frames and trims. When installing Miter joint first wood pieces are glued and then fastened together using nails and crews to the framing material.
For freestanding objects, first, you should glue wood pieces at the seam and additional nails use to fasten them permanently together.
Therefore, if you’re thinking to apply a Miter joint for a free-standing object like a picture frame, you need to have both wood glue and fasteners to combine them.
Because wood glue and nails/screws secure the Miter joint bond.
Because of using an adhesive like wood glue, Miter joint’s strength depends mostly on them.
If wood glue has securely tightened the wood pieces, the Miter joint is strong. But if wood glue is unable to tighten the wood pieces, the Miter joint is weak.
Even though most of the Miter joints are cut at 45-degree angles, you can develop the Miter joint into an octagonal mirror frame by cutting at 22.5-degree angles.
Tools Needed for Miter Joints
Ready to tackle a miter joint? Get your hands on these essential woodworking tools:
- Miter saw or miter box: Precision is key – these tools help you make accurate angled cuts.
- Clamps: Hold the wood pieces steady during assembly with woodworking clamps.
- Wood glue: The bonding agent that keeps your joint together.
- Tape measure and pencil: Mark your measurements and cut lines with ease.
- Reinforcement (optional): Strengthen the joint with biscuits, splines, or nails, if you’d like.
How to Make a Miter Joint
Follow this process to create a miter joint masterpiece:
- Measure and mark: Precisely measure and mark the desired length on your wood pieces.
- Cut the angles: Grab your miter saw or miter box, and cut the ends at a 45-degree angle. Remember, the angles should be opposite!
- Dry-fit the joint: Do a dry run – fit the joint without glue to check alignment and ensure a tight corner.
- Glue and clamp: Apply wood glue to the angled ends, press the pieces together, and clamp securely. Keep the joint square!
- Reinforce (optional): For added strength, use biscuits, splines, or nails.
- Allow the glue to dry: Let the glue dry according to the manufacturer’s guidelines before removing clamps and moving forward with your project.

Uses Of Miter Joints
Miter joints excel in a variety of woodworking projects, including:
- Picture frames: Showcase your artwork or photographs with clean, precise corners.
- Window and door trim: Join trim seamlessly around windows and doors.
- Cabinetry and furniture: Add decorative elements, such as molding and trim, to elevate your cabinetry and furniture.
Benefits Of Miter Joints
Why choose a miter joint? Here are some benefits:
- Aesthetic appeal: Clean, attractive corners make for a visually striking project.
- Versatility for days: Miter joints work well in diverse woodworking projects.
- Adjustability: Adjust miter joints to create corners at various angles, not just 90 degrees.
- Ease of construction: With the right tools, even novice woodworkers can create miter joints with ease.
Tips:
- Use Miter saw to create Miter joints without leaving any spaces between wood pieces. Miter saw is able to cut woods at precise angles.
- Make sure to hold the wood piece firmly against Miter saw to keep it moving while cutting.

5. Lap Joint
A lap joint is a simple yet effective woodworking joint that involves overlapping two workpieces, with a portion of each piece removed to create a flat, flush connection.
The joint is typically glued, and sometimes reinforced with screws, nails, or dowels for added strength.
Tools Needed for Lap Joints
To create a lap joint, you’ll need the following woodworking tools:
- Hand saw, table saw, or circular saw: For cutting the workpieces and removing material to form the lap.
- Chisels and mallet: To clean up and refine the joint surfaces.
- Marking gauge and pencil: To accurately mark the overlapping areas on the workpieces.
- Woodworking clamps: To hold the pieces securely during cutting and assembly.
- Wood glue, screws, nails, or dowels: To bond and reinforce the joint.
How to Make a Lap Joint
To make a lap joint, follow these steps:
- Prepare the workpieces: Cut the wood pieces to the desired length and width, ensuring they are square and have clean edges.
- Mark the overlapping areas: Use a marking gauge and pencil to accurately mark the areas to be removed from each workpiece.
- Cut the laps: With a hand saw, table saw, or circular saw, carefully remove the material from each piece, creating a flat surface that will overlap with the other piece.
- Refine the joint surfaces: Use chisels and a mallet to clean up and refine the surfaces of the lap joint.
- Test fit and adjust: Dry-fit the joint, making any necessary adjustments for a precise fit.
- Assemble and secure: Apply wood glue to the joint surfaces, and then assemble the joint, using clamps to hold the pieces together while the glue dries. Optionally, add screws, nails, or dowels for extra reinforcement.

Uses of Lap Joints
Lap joints are versatile and can be used in various woodworking applications, including:
- Framing: In timber framing, lap joints can be used to connect beams and posts.
- Shelving: They are suitable for creating supports in shelving units or bookcases.
- Cabinetry: Lap joints can be employed in cabinet construction, connecting rails to stiles or vertical supports.
- Furniture: In chairs, tables, and other furniture pieces, lap joints can be used to create strong, stable connections between various components.
Benefits of Lap Joints
There are several advantages to using lap joints in woodworking projects:
- Strength: The overlapping design of the lap joint provides a strong connection that resists pulling apart and can handle significant weight.
- Simplicity: Lap joints are relatively easy to create, requiring only basic woodworking tools and techniques.
- Adaptability: The joint can be adapted to various woodworking applications, making it a useful technique to master.
The lap joint is a strong wood joint that uses for areas where two pieces of wood overLap. There’re main two types of Lap joints. They are,
- Full Lap joint
- Half Lap joint
Tips:
When you’re cutting pieces to make Lap joint, make sure to lay them clearly and mark both surfaces of wood pieces at the same time to avoid confusion.
Full Lap Joint
Full Lap joints are used in the areas where one wood piece overLaps with another and the contact area is fastened together using nails and screws.
It is mostly used in construction projects like structural frames in houses and erecting fences.
Full Lap joint reinforces other areas of the wood pieces when overLapping diagonal wood pieces with vertical wood pickets in a gate.
Half Lap Joint
A half Lap joint is stronger than a full Lap joint because it is created by overlapping two pieces of wood that are notched and fitted together at notched areas.
They fit smoothly one over another because of the notched areas. Therefore, Half Lap joints are also known as notched Lap joints.
The strength of the half Lap joint depends on the depth of notches. This varies according to the type of the project as well.

Tools Needed for Half Lap Joints
To create a half lap joint, you’ll need the following tools:
- Saw: A table saw, circular saw, or hand saw for cutting the half laps.
- Router or chisel: To remove the material for the half lap.
- Wood glue: For bonding the joint.
- Woodworking clamps: To hold the pieces securely during assembly.
- Screws or nails (optional): For added reinforcement.
How to Make a Half Lap Joint
Follow these steps to create a half lap joint:
- Mark the joint: Measure and mark the location of the half lap on each piece of wood.
- Cut the half laps: Using a table saw, circular saw, or hand saw, cut along the marked lines on each piece of wood.
- Remove the material: Use a router or chisel to remove half the thickness of the material from each piece, creating a recess for the joint.
- Test fit: Test the fit of the joint by placing the two pieces together, ensuring a snug fit.
- Apply glue: Spread wood glue evenly along the mating surfaces of the half lap joint.
- Assemble the joint: Press the two pieces together, aligning the half lap recesses.
- Clamp the joint: Use woodworking clamps to hold the joint securely while the glue dries.
- Reinforce (optional): To strengthen the joint, you can drive screws or nails through the joint after the glue has dried.
Uses of Half Lap Joints
Half lap joints are commonly used in various woodworking applications, such as:
- Frames: In the construction of picture frames, window frames, and door frames.
- Cabinetry: For connecting cabinet frames and shelves.
- Tables and chairs: For joining the rails and legs of tables and chairs.
Benefits of Half Lap Joints
Half lap joints offer several advantages:
- Strength: The increased surface area for gluing creates a stronger bond compared to a basic butt joint.
- Rigidity: Half lap joints provide more rigidity than other joints, making them ideal for applications that require stability.
- Flush surfaces: The joint surfaces are flush, providing a clean and professional appearance.
Lap joint is a simple, strong, and adaptable woodworking joint suitable for a wide range of applications.
By learning to create lap joints, you’ll enhance your woodworking skillset and expand the types of projects you can tackle.
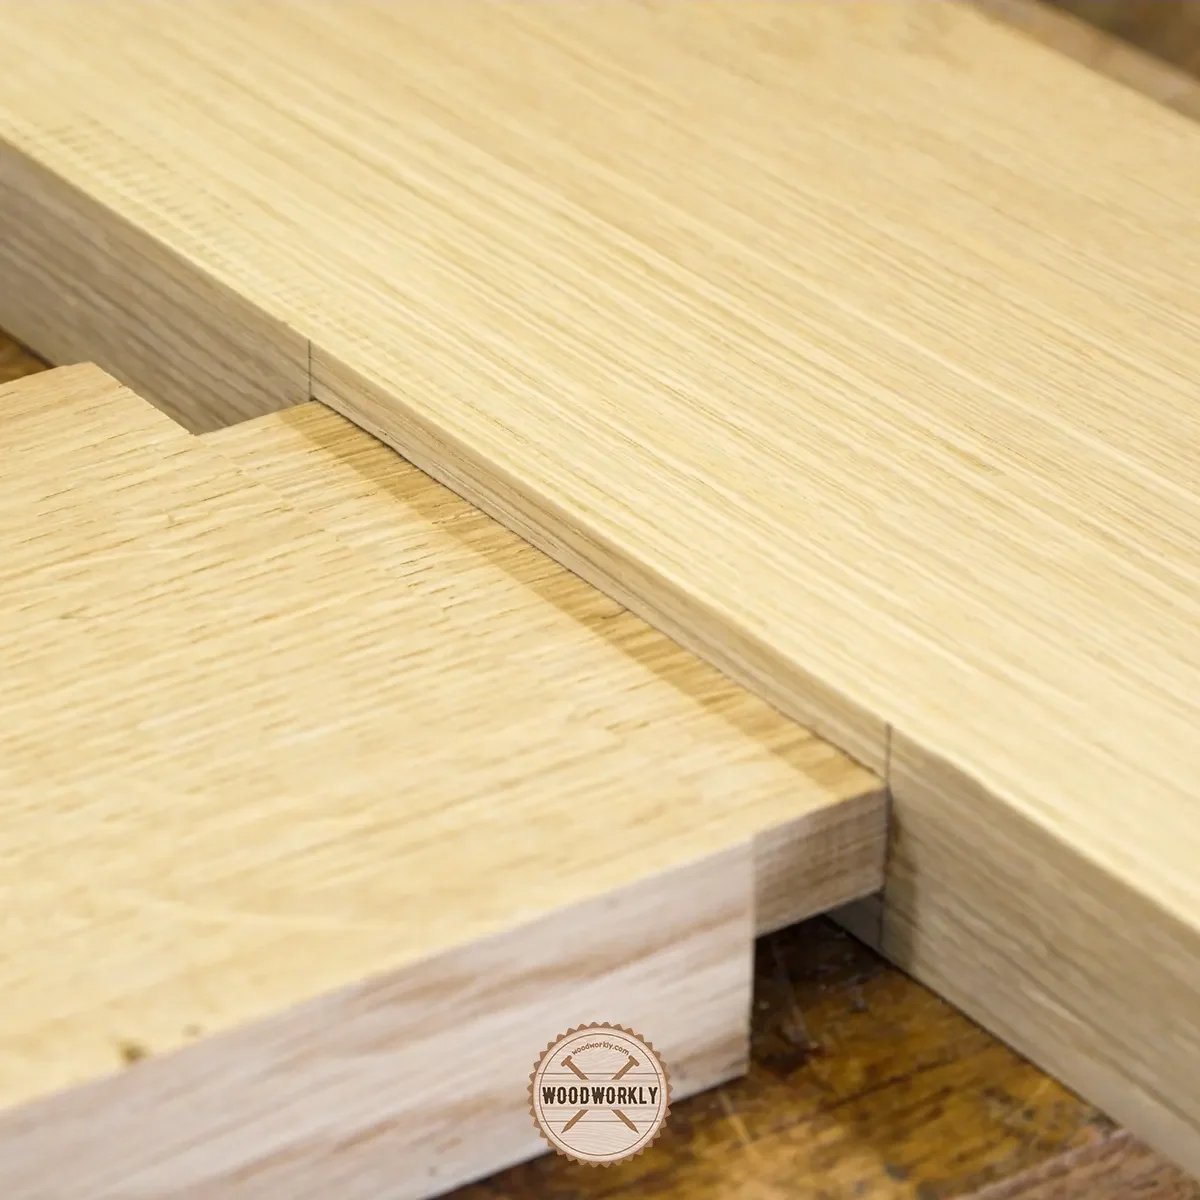
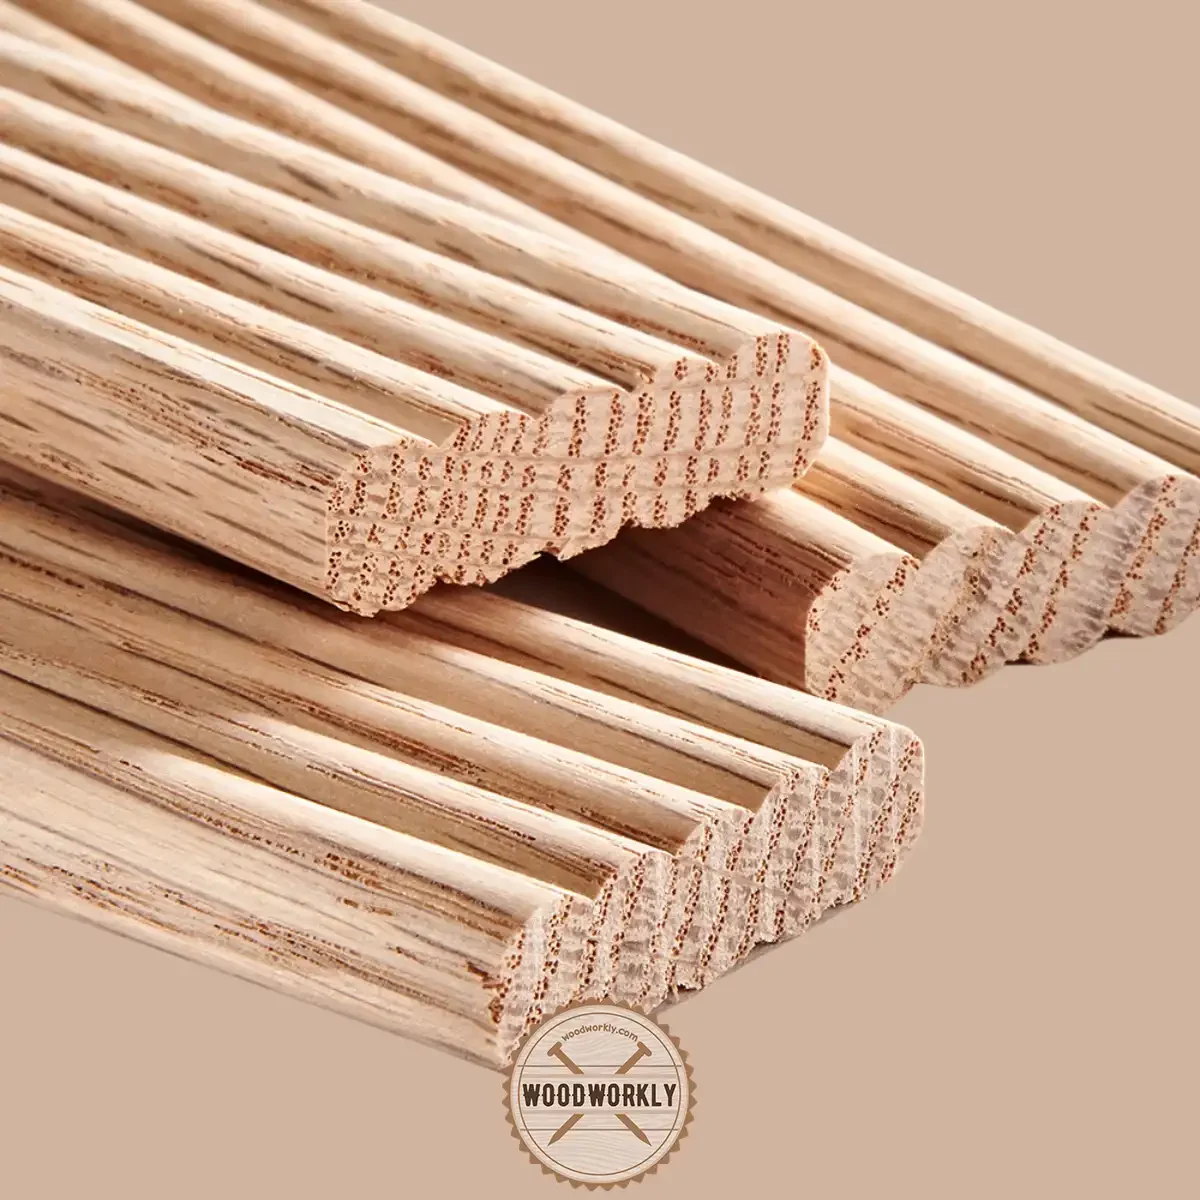
6. Tongue and Groove Joint
The tongue and Groove joint is one of the strongest wood joint that provides adjoining surface areas.
It is used when two boards of squares joining to one another along a long edge. The tongue of each wood runs along the other side.
One wood piece Butt the joint together and tighten with fasteners such as nails and screws.
Nails are the grooved side of the other board which is fitted over the tongue to conceal the nails. This is known as blind nailing because surfaces are unblemished by steel heads of nails.
The tongue and Groove joint is so useful when gluing the joint. It is used to install materials that lie flat such as hardwoods and breadboards on walls.

Tools Needed for Tongue and Groove Joints
To create a tongue and groove joint, you’ll need the following tools:
- Router or shaper: To create the tongue and groove profiles on the edges of the wood pieces.
- Router bits or shaper cutters: Specifically designed for cutting tongue and groove profiles.
- Wood glue: For bonding the joint.
- Woodworking clamps: To hold the pieces securely during assembly.
- Mallet or hammer (optional): To gently tap the joint together, if needed.
How to Make a Tongue and Groove Joint
Follow these steps to create a tongue and groove joint:
- Prepare the wood: Ensure that the edges of the wood pieces are straight and square.
- Set up the router or shaper: Install the appropriate tongue and groove router bit or shaper cutter.
- Cut the tongue: Run one edge of the wood piece along the router or shaper to form the tongue.
- Cut the groove: Adjust the router bit or shaper cutter and run the other edge of the wood piece along the tool to form the groove.
- Test fit: Test the fit of the joint by inserting the tongue into the groove. Adjust the cuts if necessary to achieve a snug fit.
- Apply glue: Spread wood glue evenly along the mating surfaces of the tongue and groove joint.
- Assemble the joint: Press the two pieces together, aligning the tongue and groove.
- Clamp the joint: Use woodworking clamps to hold the joint securely while the glue dries.

Uses of Tongue and Groove Joints
Tongue and groove joints are commonly used in various woodworking applications, such as:
- Flooring: To connect wooden floorboards, providing a strong and stable surface.
- Paneling: For joining wooden panels in walls and ceilings.
- Furniture: In the construction of tabletops, cabinet doors, and drawer bottoms.
Benefits of Tongue and Groove Joints
Tongue and groove joints offer several advantages:
- Strength: The interlocking design creates a strong bond between the wood pieces.
- Alignment: The joint helps align the wood pieces, ensuring a flat and even surface.
- Expansion and contraction: The joint allows for slight wood movement due to changes in humidity and temperature, reducing the risk of warping or cracking.
- Aesthetics: The joint provides a clean and seamless appearance.
Tongue and Groove Joint can use to make square joints by cutting a groove into the surface of the board while milling the tongue on the edge.
Nowadays, tongues and grooves come with already cut surfaces and you just have to fit them together to get a nice and smooth wood joint.
Tips:
- Install Tongue and Groove tightly without making any gaps. You can use a rubber mallet to install them perfectly.
- Hardwood floors use nails that sets boards snugly together and insert the nails smoothly at the same time.

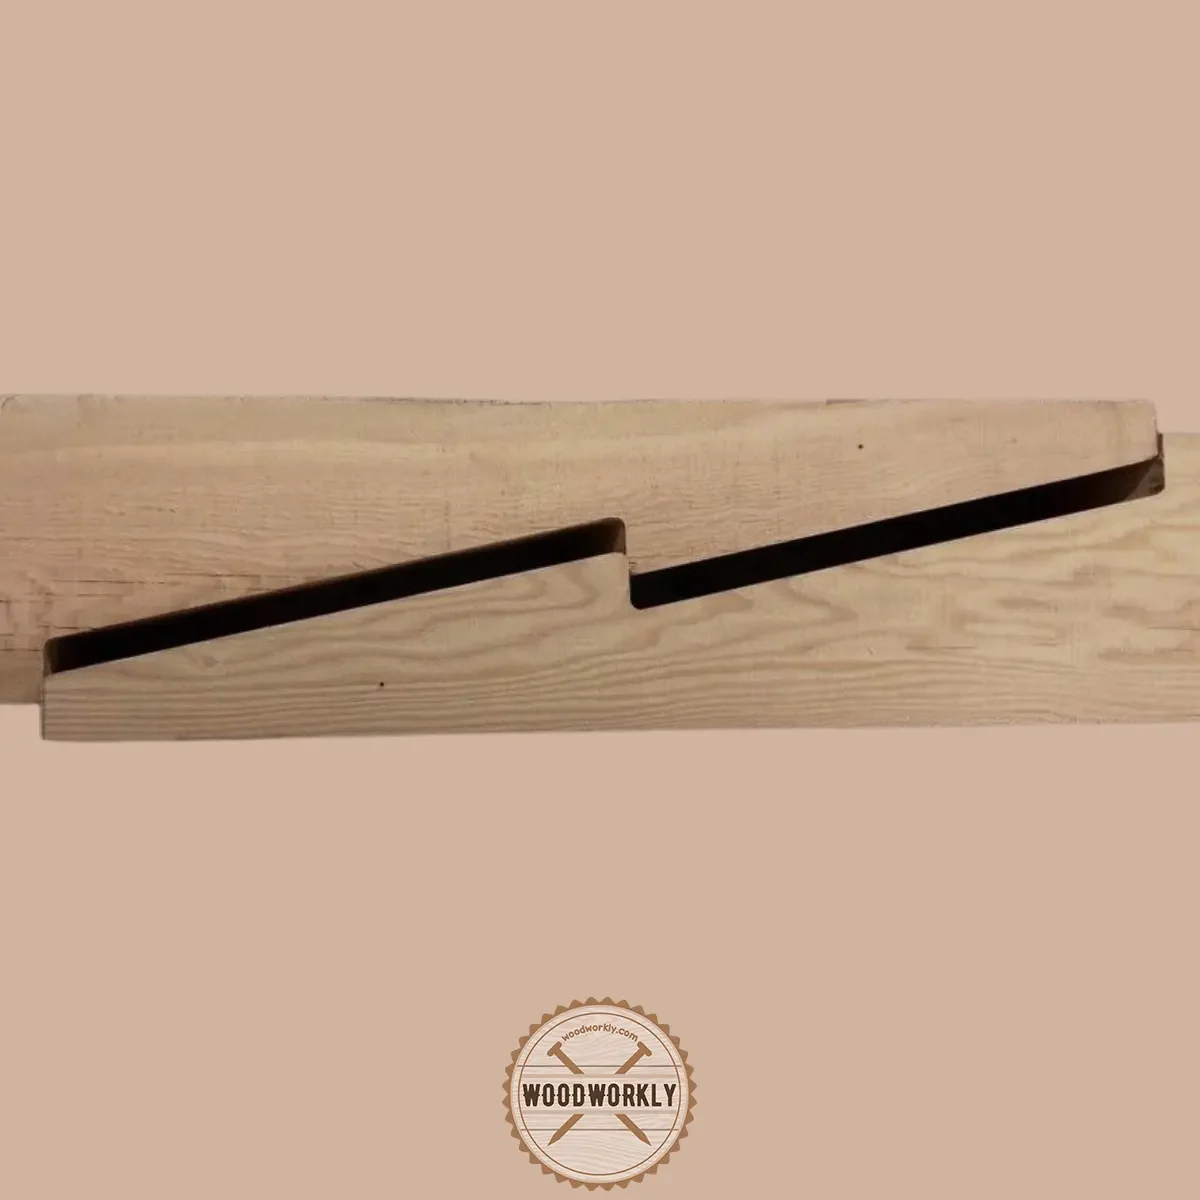
7. Rabbet Joint
Rabbet joint is mainly used for cabinetry applications. It is almost similar to the Dado joint because Rabbet is a Dado cut along the board edge.
It is created by forming a recess into the edges of the wood pieces.
In terms of its appearance, it’s similar to Tongue and Groove joint but here is the Rabbet joint we only make cuts from one side instead of two.
Rabbet joint is a strong assembling joint that uses for the back of cabinets and other assembling tasks.
You need to have a clear understanding of how to cut Rabbet to use them.
The rabbet joint is stronger than the Butt joint. It fairly uses nails or screws.
The Rabbet joint method, allows a flat piece of wood such as the back of the cabinet to flush with both sides for a smooth seamless finish.
A rabbet joint, also known as a rebate joint, is a woodworking joint where a groove or channel (called a rabbet) is cut along the edge or end of a piece of wood, allowing another piece to fit snugly into the groove.
Rabbet joints are relatively simple to create and provide more surface area for gluing compared to a basic butt joint, resulting in a stronger connection.
Tools Needed for Rabbet Joints
To create a rabbet joint, you’ll need the following tools:
- Saw: A table saw, circular saw, or router for cutting the rabbet.
- Wood chisel (optional): To clean up the rabbet if necessary.
- Wood glue: For bonding the joint.
- Woodworking clamps: To hold the pieces securely during assembly.
- Screws or nails (optional): For added reinforcement.
How to Make a Rabbet Joint
Follow these steps to create a rabbet joint:
- Cut the rabbet: Use a table saw, circular saw, or router to cut a rabbet along the edge or end of one piece of wood. The width and depth of the rabbet should match the thickness of the mating piece.
- Clean up the rabbet (optional): If necessary, use a wood chisel to clean up any rough edges or corners in the rabbet.
- Apply glue: Spread wood glue evenly along the rabbet, making sure to cover the entire surface.
- Assemble the joint: Slide the mating piece into the rabbet, ensuring a snug fit.
- Clamp the joint: Use woodworking clamps to hold the joint securely while the glue dries.
- Reinforce (optional): To strengthen the joint, you can drive screws or nails through the joint after the glue has dried.

Uses of Rabbet Joints
Rabbet joints are commonly used in various woodworking applications, such as:
- Cabinet construction: For joining cabinet sides to tops, bottoms, or backs.
- Window and door frames: In the construction of window and door frames.
- Drawer assembly: For attaching drawer sides to the front and back pieces.
Benefits of Rabbet Joints
Rabbet joints offer several advantages:
- Increased gluing surface: The rabbet provides more surface area for gluing, resulting in a stronger bond.
- Simple to create: Rabbet joints are relatively easy to make with common woodworking tools.
- Versatility: Rabbet joints can be used in various woodworking applications and can be combined with other joint types for added strength.
Tips:
- Use glue to make a tight and strong Rabbet joint.
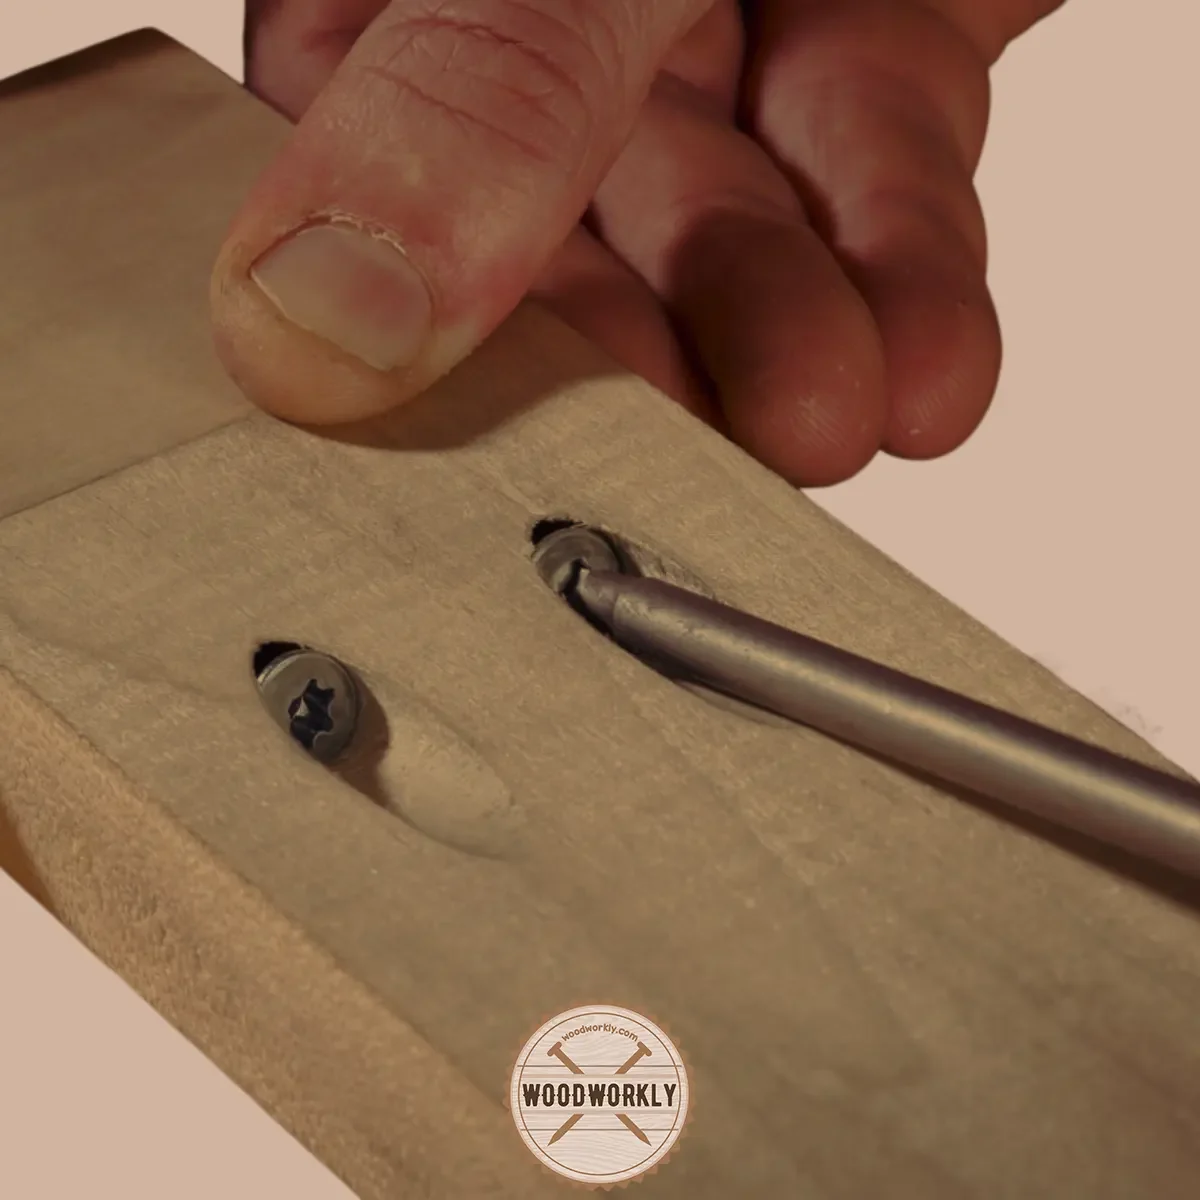
8. Pocket Hole Joint
The pocket hole joint is one of the strongest wood joints consisting of a Butt joint with pocket hole screws. Pocket hole joint requires two drilling operations. They are,
- Counterbore the pocket itself. This takes wood pieces with a screw head.
- Drill a pilot hole with a centerline same as the pocket hole
The pilot hole is important to drill through one piece of wood into an adjoining wood piece.
Two different sizes of drill bits are required, or you can use a drill bit that is specially made to perform this function with a single task.
Pocket hole jig is the machine that we use for the drilling operations. Pocket hole jig (Kreg jig) makes pocket holes precisely to the correct depth and correct angle.
Usually, holes are drilled at a 15-degree angle. wood glue is used to strengthen the pocket hole joint.
Mortise and Tenon joint is much stronger than pocket hole joint.
Tools Needed for Pocket Hole Joints
To create a pocket hole joint, you’ll need the following tools:
- Pocket hole jig: A specialized tool that guides the drill bit at the correct angle for creating pocket holes.
- Drill and driver: For drilling pocket holes and driving pocket hole screws.
- Pocket hole drill bit: A special stepped drill bit for creating pocket holes.
- Pocket hole screws: Specially designed screws with a flat head and self-tapping threads to create a strong joint.
- Clamps: To hold the pieces securely during assembly.
- Wood glue (optional): For added strength and durability.
How to Make a Pocket Hole Joint
Follow these steps to create a pocket hole joint:
- Prepare the wood: Ensure that the edges of the wood pieces are straight and square.
- Set up the pocket hole jig: Adjust the jig for the thickness of the wood being used.
- Drill the pocket holes: Using the pocket hole jig, drill the angled holes in the first piece of wood.
- Apply glue (optional): Spread wood glue on the mating surfaces of the joint for added strength.
- Align the pieces: Position the two pieces of wood together, aligning the edges and ends.
- Clamp the joint: Use clamps to hold the pieces securely in place during assembly.
- Drive the screws: Insert pocket hole screws into the holes and drive them using a drill or driver, connecting the two pieces of wood.

Uses of Pocket Hole Joints
Pocket hole joints are widely used in various woodworking applications, such as:
- Cabinetry: For building sturdy cabinets and attaching face frames to cabinet carcasses.
- Furniture: In the construction of tables, chairs, and bookshelves.
- DIY projects: For quickly and easily joining wood pieces in home improvement and woodworking projects.
Benefits of Pocket Hole Joints
Pocket hole joints offer several advantages:
- Speed and ease: Pocket hole joints are quick to create and require minimal clamping.
- Hidden fasteners: The screws are concealed within the joint, providing a clean appearance.
- Adjustability: The joint can be easily disassembled and reassembled if needed.
- Versatility: Pocket hole joinery is suitable for a wide range of woodworking projects and materials.
Tip:
- Because Kreg Jig costs a lot of money. Better to use Mortise and Tenon joint instead of pocket hole joint for less money while gaining a stronger joint.

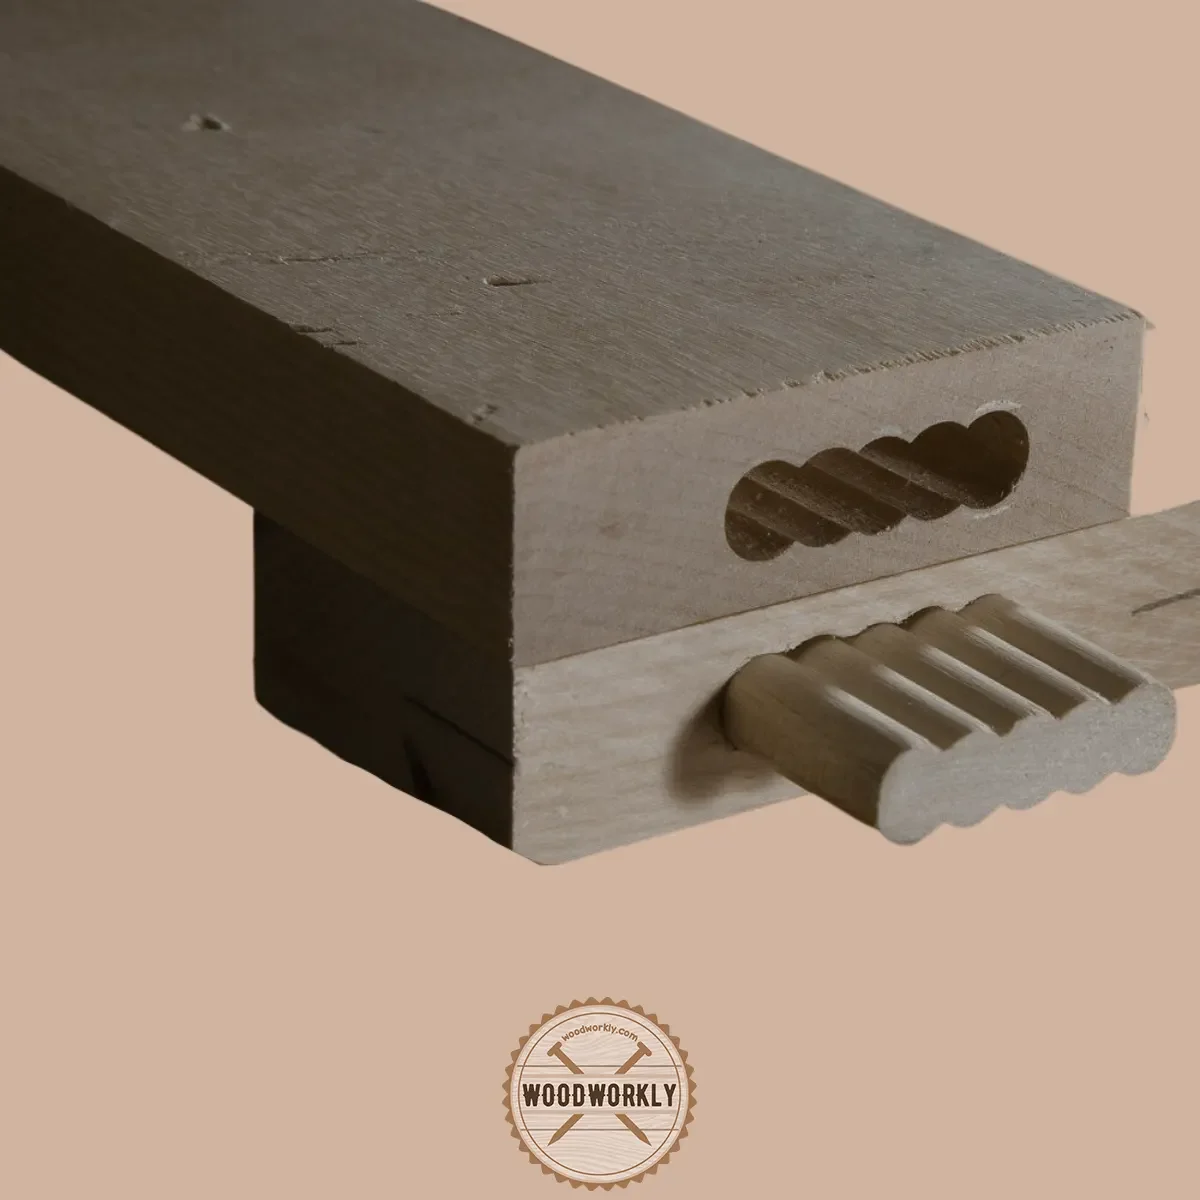
9. Finger Joint (Box Joint)
The finger joint also known as the box joint is the best alternative wood joint for the Dovetail joint. It works at the edges of wood pieces to combine them together at a right seamless perpendicular 90-degree angle.
Wood pieces combine through symmetrical rectangular slots that fit with each other perfectly. You only have to apply wood glue to make the box joint tighten to get a solid corner.
Box joint is easy to create, not unlike the Dovetail joint while providing great strength. It works well with plywood as well.
But the Dovetail joint is stronger than the Finger joint (box joint).

Tools Needed for Finger or Box Joints
Creating finger joints requires a variety of woodworking tools, such as:
- Table saw or router: A table saw with a dado blade or a router with a straight bit to cut the interlocking fingers.
- Box joint jig: A specialized jig to ensure accurate and consistent spacing of the fingers.
- Clamps: Woodworking clamps to hold the workpieces securely during cutting and gluing.
- Square and measuring tools: A combination square, ruler, or tape measure for marking and measuring the joint dimensions.
- Chisels and sandpaper: For fine-tuning and smoothing the fingers as needed.
How to Make a Finger or Box Joint
Follow these steps to create a finger joint:
- Prepare the workpieces: Cut the wood pieces to the desired length and width, ensuring they are square and have clean edges.
- Set up the jig: Adjust the box joint jig to match the desired finger width and spacing for your project.
- Mark the joint: Measure and mark the finger positions on the edges of the workpieces.
- Cut the fingers: Use a table saw with a dado blade or a router with a straight bit to cut the interlocking fingers, following the jig’s guide.
- Test fit and adjust: Dry-fit the joint and make any necessary adjustments to the fingers for a snug fit.
- Assemble and glue: Apply wood glue to the finger surfaces and clamp the joint together, ensuring it remains square during drying.

Uses of Finger or Box Joints
Finger joints are versatile and can be found in a variety of woodworking applications, including:
- Box and case construction: Finger joints are commonly used in the corners of wooden boxes, drawers, and cabinets.
- Framing and structural elements: These joints can be used in lightweight frames or other structural applications where strength and rigidity are required.
- Decorative elements: Finger joints can add a visually appealing detail to projects, showcasing the woodworker’s skill and precision.
Benefits of Finger or Box Joints
Finger joints offer several advantages for woodworkers and their projects:
- Strength: The interlocking fingers create a strong, secure connection that resists pulling apart and provides increased gluing surface.
- Efficiency: With the proper jig setup, finger joints can be cut quickly and consistently, making them an efficient joinery option.
- Versatility: Finger joints can be used in a wide range of woodworking projects, from simple boxes to more complex constructions.
- Aesthetics: When well-executed, finger joints add a pleasing visual element that showcases the woodworker’s skill.
By understanding finger or box joints and their applications, you can incorporate this strong and versatile joinery technique into your woodworking projects.
The result will be well-crafted pieces with both structural integrity and visual appeal.
Tips:
- Sometimes Finger joint (box joint) is better than the Dovetail joint because of having 90-degree or 180-degree angles rather than Dovetail’s wedge angle.
- However, the box joint is also known as one of the strongest wood joints in woodworking.
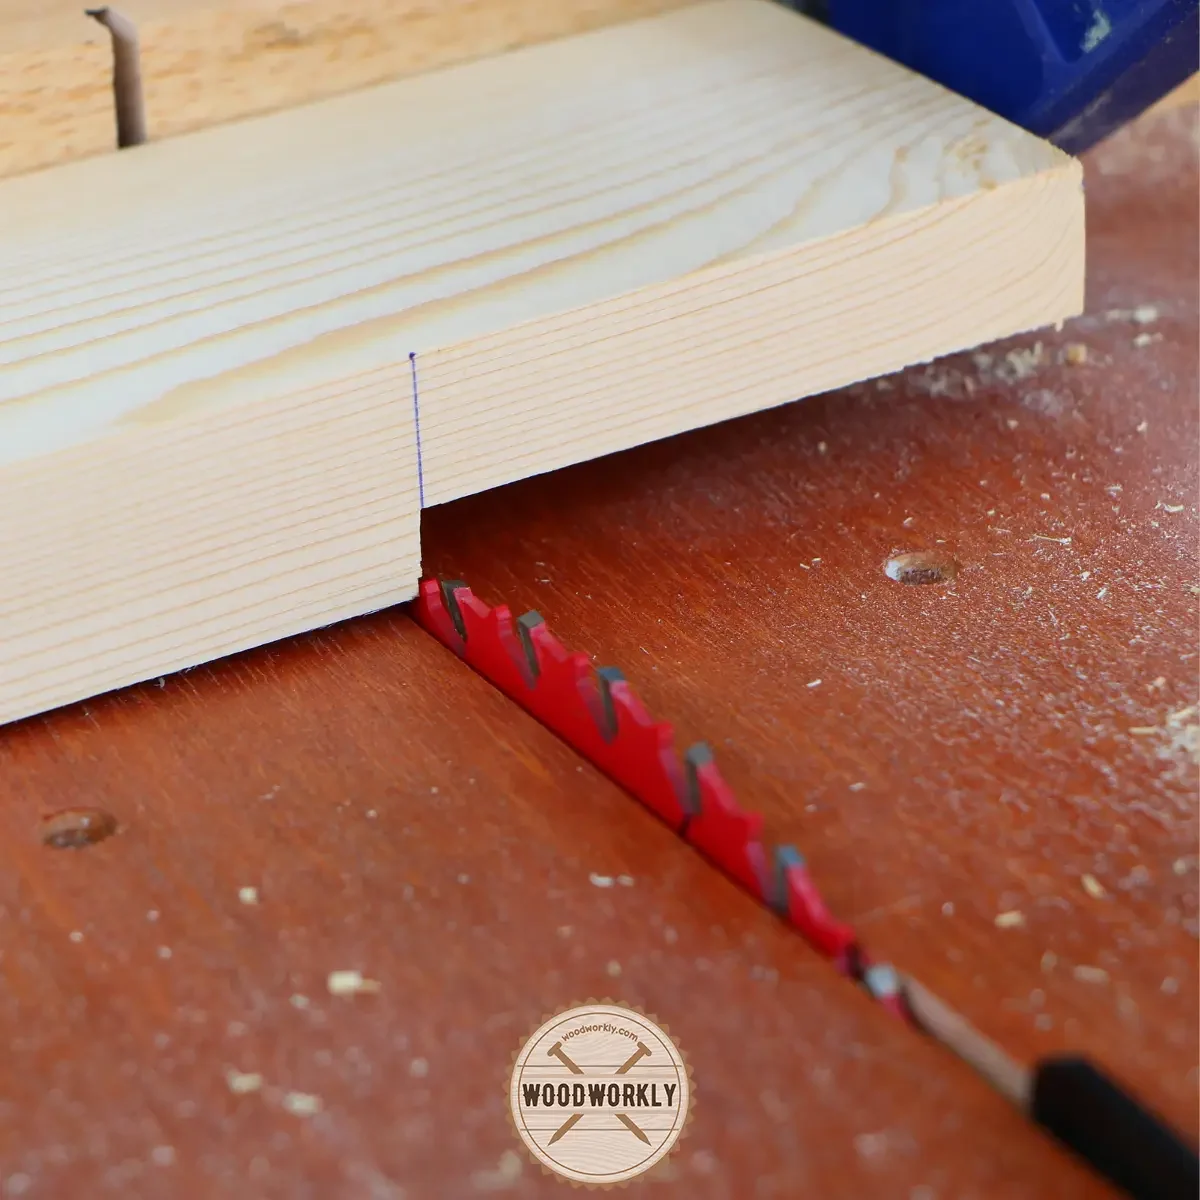
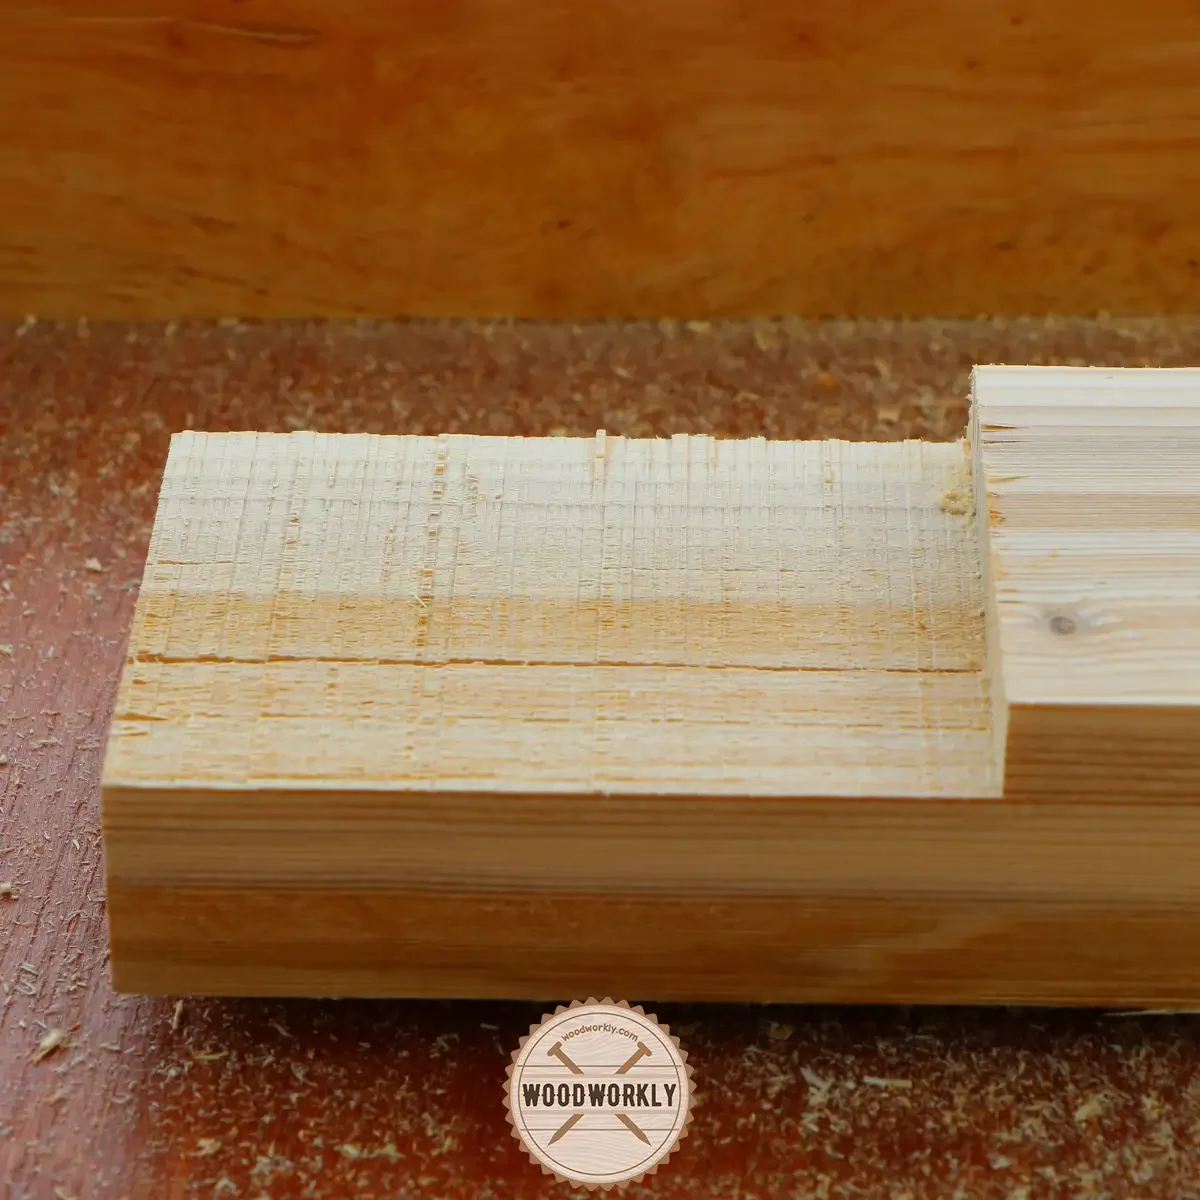
10. Dado Joint
Dado joint means a square grooved slot on one board combined with another board.
Dado joint is similar to the Tongue and Groove joint, but Dado joins cut across the wood grain, not like grooves that cut along the direction of the wood grain.
It is mainly used to join plywood.
In Dado joint groove is cut wider in order to accept the thickness of the joining wood piece.
Tools Needed for Dado Joints
To create a dado joint, you’ll need the following tools:
- Table saw or router: For cutting the dado groove in the wood.
- Dado blade or straight bit: A special blade or bit for cutting the dado groove.
- Measuring tools: A tape measure, square, and marking tool for accurate layout and cutting.
- Clamps: To hold the pieces securely during assembly.
- Wood glue: For added strength and durability.
So, let’s have a look at the way of making dado joint without messing things up.
How to Make a Dado Joint
Follow these steps to create a dado joint:
- Measure and mark: Measure the width and depth of the dado groove on the piece of wood that will receive the dado, using a square and marking tool for accuracy.
- Set up the cutting tool: Install the dado blade on a table saw or a straight bit on a router, and adjust the cutting depth to match the depth of the dado groove.
- Cut the dado groove: Run the wood through the table saw or router, making multiple passes if necessary, until the desired width and depth of the dado groove are achieved.
- Test fit: Check the fit of the mating piece of wood in the dado groove, making any necessary adjustments to the width of the groove for a snug fit.
- Apply glue: Spread wood glue on the surfaces of the dado groove and the mating piece of wood.
- Assemble the joint: Slide the mating piece of wood into the dado groove, ensuring a tight fit.
- Clamp and dry: Clamp the joint securely and allow the glue to dry according to the manufacturer’s instructions.
If you need to know more about making grooves in wood, Read my latest post about, how to cut a groove in wood with a table saw!
Uses of Dado Joints
Dado joints are used for many different kinds of woodworking applications. Such as,
- Shelving: For securely attaching shelves to vertical supports in bookcases and cabinets.
- Cabinetry: In the construction of cabinet carcasses and dividers.
- Furniture: As a method of joining components in tables, desks, and other furniture pieces.
In order to get a better understanding, let’s have a look at the pros of dado joints.
Benefits of Dado Joints
Dado joints offer several advantages:
- Strength: The interlocking design of dado joints provides a strong and stable connection between wood pieces.
- Simplicity: Dado joints are relatively easy to create, requiring only basic woodworking tools and skills.
- Versatility: Dado joints can be used with a variety of materials, including plywood, MDF, and solid wood.
- Aesthetics: Dado joints create a clean, professional appearance, especially when used in cabinetry and furniture making.
Tip:
- You can Rabbet the shelves and other woodworks to fit the Dado. This kind of joint is called Rabbet and Dado joint, which is a combination of wood joints.

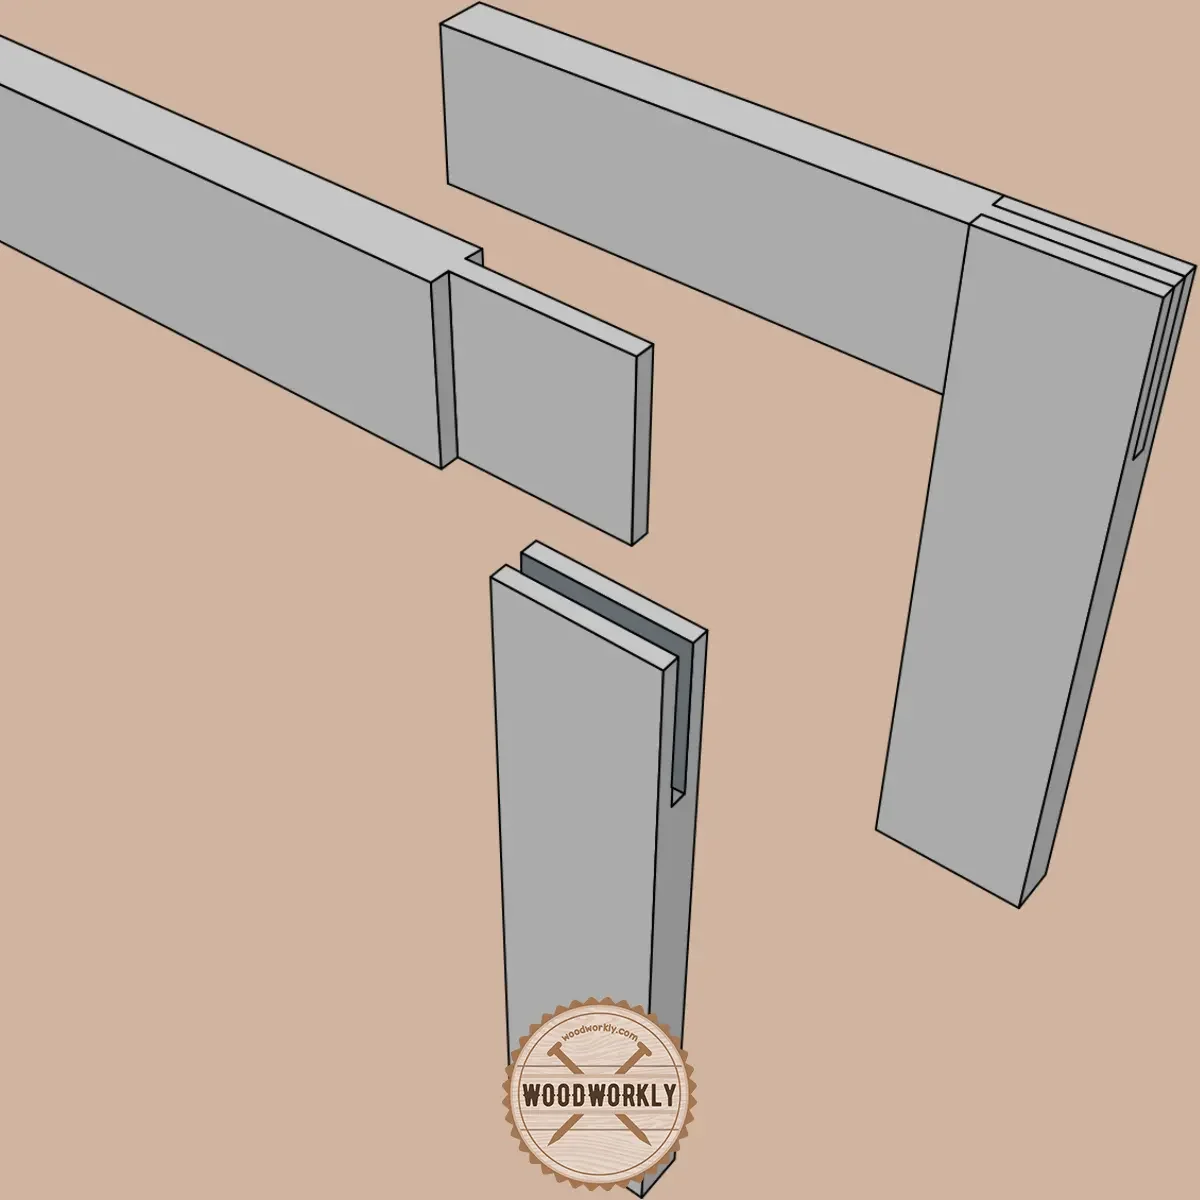
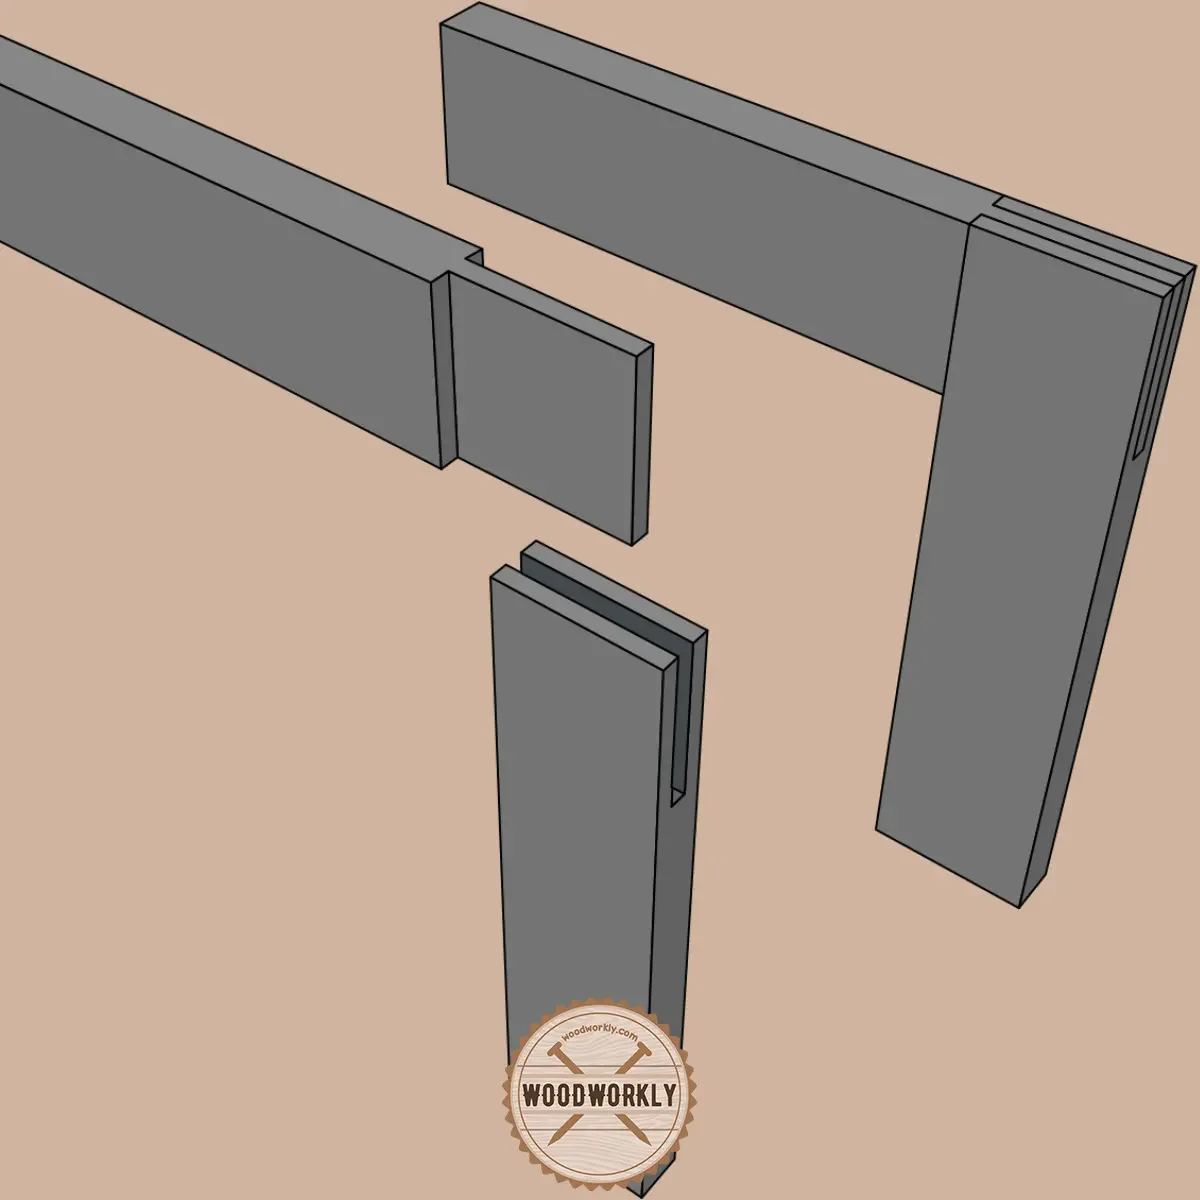
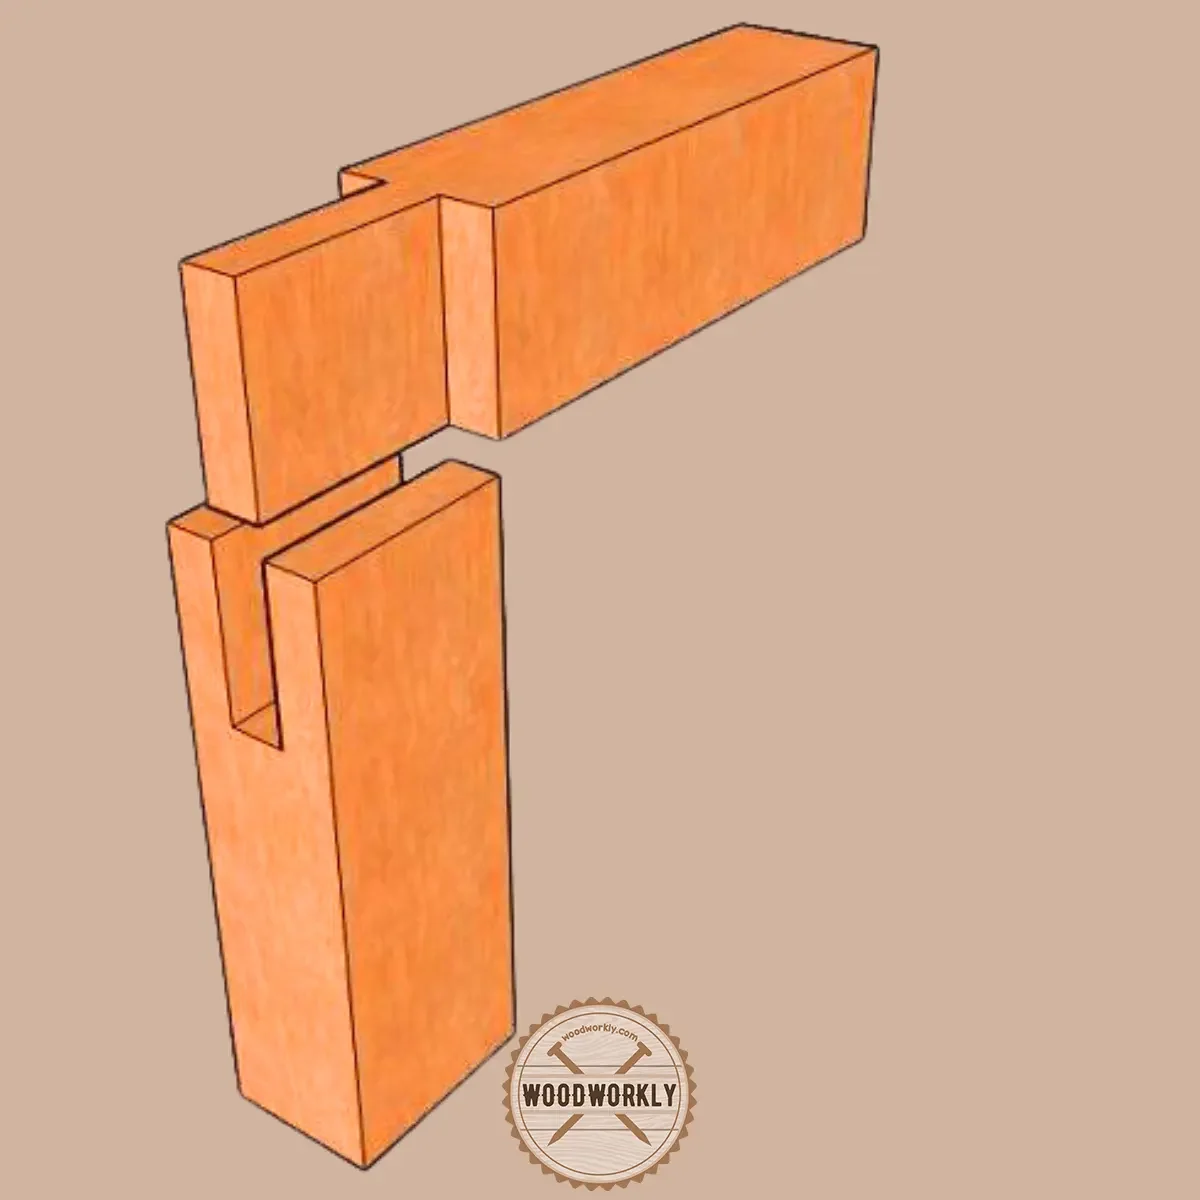
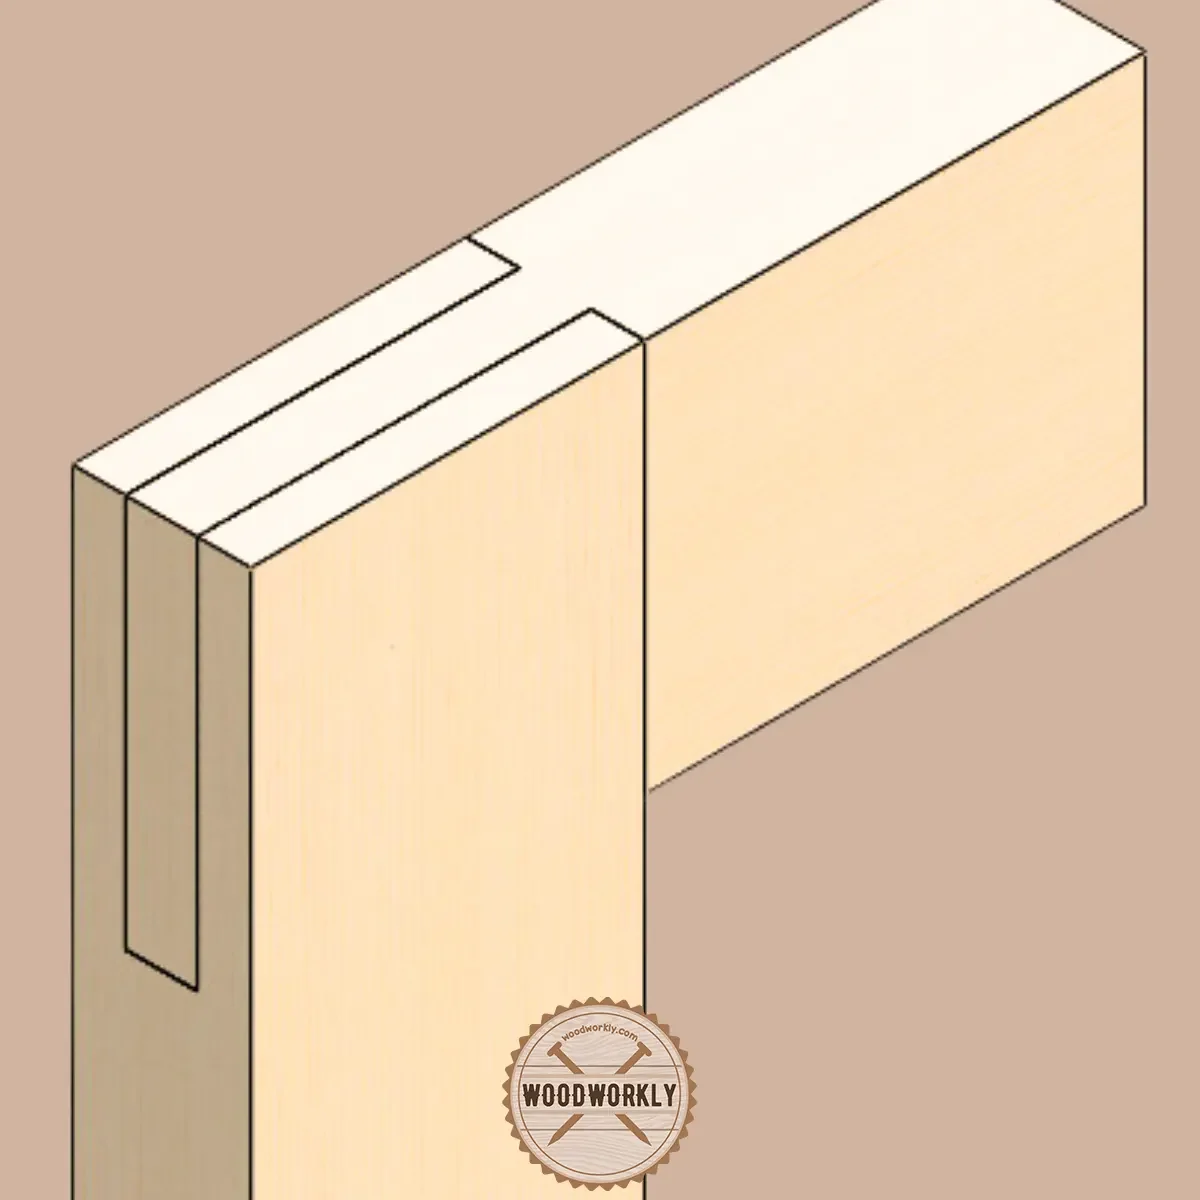
11. Bridle Joint
The bridle joint is a strong joint that is known as an alternative wood joint to Mortise and Tenon joint.
In Bridle joints, instead of cutting wood pieces, woodworkers create a lengthy wood piece that fits the grooved piece seamlessly.
Bridle joints create the correct angle to make the joint from three surfaces and they’ll hold wood glue and other adhesives well to build a strong wood joint.
In corners, the Bridle joint holds two surfaces by forming a corner.
The bridle joint provides good compressive strength and is resistant to racking. Better to apply mechanical faster (nails or screws) to strengthen up the joint.
Most importantly, Without destroying the integrity of the joint, you can remove material from Bridle joint wood pieces.
As you can see Bridle joint is a versatile wood joint with lots of excellent woodworking qualities. Therefore, it is popular among woodworkers.
Tools Needed for Bridle Joints
To make a bridle joint, you’ll need the following woodworking tools:
- Hand saw or table saw: For cutting the tenon and open mortise.
- Chisels: To clean up and refine the joint surfaces.
- Marking gauge and marking knife: To accurately mark the tenon and mortise dimensions on the workpieces.
- Woodworking clamps: To hold the pieces securely during cutting and assembly.
- Wood glue: To bond the joint together.
How to Make a Bridle Joint
Creating a bridle joint involves these steps:
- Prepare the workpieces: Cut the wood pieces to the desired length and width, ensuring they are square and have clean edges.
- Mark the tenon and mortise: Use a marking gauge and marking knife to accurately mark the tenon on one piece and the open mortise on the other.
- Cut the tenon: With a hand saw or table saw, carefully cut the tenon along the marked lines.
- Cut the open mortise: Cut the open mortise on the other workpiece, ensuring the dimensions match the tenon for a snug fit.
- Refine the joint surfaces: Use chisels to clean up and refine the surfaces of the tenon and mortise.
- Test fit and adjust: Dry-fit the joint, making any necessary adjustments for a precise fit.
- Assemble and glue: Apply wood glue to the joint surfaces, and then assemble the joint, using clamps to hold the pieces together while the glue dries.

Uses of Bridle Joints
Bridle joints are versatile and can be used in various woodworking applications, including:
- Framing: In timber framing and roof trusses, bridle joints provide a strong connection between beams and posts.
- Furniture: They can be used in chair and table construction, connecting legs to aprons or rails.
- Cabinetry: Bridle joints can be employed in the construction of cabinets and other storage units to connect rails to stiles or vertical supports.
Benefits of Bridle Joints
There are several advantages to using bridle joints in woodworking projects:
- Strength: The interlocking design of the bridle joint provides a strong connection that resists twisting and racking forces.
- Simplicity: Bridle joints are relatively simple to create, requiring only a few basic woodworking tools.
- Versatility: The joint can be used in a wide range of woodworking applications, making it a useful technique to master.
Tips:
- There’re some variations of Bridle joint known as, T-Bridle, Mitered Bridle, and double Bridle joints which use for stretcher bars

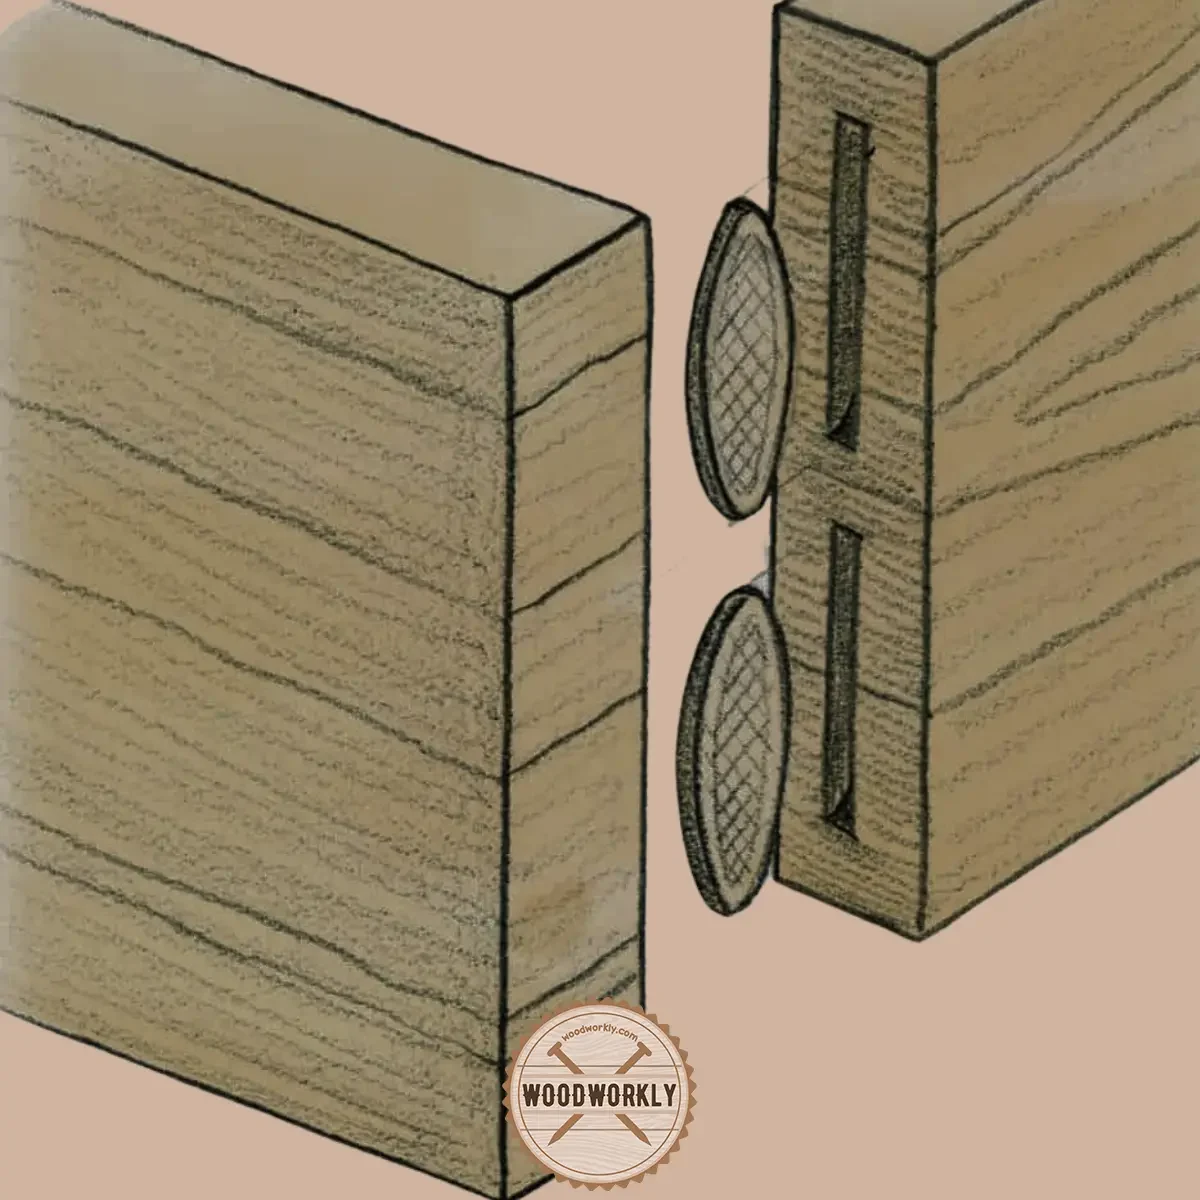
12. Biscuit Joint
The biscuit joint is a strong nontraditional woodworking joint.
In the Biscuit joint, a wooden oval-shaped piece is glued into two crescent-shaped wood holes.
It is useful for joining boards along the edges similar to the Tongue and Groove joint.
The biscuit joint is a modern wood joint that is also known as the robust version of the Butt joint. Both ends of wood pieces are cut to make a small wafer which acts as the connection between them.
After the addition of wood glue, it starts to swell until the gaps get filled.

Tools Needed for Biscuit Joints
To create a biscuit joint, you’ll need the following tools:
- Biscuit joiner (plate joiner): A specialized power tool designed to cut the crescent-shaped slots for the biscuits.
- Biscuits: Pre-made, compressed wooden wafers available in various sizes.
- Wood glue: For added strength and durability.
- Clamps: To hold the joint together while the glue dries.
- Measuring and marking tools: A tape measure, square, and marking tool for accurate layout.
How to Make a Biscuit Joint
Follow these steps to create a biscuit joint:
- Measure and mark: Determine the location of the biscuit joint on both pieces of wood and mark their positions using a square and marking tool.
- Set up the biscuit joiner: Adjust the fence height and depth on the biscuit joiner to match the size of the biscuit being used.
- Cut the slots: Align the biscuit joiner with the marks on each piece of wood and make the cuts to create the crescent-shaped slots.
- Test fit: Insert the biscuit into the slots on both pieces of wood to ensure a snug fit.
- Apply glue: Spread wood glue on the biscuit and inside the slots.
- Assemble the joint: Insert the biscuit into one slot and join the two pieces of wood together, making sure the biscuit fits securely in both slots.
- Clamp and dry: Clamp the joint securely and allow the glue to dry according to the manufacturer’s instructions.
Uses of Biscuit Joints
Biscuit joints are commonly used in various woodworking applications, such as:
- Furniture: For joining boards together to create tabletops, panels, or large surface areas.
- Cabinetry: In the construction of cabinet carcasses, face frames, and doors.
- Edge-to-edge joining: For connecting two pieces of wood along their edges to create a wider panel or surface.
Benefits of Biscuit Joints
Biscuit joints offer several advantages:
- Strength: The biscuit adds reinforcement to the joint, increasing its overall strength and stability.
- Alignment: Biscuit joints help to align the two pieces of wood, ensuring a flush and even surface.
- Aesthetics: Since the biscuit is hidden within the joint, it creates a clean, professional appearance.
- Ease of use: Biscuit joints are relatively simple to create, requiring only a biscuit joiner and basic woodworking skills.
In the Dowel joint, we drill holes to put wooden pins instead of using Biscuit slots like Biscuit joints.
So, the Dowel joint is a modification of the Biscuit joint.
Tips:
- Biscuit joint is made of compressed dried wood, such as beech.
- Make sure to locate the mortise correct distance from the wood joint in both wood pieces.
- Biscuit is thin and it’s so hard to place it in correct alignment.

13. Japanese Wood Joint (Kumiki)
Delving into the realm of traditional Japanese woodworking, one encounters the mesmerizing “Kumiki” joint, an artful and time-honored technique of connecting wooden pieces without any need for nails, screws, or glue.
As if by magic, the meticulously crafted and intricate Kumiki joints reveal the exceptional talent and expertise of the woodworker.
Simultaneously offering both visual allure and structural resilience, these joints captivate and inspire with their remarkable fusion of beauty and strength.

Tools Needed for Japanese Wood Joints (Kumiki)
To create Kumiki joints, you’ll need the following tools:
- Japanese saws (Nokogiri): Different types of saws, such as Dozuki, Ryoba, or Kataba, are used to make precise cuts.
- Chisels (Nomi): Various sizes of chisels are essential for carving and shaping the intricate joints.
- Marking tools: A scribe, marking knife, or pencil to create accurate layout lines.
- Measuring tools: A measuring tape, ruler, or square for precise measurements.
- Mallet: A wooden mallet to tap the joints together.
- Sharpening stones: To maintain the sharpness of chisels and other cutting tools.
How to Make a Japanese Wood Joint (Kumiki)
The process of creating a Kumiki joint depends on the specific type of joint you’re making. However, the general steps include:
- Select the joint type: Choose the appropriate Kumiki joint design for your project, such as a dovetail, mortise and tenon, or interlocking joint.
- Measure and mark: Measure and mark the precise locations of the joint components on each piece of wood, ensuring that they will fit together seamlessly.
- Cut and shape: Use Japanese saws and chisels to carefully cut and shape the components of the joint. This process requires patience, skill, and attention to detail.
- Test fit: Assemble the joint components to ensure a snug and accurate fit. Make any necessary adjustments to the joint components.
- Final assembly: Carefully tap the joint together using a wooden mallet, ensuring a tight fit. In some cases, wooden wedges or pins may be used to secure the joint further.

Uses of Japanese Wood Joints (Kumiki)
Kumiki joints are used in various woodworking applications, such as:
- Architecture: In traditional Japanese buildings, such as temples, shrines, and houses.
- Furniture: For creating strong and durable joints in tables, chairs, and cabinets.
- Art and decoration: In decorative wooden items, such as sculptures, puzzles, or ornaments.
Benefits of Japanese Wood Joints (Kumiki)
Kumiki joints offer several advantages:
- Strength and durability: Kumiki joints provide a strong and lasting connection between pieces of wood, often surpassing the strength of conventional joints.
- Aesthetics: The intricate design and craftsmanship of Kumiki joints are visually appealing and showcase the woodworker’s skill.
- Environmentally friendly: Since Kumiki joints do not require nails, screws, or glue, they are more eco-friendly and can be easily disassembled and reassembled.

14. T-Bridle Joint
A T-bridle joint is a fascinating woodworking connection, designed to merge two wooden pieces at a right angle, reminiscent of the letter “T.”
Comparable to a mortise and tenon joint, the T-bridle joint showcases an open tenon and mortise on one side.
Renowned for its robustness, this joint is ideal for scenarios requiring sturdy corner connections.

Tools Needed for T-Bridle Joint
To skillfully create a T-bridle joint, these indispensable tools are necessary:
- Saw: Whether it’s a handsaw or table saw, cutting the wooden pieces accurately is crucial.
- Chisels: A diverse set of chisels is required for sculpting the tenon and mortise.
- Mallet: A wooden mallet ensures the joint is tapped together with precision.
- Measuring devices: A measuring tape, ruler, or square guarantees exact measurements.
- Marking instruments: Employ a scribe, marking knife, or pencil to draw precise layout lines.
- Clamps: These hold the components in position during assembly.
How to Make a T-Bridle Joint
Follow this step-by-step guide to form the perfect T-bridle joint:
- Measure and mark: Carefully measure the width and thickness of the two wooden pieces set to be joined. Mark the tenon and mortise locations on each piece, ensuring they align flawlessly.
- Cut the tenon: Using a saw, fashion the tenon on one wooden piece, matching the mortise’s width. Chisel away excess material to produce a smooth, flat surface.
- Cut the mortise: On the second wooden piece, carve the mortise with a saw and chisels. Confirm that the mortise’s width is suitable for the tenon.
- Test the fit: Conduct a dry-fit of the joint, ensuring a snug and precise connection. Make any necessary adjustments to the tenon or mortise.
- Assemble the joint: Apply glue to the tenon and mortise, and gently tap the joint together with a wooden mallet. Clamp the joint securely and let the glue dry.

Uses of T-Bridle Joint
T-bridle joints are frequently uses in:
- Cabinetry: Crafting robust connections between cabinet components.
- Framing: Building doors, windows, and other structures requiring strong corner joints.
- Furniture: Connecting table legs to tabletops or chair legs to seats.
The Advantages of T-Bridle Joints
The T-bridle joint offers numerous benefits:
- Strength: The joint delivers a powerful and enduring connection between wooden pieces, making it ideal for load-bearing applications.
- Stability: The interlocking tenon and mortise design resists twisting and warping.
- Aesthetics: T-bridle joints showcase a polished and professional look, contributing to the visual appeal of the final product.

15. Corner Bridle Joint
A corner bridle joint is a fascinating variation of the bridle joint family, specifically designed to join two wooden pieces at a right angle, forming a corner connection.
In this joint, one piece features an open-ended mortise while the other piece has a corresponding tenon.
Known for its strength, durability, and ease of assembly, the corner bridle joint is an excellent choice for various woodworking applications.
Tools Needed for Crafting a Corner Bridle Joint
Creating a corner bridle joint requires the following tools:
- Saw: A handsaw, table saw, or bandsaw is necessary for cutting the tenon and mortise accurately.
- Chisels: A variety of chisels is crucial for shaping the tenon and mortise.
- Mallet: A wooden mallet is perfect for tapping the joint together gently.
- Measuring devices: A measuring tape, ruler, or square ensures precise measurements.
- Marking instruments: Use a scribe, marking knife, or pencil to draw accurate layout lines.
- Clamps: These hold the components in place during assembly.
How to Make a Corner Bridle Joint
Follow these step-by-step instructions to construct a corner bridle joint:
- Measure and mark: Accurately measure the width and thickness of the two wooden pieces to be joined. Mark the tenon and mortise locations on each piece, ensuring proper alignment.
- Carve the tenon: Using a saw, create the tenon on one wooden piece, matching the mortise’s width. Use chisels to remove excess material and produce a smooth, flat surface.
- Fashion the mortise: On the second wooden piece, carve the open-ended mortise using a saw and chisels. Ensure the mortise’s width is appropriate for the tenon.
- Test the fit: Perform a dry-fit of the joint, confirming a snug and precise connection. Make any necessary adjustments to the tenon or mortise.
- Assemble with precision: Apply glue to the tenon and mortise, and gently tap the joint together using a wooden mallet. Clamp the joint securely and allow the glue to dry.
Uses of Corner Bridle Joints
Corner bridle joints are widely used in:
- Cabinetry: Constructing sturdy corner connections between cabinet components.
- Framing: Building doors, windows, and other structures requiring strong corner joints.
- Furniture: Joining the corners of frames for tables, chairs, and other furniture items.
The Advantages of Corner Bridle Joints
The corner bridle joint boasts numerous benefits:
- Strength: The joint provides a strong and long-lasting connection between wooden pieces, making it ideal for applications requiring resilience.
- Stability: The interlocking tenon and mortise design resists twisting and warping, ensuring the joint remains stable.
- Aesthetics: Corner bridle joints offer a polished and professional appearance, contributing to the visual appeal of the final product.
16. Beadlock Joint
The Beadlock joint, a versatile and robust wood joining technique, utilizes a floating tenon system that offers a secure and long-lasting connection between two wooden pieces.
This unique joint is perfect for both beginners and experienced woodworkers due to its simplicity, ease of use, and strong bond.
This article delves into the specifics of Beadlock joints, discussing their construction, uses, benefits, and the tools needed to create them.

Tools Required for Crafting a Beadlock Joint
To make a Beadlock joint, you’ll need the following tools:
- Beadlock jig: This specialized jig aids in aligning and drilling the mortises with precision.
- Drill: A power drill or drill press is necessary to bore the mortises.
- Beadlock tenon stock: This unique, bead-shaped stock serves as the floating tenon.
- Clamps: Clamps hold the workpieces securely during the assembly process.
- Glue: Wood glue bonds the tenon stock to the mortises, creating a strong joint.
Step-by-Step Process to Make a Beadlock Joint
Follow these instructions to create a Beadlock joint:
- Measure and mark: Determine the locations of the mortises on both wooden pieces and mark them accordingly.
- Set up the jig: Attach the Beadlock jig to the workpiece using clamps, aligning it with the marked mortise location.
- Drill the mortises: Using the drill and Beadlock jig as a guide, bore the mortises on both workpieces.
- Cut the tenon stock: Measure and cut the Beadlock tenon stock to fit the mortises accurately.
- Test the fit: Insert the tenon stock into the mortises, ensuring a snug and secure connection.
- Glue and assemble: Apply wood glue to the mortises and the tenon stock, then press the joint together. Use clamps to secure the joint while the glue dries.
The Many Uses of Beadlock Joints
Beadlock joints excel in a variety of woodworking applications, including:
- Furniture construction: Beadlock joints are commonly used in table legs, chair frames, and other furniture components.
- Cabinetry: These joints provide strong connections between cabinet parts and face frames.
- Shelving: Beadlock joints offer robust support for shelf structures.
The Benefits of Beadlock Joints
Beadlock joints offer numerous advantages:
- Strength: The unique floating tenon design creates a sturdy and long-lasting bond between wooden pieces.
- Simplicity: Beadlock joints are easy to create, even for novice woodworkers, as they require minimal tools and experience.
- Versatility: This joint is suitable for a wide range of woodworking projects due to its adaptability and strength.
17. Scarf Joint
Scarf joints, used in woodworking and carpentry, are a unique and versatile technique for joining two wooden pieces end-to-end.
These joints are created by cutting corresponding angles on the ends of two pieces, then fitting them together to form a longer piece.
Let’s explore the tools required to create scarf joints, the process of making them, their uses, and the benefits they offer.
Tools Needed to Make a Scarf Joint
To create a scarf joint, you will need the following tools:
- Saw: A handsaw, circular saw, or miter saw can be used to cut the precise angles needed for the scarf joint.
- Measuring tape and square: These tools help in marking the correct angles and lengths on the wooden pieces.
- Clamps: Clamps are necessary to hold the workpieces securely during the cutting and gluing process.
- Glue: Wood glue is essential to bond the joint together, ensuring a strong and lasting connection.
- Optional: Reinforcement hardware or dowels: To increase the strength of the joint, additional reinforcement like screws, nails, or dowels can be used.
Crafting a Scarf Joint: Step-by-Step Guide
Here’s how to create a scarf joint:
- Measure and mark: Determine the length and angle of the scarf joint on both wooden pieces, and mark them accordingly.
- Cut the angles: Using a saw, carefully cut the corresponding angles on the ends of the wooden pieces.
- Test the fit: Place the two pieces together to ensure a snug and accurate fit. Make any necessary adjustments.
- Apply glue: Spread wood glue on the mating surfaces of the scarf joint, ensuring complete coverage.
- Assemble and clamp: Join the two pieces, aligning them carefully, and secure them with clamps while the glue dries.
- Optional reinforcement: If desired, add reinforcement hardware or dowels to increase the joint’s strength.

Uses of Scarf Joints
Scarf joints can be found in a variety of woodworking and carpentry applications:
- Timber framing: In timber construction, scarf joints are used to create longer beams from shorter pieces.
- Boatbuilding: Scarf joints are popular in boatbuilding, particularly for joining wooden planks or stringers.
- Furniture making: Scarf joints can be used in custom furniture pieces, connecting parts like table legs or rails.
The Benefits of Scarf Joints
Scarf joints offer several advantages:
- Aesthetics: Scarf joints create a visually appealing, nearly seamless connection between two wooden pieces.
- Strength: When properly constructed and glued, scarf joints can provide a strong and long-lasting bond.
- Versatility: These joints can be used in various woodworking and carpentry applications, making them a valuable skill to master.

18. Cope-and-Stick Joint
Cope-and-stick joints, also known as rail-and-stile joints, are a popular and versatile woodworking technique for creating decorative door and panel frames.
Let’s dive into the world of cope-and-stick joints, exploring what they are, the tools needed to make them, how to create them, their uses, and the benefits they provide.

What is a Cope-and-Stick Joint?
A cope-and-stick joint is a woodworking technique used to create decorative door and panel frames, commonly found in cabinet doors, raised panel doors, and wainscoting. It consists of two main components:
- Stiles: The vertical frame members that run the full length of the frame.
- Rails: The horizontal frame members that fit between the stiles, connecting them to form the frame.
Tools Needed to Make a Cope-and-Stick Joint
To create a cope-and-stick joint, you’ll need the following tools:
- Router table: A router table is essential for creating the decorative profiles and matching grooves of cope-and-stick joints.
- Cope-and-stick router bit set: These specialized router bits are designed to create the profile (stick) and cope cuts needed for this joint.
- Clamps: You’ll need clamps to hold the workpieces securely during the routing process and during assembly.
- Measuring tape and square: These tools help in marking the correct lengths and positions on the wooden pieces.
- Glue: Wood glue is necessary to bond the joint together, ensuring a strong and lasting connection.
How to Make a Cope-and-Stick Joint: Step-by-Step Guide
Here’s how to create a cope-and-stick joint:
- Prepare the workpieces: Cut the stiles and rails to the desired length, ensuring they are square and parallel.
- Create the stick cut: Install the stick-cut router bit in the router table and adjust the height and fence position. Rout the profile on the inside edge of all stiles and rails.
- Create the cope cut: Switch to the cope-cut router bit and adjust the height and fence position. Rout the cope cut on the ends of the rails.
- Test the fit: Dry-fit the cope-and-stick joint to ensure a snug and accurate fit. Make any necessary adjustments.
- Glue and assemble: Apply wood glue to the cope-and-stick joint and assemble the frame. Use clamps to hold the frame securely while the glue dries.

Uses of Cope-and-Stick Joints
Cope-and-stick joints are primarily used in:
- Cabinet doors: These joints are popular in creating decorative and functional cabinet door frames.
- Raised panel doors: Cope-and-stick joints provide the framework for raised panel doors, both in cabinetry and interior doors.
- Wainscoting and paneling: This technique can be used to create decorative wall paneling and wainscoting.
Benefits of Cope-and-Stick Joints
Cope-and-stick joints offer several advantages:
- Aesthetics: These joints create visually appealing and decorative door and panel frames.
- Strength: Cope-and-stick joints provide a strong and long-lasting connection between stiles and rails.
- Versatility: This woodworking technique is adaptable for various applications, from cabinetry to interior doors and wainscoting.

19. Butterfly Joint
Butterfly joints, also known as butterfly inlays or bowtie keys, masterfully combine functionality and decorative elements in woodworking to halt the progression of cracks or splits in wood.
In this comprehensive guide, we’ll delve into the world of butterfly joints, touching on their purpose, required tools, creation process, applications, and benefits.
What is a Butterfly Joint?
A butterfly joint refers to a woodworking technique that leverages a piece of wood shaped like a butterfly or bowtie to connect two wood pieces or stabilize and impede further cracking or splitting in wood.
The butterfly-shaped inlay, inserted into meticulously crafted recesses, exudes both strength and visual charm.

Tools Needed to Make a Butterfly Joint
To craft a butterfly joint, you’ll require the following tools:
- Chisels: Employ sharp chisels to carve out the butterfly inlay recesses.
- Mallet: Use a mallet to strike the chisels and drive them into the wood.
- Marking knife: This tool helps scribe the butterfly inlay outline onto the wood.
- Router: Utilize a router or router plane to eliminate most of the waste material when fashioning the recesses.
- Saw: A saw is essential for cutting the butterfly inlays out of a wood piece.
- Sandpaper: Sandpaper ensures the butterfly inlay edges and surfaces are smooth.
- Wood glue: Wood glue helps secure the butterfly inlays within the recesses.
How to Make a Butterfly Joint: Step-by-Step Guide
Follow these steps to create a butterfly joint:
- Prepare the inlay material: Choose a flat, defect-free piece of wood for the butterfly inlay. Ensure it is thick enough to deliver strength to the joint.
- Cut out the butterfly inlays: Sketch the desired butterfly shape onto the inlay material and use a saw to cut it out. Sand the edges and surfaces to achieve a smooth finish.
- Mark the recess location: Position the butterfly inlay on the wood at the joint location and scribe its outline with a marking knife.
- Remove the waste material: Employ a router or router plane to get rid of the majority of the waste material from the marked area, working towards the desired depth.
- Chisel the recess: Carefully use chisels and a mallet to eliminate the remaining material and create an accurate recess for the butterfly inlay.
- Test the fit: Perform a dry-fit of the butterfly inlay in the recess, ensuring a snug fit. Adjust as needed.
- Glue and insert the inlay: Apply wood glue to the recess and butterfly inlay, then insert the inlay into the recess. Press the inlay firmly in place with a mallet or clamps.

Uses of Butterfly Joints
Butterfly joints are employed in various woodworking applications, including:
- Furniture making: These joints are often utilized to stabilize and repair splits or cracks in items such as tabletops, benches, and other furniture pieces.
- Woodworking projects: Butterfly joints are popular in projects that demand both strength and decorative appeal.
- Slab woodworking: These joints are frequently used in slab woodworking, which involves the use of large wood pieces with natural edges.
Benefits of Butterfly Joints
Butterfly joints offer several advantages:
- Strength: These joints supply structural support and help prevent further splitting or cracking in wood.
- Aesthetics: Butterfly joints are visually attractive, adding a unique design element to woodworking projects.

20. Birdsmouth Joint
Embark on a journey with us as we explore the fascinating world of birdsmouth joints, a crucial element in carpentry and woodworking, specifically in roof construction.
This comprehensive guide will illuminate the nature of birdsmouth joints, the tools required, the process of crafting them, their applications, and the benefits they bring to the table.
What is a Birdsmouth Joint?
The birdsmouth joint, alternatively known as the bird’s beak cut or birdsmouth notch, is a distinct V-shaped or L-shaped notch expertly carved into a rafter or beam.
This allows it to comfortably rest on top of a wall plate or another support component.
The joint serves as a stable anchor point for the rafter, securing a robust connection and even distribution of weight, making it an indispensable part of roof framing.

Tools Needed to Make a Birdsmouth Joint
To create a birdsmouth joint, you’ll need the following tools:
- Measuring tape: To ensure accuracy when marking the joint’s measurements.
- Carpenter’s square: For absolute precision while marking the joint’s angles.
- Pencil or marking tool: To delineate the cutting lines on the rafter.
- Circular saw or handsaw: To carve the birdsmouth cuts into the rafter.
- Chisel and mallet: To refine and square up the birdsmouth joint.
How to Make a Birdsmouth Joint: Step-by-Step Guide
Follow these steps to craft a birdsmouth joint:
- Measure and mark the rafter: Initially, calculate the desired pitch, length, and spacing of your rafters. Measure and mark the rafter according to these dimensions.
- Mark the birdsmouth joint: Ascertain the birdsmouth joint’s position on the rafter based on the wall plate’s width. Use a carpenter’s square to accurately mark the V-shaped or L-shaped notch.
- Cut the joint: Utilize a circular saw or handsaw to cut along the marked lines. Refrain from cutting past the intersection point of the lines to preserve the joint’s structural integrity.
- Clean up the joint: Employ a chisel and mallet to remove any remaining material and square up the joint.
- Test fit and installation: Check the fit of the birdsmouth joint on the wall plate or supporting member. Make any necessary adjustments, then secure the rafter in place using suitable fasteners or metal connectors.

Uses of Birdsmouth Joints
Birdsmouth joints are predominantly used in the following scenarios:
- Roof framing: These joints establish a stable connection between rafters and wall plates in both straightforward and intricate roof structures.
- Shed construction: Birdsmouth joints are commonplace in shed construction, connecting the roof’s rafters to the supporting walls.
- Pergolas and gazebos: These joints are employed in the construction of pergolas and gazebos to create stable, pitched roof structures.
Benefits of Birdsmouth Joints
Birdsmouth joints boast several advantages:
- Stability: The joint’s design guarantees even distribution of weight, forming a stable connection between the rafter and wall plate or supporting member.
- Strength: Birdsmouth joints contribute to the overall strength and rigidity of roof structures.
- Ease of construction: With the appropriate tools and skills, birdsmouth joints can be effortlessly created and installed, streamlining the roof framing process.
- Versatility: The joint can be adapted for use in a variety of roof designs, including simple gable roofs and more complex structures.
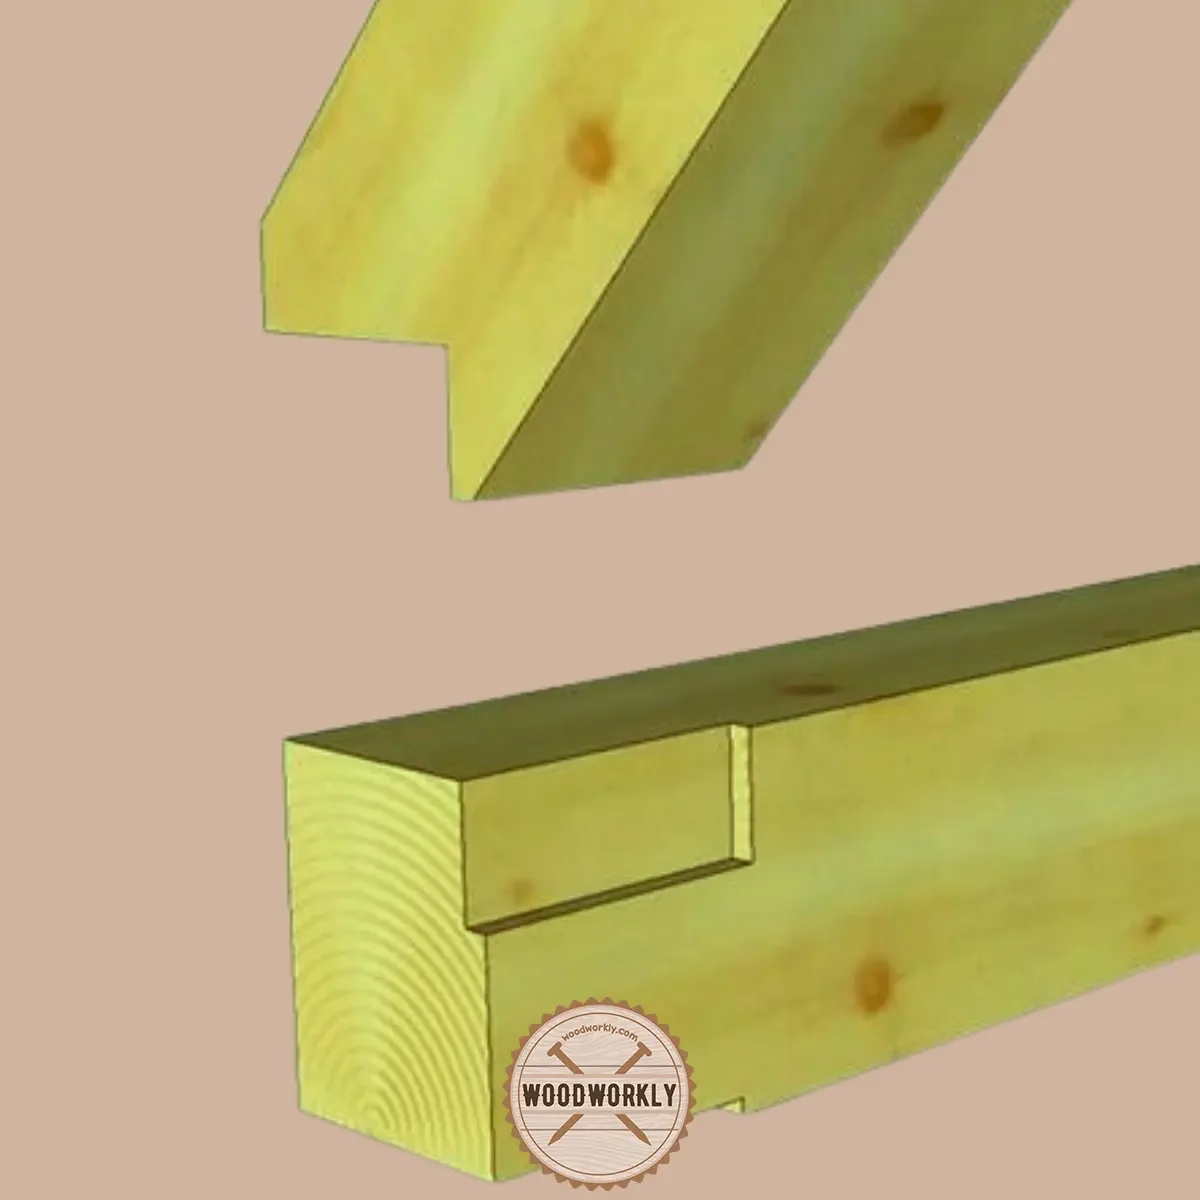
21. Butt Joint
The butt joint is not strong as other types of joints. It can hold only light stress.
The butt joint is a strong easy joint that is almost similar to the Miter joint. The butt joint is the most basic joinery method.
Here, one piece of wood end directly contacts the end of another piece of wood at a correct angle.
The bonding area will be fastened using mechanical fasteners such as nails, and screws to preserve the joint.

The strength of the Butt joint depends on,
- The wood glue that holds wood pieces together
- Orientation of the wood pieces
Usually, the end of lumber is known as the “Butt”. So, contact between two ends of lumbers can be called a Butt joint.
They create corners by combining at a right angle. The butt joint is commonly used when installing trim.
Butt joints are commonly used for door and window trims that vertical trims Butt into the horizontal trim at the top of the door or window or horizontal windowsill.
In Mitered Butt joint, cutting edges of two wood pieces contact on opposite angles to make it look like a whole new piece.
How to Make a Butt Joint
Follow these steps to create a butt joint:
- Cut the wood pieces: Cut the two wood pieces to the desired length using a saw.
- Align the pieces: Place the two wood pieces together end-to-end, ensuring that their edges are flush and aligned.
- Apply glue: Spread wood glue evenly on the end of one piece, then press the glued end against the other piece.
- Clamp the joint: Use woodworking clamps to hold the joint securely while the glue dries.
- Reinforce (optional): To strengthen the joint, you can drive screws, nails, or dowels through the joint after the glue has dried.

Uses of Butt Joints
Butt joints are commonly used in various woodworking applications, including:
- Cabinetry: For constructing basic cabinet carcasses and boxes.
- Shelving: In lightweight shelving systems or bookcases.
- Framing: As temporary or non-structural joints in framing applications.
Benefits of Butt Joints
Some advantages of butt joints include:
- Simplicity: Butt joints are easy to make and require only basic woodworking tools.
- Speed: They can be assembled quickly, making them suitable for projects with tight deadlines.
- Low cost: The simplicity of butt joints means they often require fewer materials and less labor than more complex joints.
However, it’s important to note that butt joints are not as strong as other types of wood joints, such as dovetails or mortise and tenon joints.
They are best suited for light-duty applications or projects where strength is not the primary concern.
Tip:
- To make the Butt joint strong use a chop saw to make precise cuts. Because it’s difficult to make cuts using a hand saw and a circular saw.

So, let’s find out what is the strongest wood glue to make the strongest wood joint.
Strongest Glue for Strongest Wood Joint
To make the strongest wood joint you need to have a wood glue that holds well onto the wooden surface.
It should work well with wood joints to improve their strength and reinforce the entire woodwork.
Here’re the best strongest wood glue that use to make the strongest wood joint,
- Gorilla wood glue
- Elmer wood glue
- Titebond 1414 Ultimate wood glue
- Krazy wood glue
By using the above wood glue products, you’ll be able to make your wood joint much stronger and improve the durability of the furniture or woodwork.
Wood glue works pretty well on both painted and stained surfaces of wood joints.
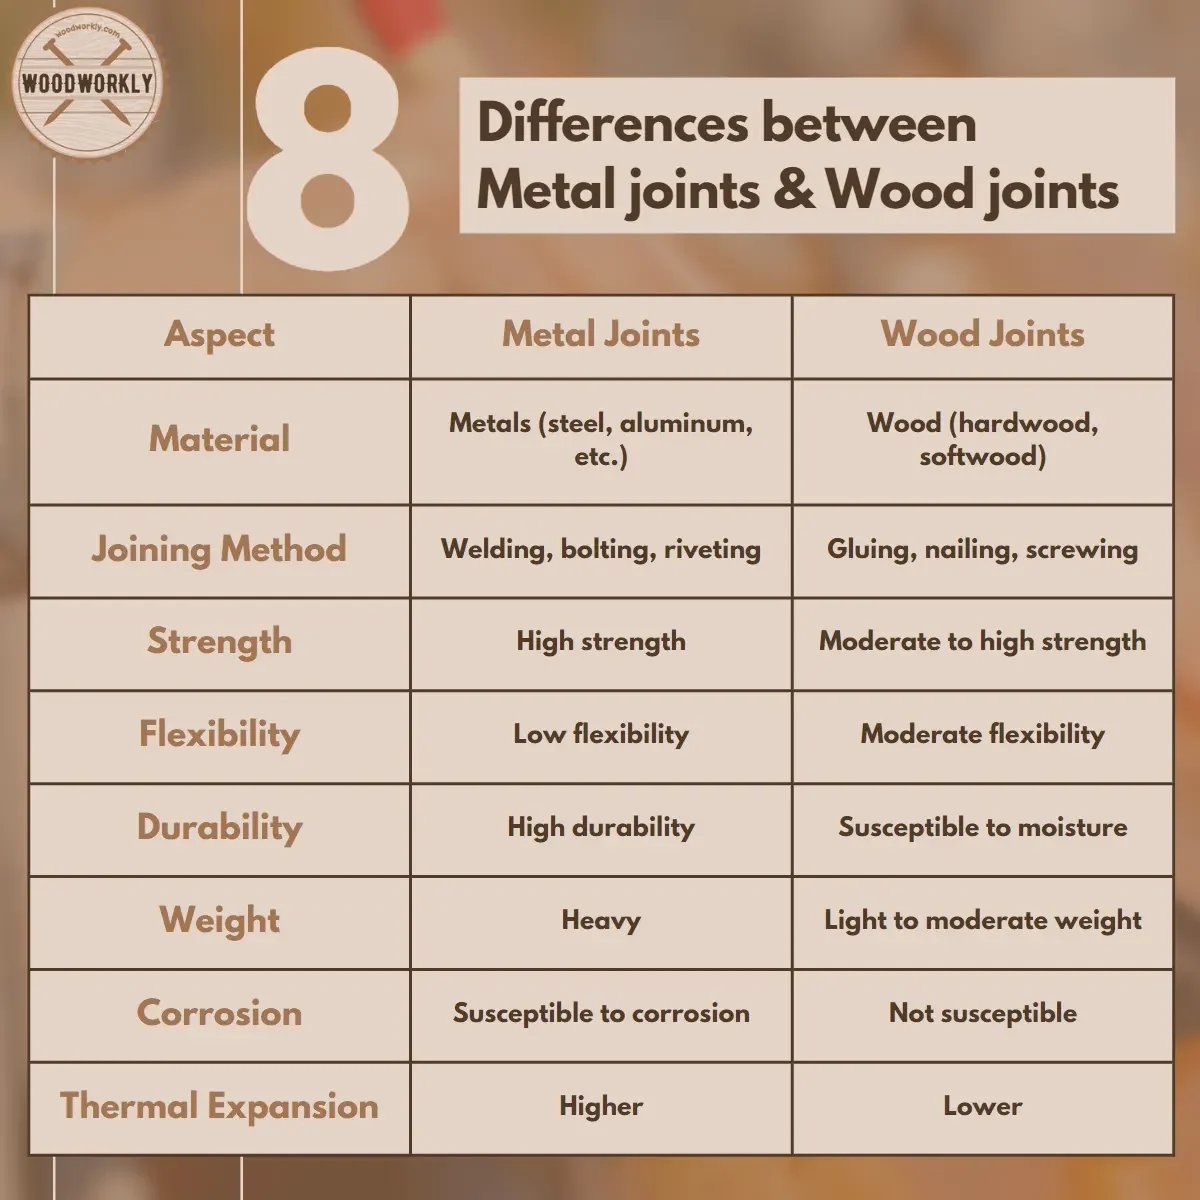
Factors to Consider When Choosing a Joint
When embarking on a woodworking or carpentry project, selecting the most suitable joint for the task at hand can be the key to success.
Here’re the key factors you should consider when choosing a wood joint,
- Strength and durability of the joint
- Ease of construction
- Appearence of teh joint
- Material and cost
- Application and purpose
- Time constraints
In this engaging and informative guide, we’ll delve into the factors that should be considered when choosing a joint.
By taking these aspects into account, you’ll ensure a strong, durable, and visually appealing outcome for your project.
Let’s dive in!
1. Strength and Durability
One of the primary factors to consider is the strength and durability of the joint. Different joints provide varying levels of strength, depending on the materials used and the joint’s design.
For example, mortise and tenon joints are ideal for creating strong, long-lasting connections in furniture, while butt joints may be more suitable for simpler, less load-bearing applications.
2. Ease of Construction
The complexity of creating a joint plays a significant role in the decision-making process. Some joints, like butt joints and lap joints, are relatively straightforward to make and require fewer tools and skills.
On the other hand, dovetail joints and Japanese wood joints (Kumiki) demand more advanced techniques and expertise.
Choose a joint that aligns with your skill level and available tools to ensure a smooth and enjoyable woodworking experience.
3. Appearence
The visual appeal of a joint can impact the overall appearance of a finished piece. Certain joints, like the dovetail and finger joints, are considered more attractive due to their intricate design and craftsmanship.
In contrast, others, like the pocket hole joint, prioritize function over form and are often hidden from sight. Consider the desired aesthetic of your project when selecting a joint.

4. Material and Cost
The materials you plan to use and your budget will also influence your choice of joint.
Some joints may require specific materials or hardware, such as biscuits for biscuit joints or metal fasteners for pocket hole joints.
Additionally, more complex joints might necessitate the purchase of specialized tools. Weigh the costs associated with the materials and tools required for a particular joint against your budget constraints.
5. Application and Purpose
The intended use of the finished piece is another crucial factor.
For instance, if you’re constructing a piece of furniture that will experience heavy use, such as a dining table, a robust joint like the mortise and tenon or the bridle joint would be suitable.
On the other hand, simpler joints like the butt joint or lap joint may suffice for decorative pieces or projects that won’t experience significant stress.
6. Time Constraints
Finally, consider the time you have available to complete your project.
Some joints, like the dovetail and Japanese wood joints, require more time and effort to create due to their complexity.
If you’re working under tight deadlines, opting for simpler, more time-efficient joints may be a better choice.
By taking these factors into account when choosing a joint, you’ll ensure the success of your woodworking or carpentry project.
Each joint has its unique benefits and drawbacks, so understanding your specific requirements and constraints will help you make an informed decision that leads to a durable, attractive, and functional end product.
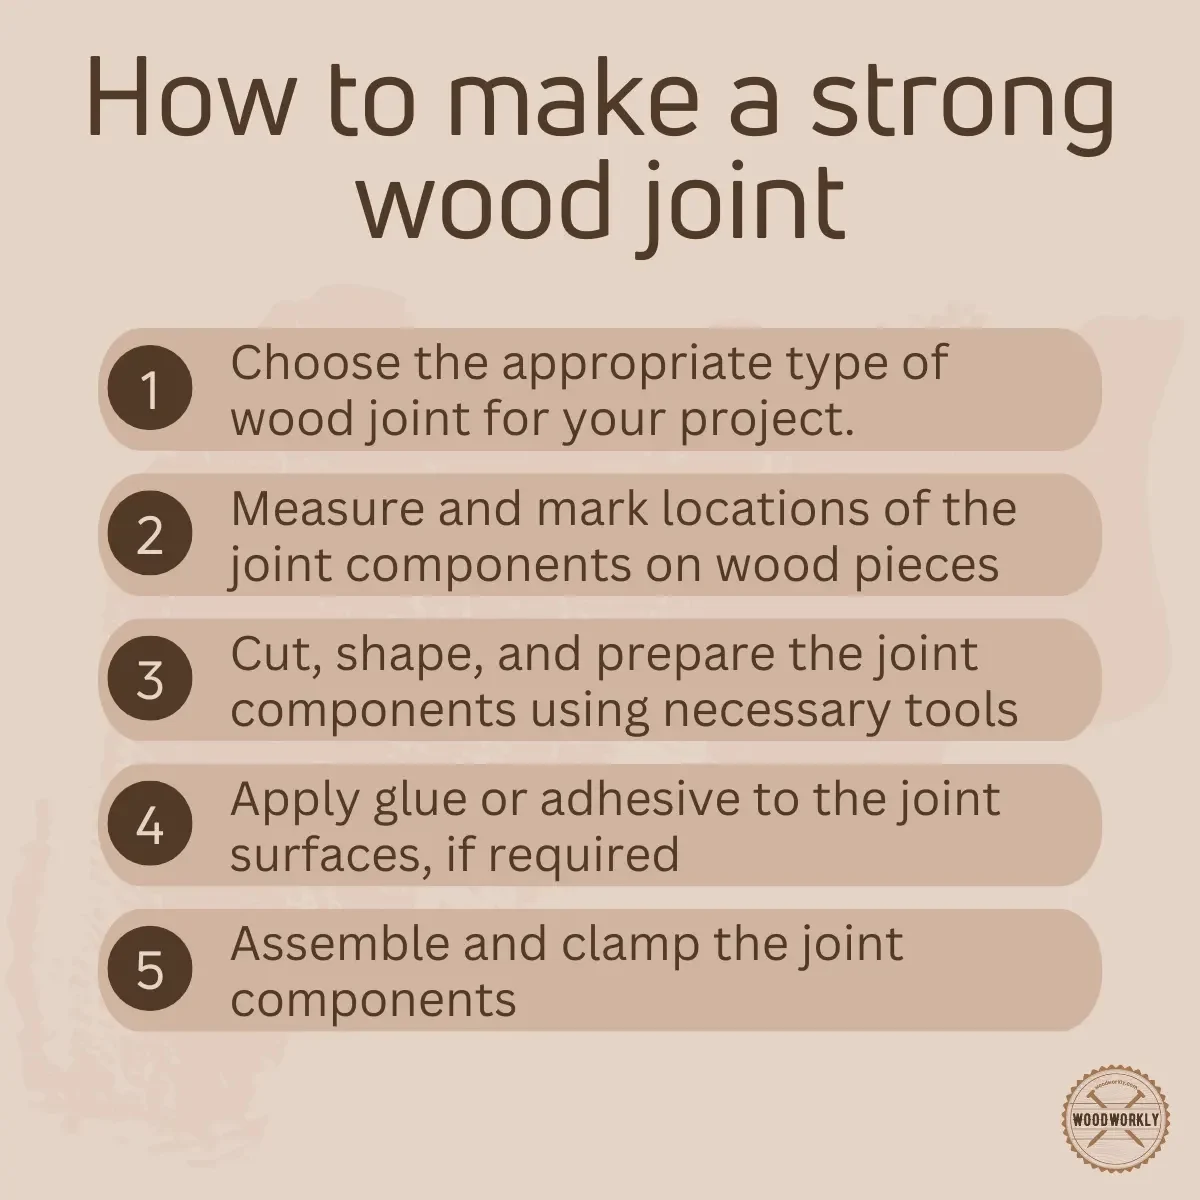
How To Make Wood Joints Stronger?
Crafting robust and long-lasting wood joints is a vital aspect of woodworking and carpentry.
Here’re the steps you should take to make wood joints stronger,
- Choose the right joint for the job.
- Use quality materials.
- Ensure precision and accuracy.
- Reinforce joints with glue and fasteners.
- Increase the gluing surface area.
- Clamp joints securely.
- Allow adequate curing time.
In this comprehensive and engaging guide, we’ll delve into a variety of techniques and strategies to reinforce wood joints, guaranteeing dependable and enduring results.
By adopting these tips, you can elevate the caliber of your craftsmanship and boost the stability of your projects.
1. Choose the Right Joint for the Job
Picking the most appropriate joint for your project is the initial step in creating strong connections.
Each joint type possesses unique characteristics that determine its strength and sturdiness.
For example, mortise and tenon joints are renowned for their excellent load-bearing capacity, while dovetail joints excel in resisting pulling forces.
Evaluate your project’s requirements and select a joint that aligns with those needs.
2. Use Quality Materials
Employing top-notch wood and other materials is crucial in the strength and longevity of your joints.
Opt for dense, stable woods like oak, maple, or walnut, which are recognized for their durability and resistance to warping.
Additionally, ensure the wood is adequately dried to avoid future shrinkage and cracking.
3. Ensure Precision and Accuracy
Accurate and precise cuts are indispensable for crafting strong joints.
Utilizing well-maintained tools and measuring devices, such as a square, a marking gauge, and a sharp saw, will help you achieve clean, precise cuts.
When the mating surfaces of a joint fit tightly together, the connection becomes inherently stronger.
4. Reinforce the Joint with Glue and Fasteners
Using robust wood glue is critical for creating secure joints. Apply glue uniformly across the entire surface of the joint, ensuring that the adhesive forms a solid bond.
For added strength, consider using mechanical fasteners like screws, nails, or dowels to reinforce the connection.
These fasteners offer additional support and help distribute stress evenly across the joint.

5. Increase the Gluing Surface Area
Frequently, the strength of a joint can be enhanced by enlarging the gluing surface area.
Techniques such as adding grooves or dadoes can provide extra surface contact between the connected pieces, resulting in a stronger bond.
This principle is particularly relevant for joints like the finger joint or the dovetail joint, where the increased surface area contributes to their strength.
6. Clamp the Joint Securely
Appropriate clamping is essential for ensuring strong, well-aligned joints.
By applying even pressure across the joint during the glue-up process, you encourage a more robust bond and prevent the wood from shifting out of alignment.
Use high-quality clamps and make sure they are correctly positioned to avoid any unwanted distortion or stress on the joint.
7. Allow Adequate Curing Time
Permitting the glue to cure entirely before removing clamps or applying stress to the joint is crucial.
Follow the manufacturer’s recommendations for curing time, which typically range from 24 to 48 hours.
Allowing the adhesive enough time to set will result in a stronger and more reliable bond.
That’s it folks! Now you know everything you want to know about strongest wood joint types with tips to make them even stronger.

Let’s answer some frequently asked questions.
What are the strongest wood joints for different applications?
The strength of wood joints varies depending on their intended use. Some of the strongest wood joints include:
- Mortise and Tenon: Excellent for load-bearing applications, such as table legs and chair frames.
- Dovetail: Ideal for resisting pulling forces, often used in drawer construction.
- Finger Joint: Great for increasing the gluing surface area, typically used in box corners and long wood pieces.
How does wood glue contribute to joint strength?
Wood glue plays a significant role in joint strength by forming a solid bond between the wood pieces.
When applied uniformly across the entire surface of the joint, it creates a strong connection that helps resist stress and prevent the wood from separating.
Using high-quality wood glue and allowing adequate curing time is crucial for a durable bond.
Can wood screws be used to strengthen wood joints?
Yes, wood screws can be employed to reinforce wood joints. When used alongside glue, screws provide additional support and help distribute stress evenly across the joint.
To maximize joint strength, choose the appropriate screw size and length, and ensure proper pre-drilling and countersinking to avoid splitting the wood.

Are there any wood joint alternatives for beginners?
For beginners or those without advanced woodworking tools, there are several accessible wood joint options that still provide strong connections. These include:
- Pocket Hole Joint: Easy to create using a pocket hole jig and screws, suitable for a wide range of applications.
- Biscuit Joint: Requires a biscuit joiner, offers a hidden connection that adds strength to edge-to-edge joints.
- Dowel Joint: Utilizes wooden dowels and glue to create reinforced butt joints, suitable for frames and panels.
How can I avoid joint failure in my woodworking projects?
To prevent joint failure, follow these best practices:
- Choose the appropriate joint for the specific application.
- Use high-quality wood and materials.
- Ensure precision and accuracy when cutting and assembling joints.
- Reinforce joints with glue and fasteners as needed.
- Allow sufficient curing time for glue before applying stress to the joint.
What is the weakest wood joint?
The weakest wood joint is typically the butt joint, where two pieces of wood are joined together end-to-end without any additional reinforcement.
Butt joints rely solely on glue for bonding, which makes them more susceptible to separation under stress. However, they can be strengthened by adding dowels, screws, or other reinforcing methods.

What are the common mistakes in wood joint making?
Common mistakes in wood joint making include:
- Inaccurate measurements and cuts: This can lead to ill-fitting joints, reducing their overall strength.
- Insufficient glue application: Applying too little glue can result in weak bonds and joint failure.
- Over-tightening screws or clamps: Excessive pressure can cause wood to split or deform, compromising the joint’s integrity.
- Inadequate curing time for glue: Rushing the curing process can lead to weak bonds and reduced joint strength.
- Choosing the wrong joint type: Selecting an unsuitable joint for the specific application can result in reduced stability and durability.
By avoiding these common mistakes, you can improve the strength and longevity of your wood joints, ensuring your projects maintain their structural integrity.
Did I cover all you wanted to know about: Strongest Wood Joint Types
In this article, I have deeply discussed the 21 strongest wood joint types with their characteristic qualities, properties, and uses with pros and cons.
Also, I have discussed some pro tips for each wood joint which are additionally helpful for a successful woodworking project.
The strongest wood joint is the mortise and tenon joint. This joint has been used for centuries and is known for its impressive strength and durability. It involves connecting a tenon (a projecting part) on one piece of wood into a mortise (a cavity) on the other piece.
According to my experience, the strength of the wood joint depends on the application that we’re going to use.
You need to have a clear understanding of wood joints and what joints fit perfectly for each situation.
Furthermore, I have answered some frequently asked questions as well.
Hope you have gained good knowledge about the strongest wood joint with their uses.
So, make sure to use the things you learned from this article when you’re working with a wood joint. Have fun in woodworking!