Ever wondered if the warm glow of burnt wood can be enhanced with a splash of stain? Let’s dive into the transformative art of staining after wood burning!
Pyrography is like drawing with fire; it’s a way to make pictures on wood using tools that get really hot. The best kinds of wood for this are Willow, Aspen, and Basswood.
I started learning pyrography in 2004, and back then, I had a lot of questions because I was just starting out.
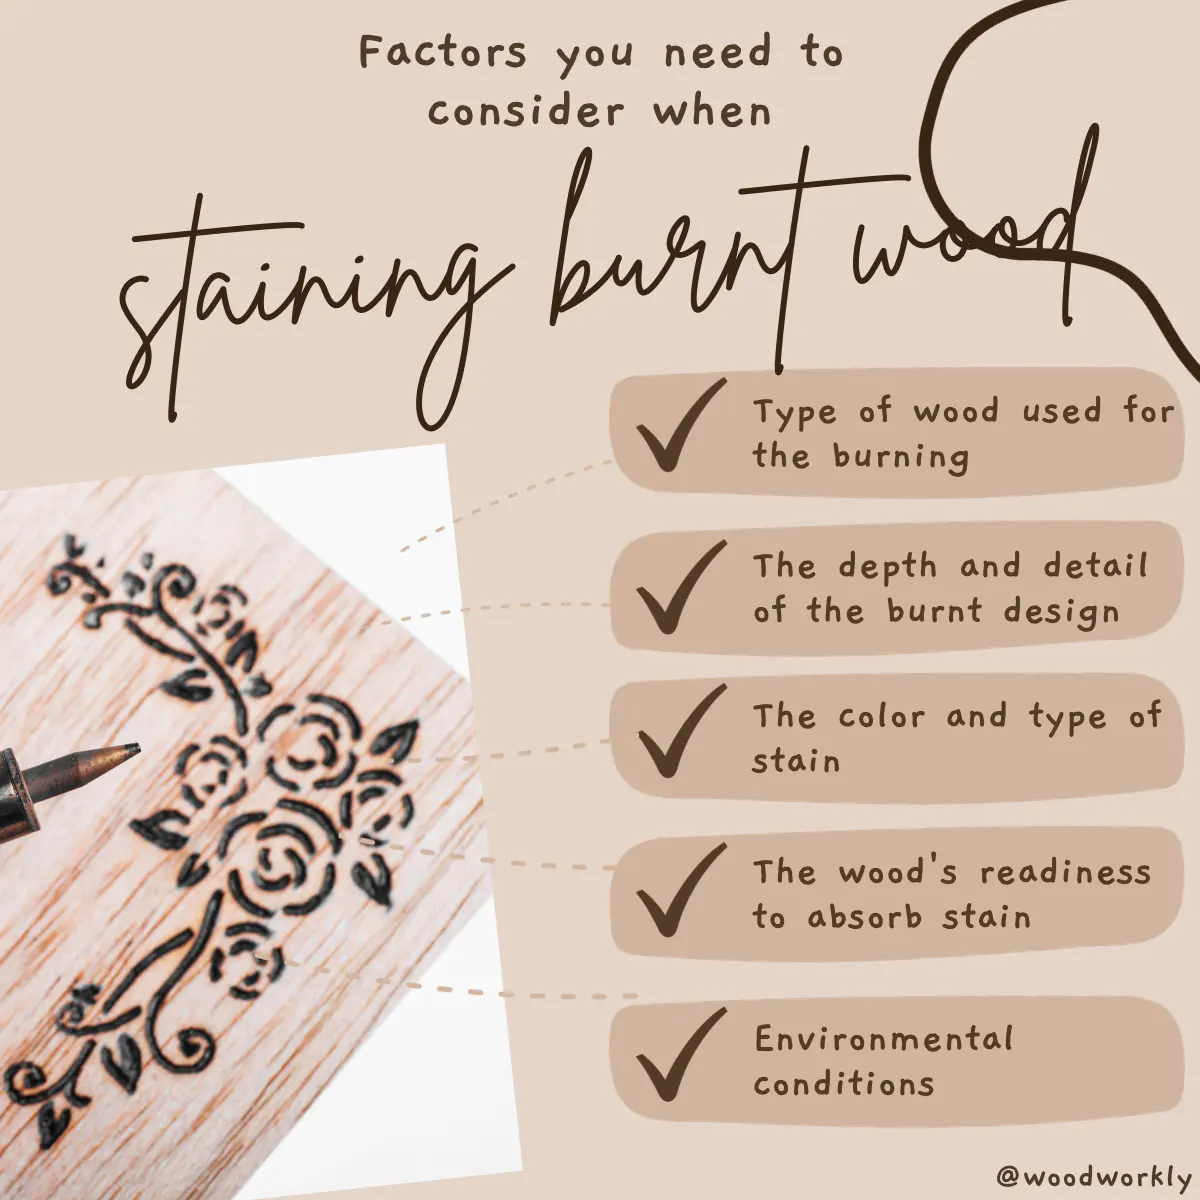
As I was getting better at it, I wondered if the wood would get stained after I drew on it with my hot metal pen. I wanted to know if the marks I made with the heat would stay without getting messed up.

So, I looked into it a lot and talked to people who are really good at pyrography, like Steve Ramsey.
With their tips and a lot of practice, I figured out the answer to my big question and I was able to make my fire drawing even better.
So, let’s find out, Can you stain over wood burning?
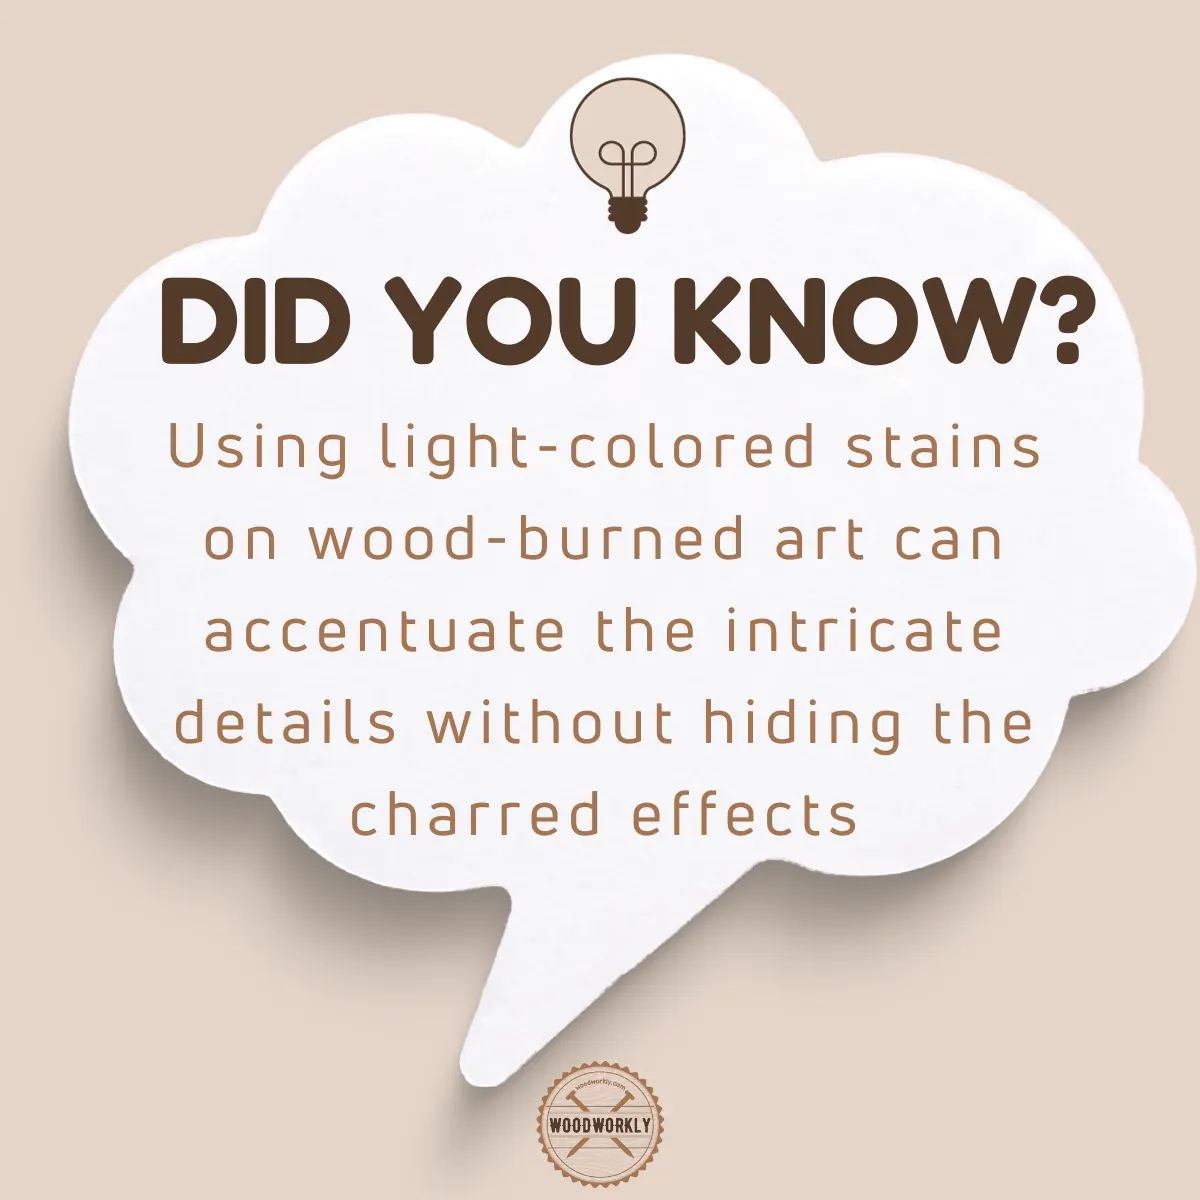
Yes, you can stain over wood burning to add color to bring the wood’s natural color and to get a polished surface that will last for a long time. Apply Gel stain over wood burning to finish the project. Use light-colored stains to distinguish the fine details in the wood-burning art.
But there’s more to know about staining over wood burning.
In this article, I’ll deeply explore, can you stain over wood burning, and how to stain wood-burning art with the best finishes you should use for the project.
Furthermore, I’ll answer frequently asked questions as well.
Just keep reading!
Can You Stain Wood After Burning It?
Yes, you can stain the wood after burning it to give it a more polished look with highlighted fine details. Burn the wood, brush it down, and then go for staining.
Never stain the wood before burning since stained wood may release toxic fumes when burned. Those toxic chemical fumes can cause breathing issues and pollute the air.
Plus, stained wood is more flammable than regular wood since it already has some organic chemicals.
So, by burning stained wood, the wood may get burnt beyond the limit and ruin your design. Therefore, always do the staining part after burning the wood.
Even though staining burned wood is an optional step since it won’t protect the wood as much as wood sealant does, it is important to the wood that emphasize its beautiful appearance.
Your drawing or creation will be highlighted even more by staining with a light color stain.
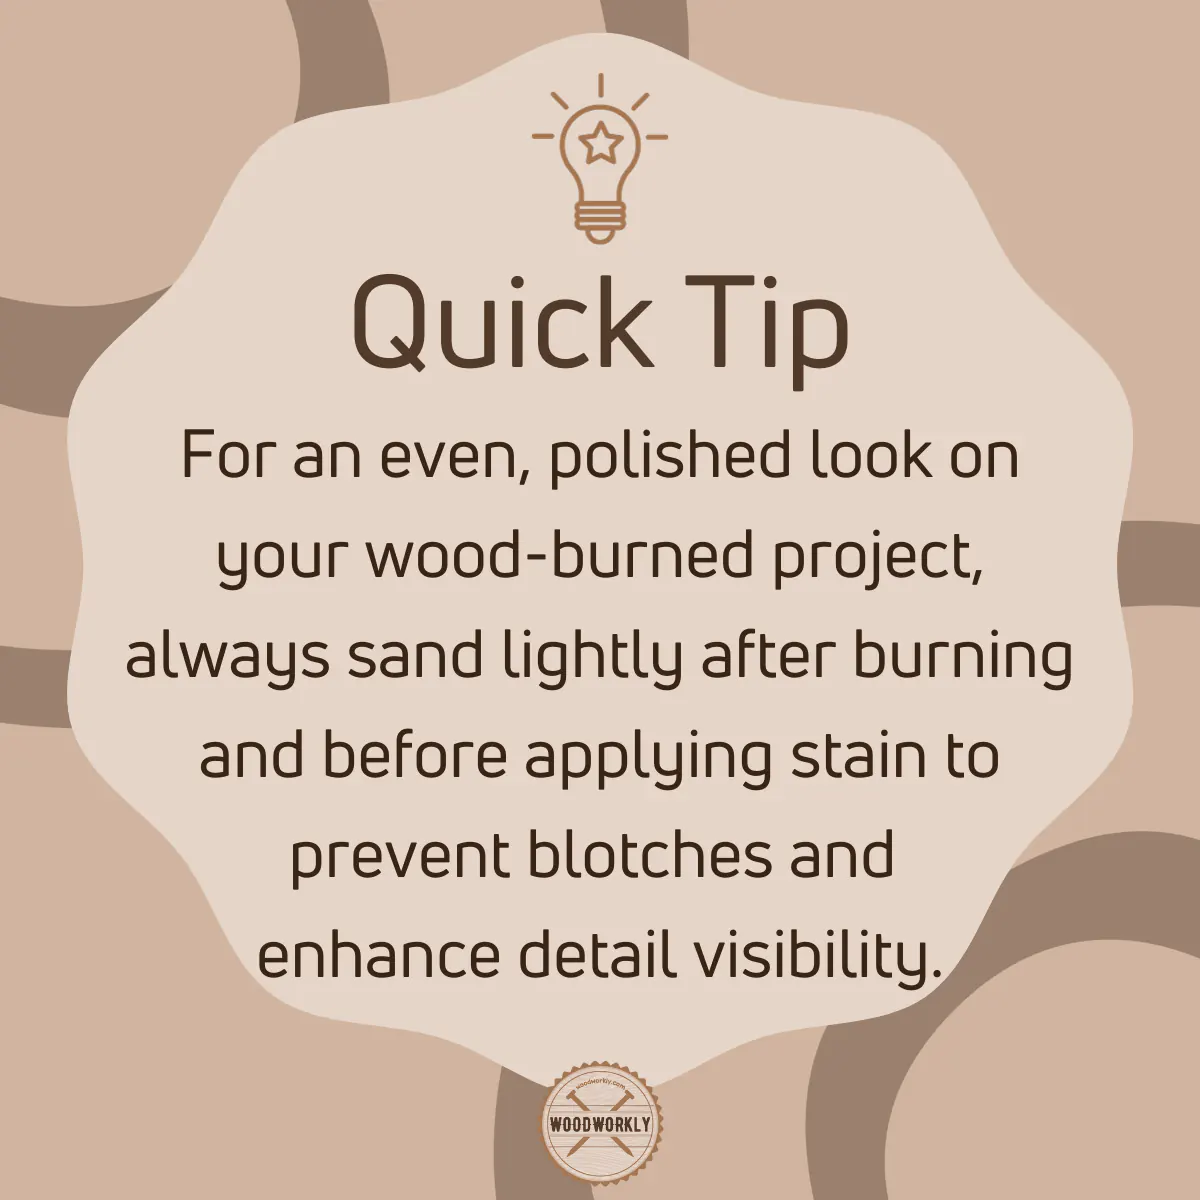
Do the wire sanding before staining to smoothen the surface and avoid randomness.
Brushing burnt wood surfaces before staining is helpful to spread the stain evenly throughout the surface without making any wood stain mistakes like forming blotches, streaks, and tacky surfaces.
As I mentioned earlier, staining wood after burning is an optional step that colors up the wood mainly with a little protection.
Therefore, sealing the wood with a quality sealant is a must after staining the burnt wood.
Stain-over-wood burning mainly focuses on the physical appearance of the wood. Sealing burnt wood mainly focuses on its protection.
Let’s see what the best stain products can go with to do the staining for wood burning with ease.
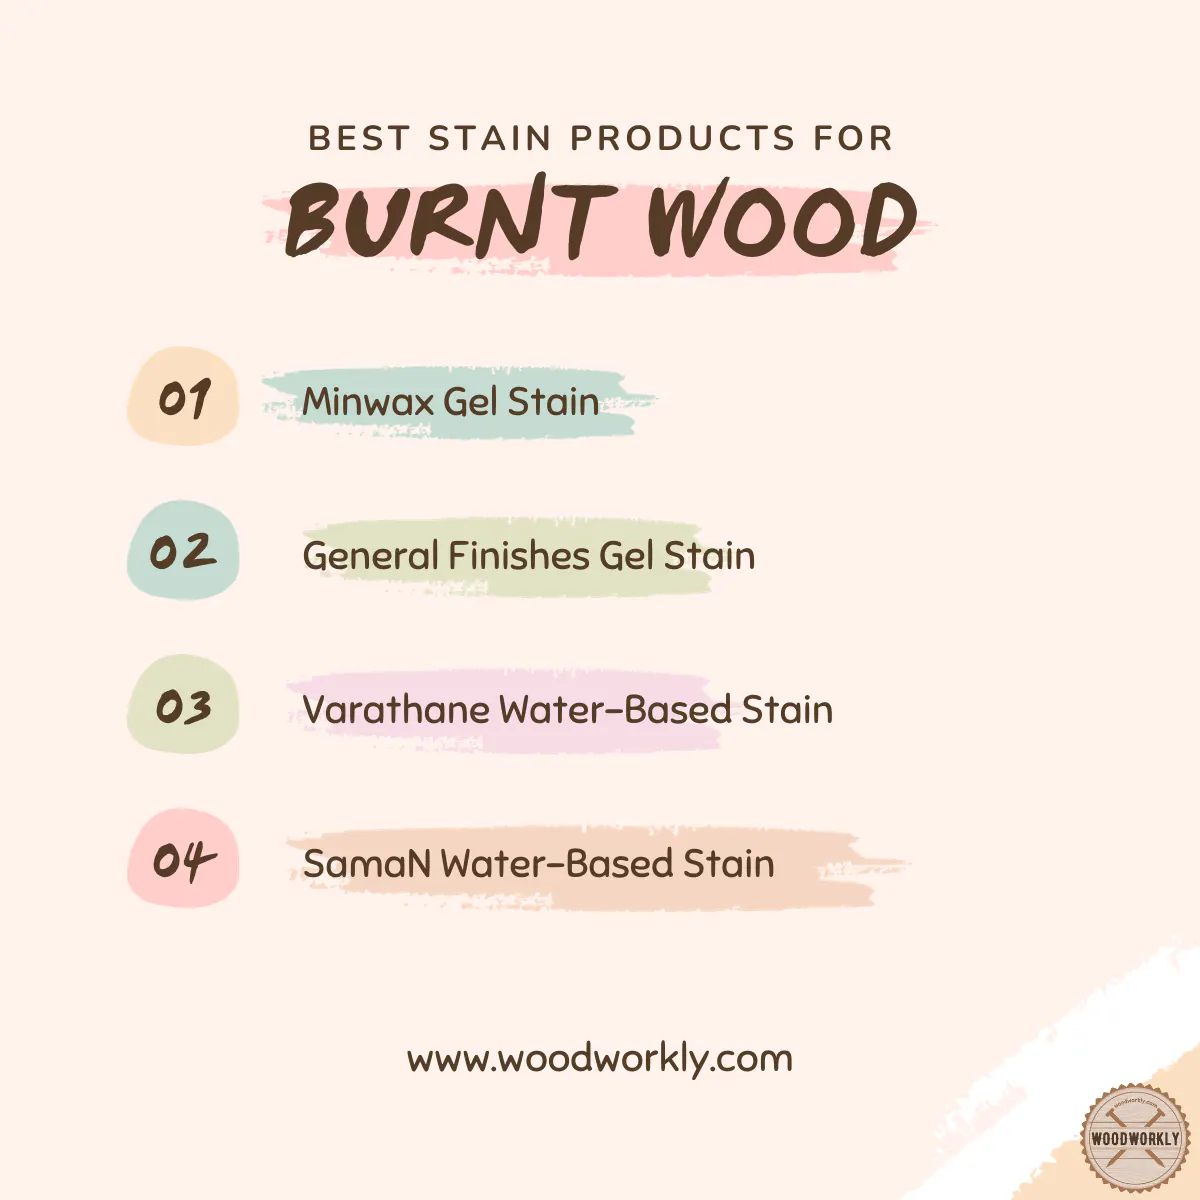
What Is The Best Stain For Burnt Wood
Here’s a list of the best stains for a wood-burning project,
- Minwax Gel Stain
- General Gel Stain
- Varathane Gel stain
- Varathane water-Based stain
- Minwax Water-Based stain
- SamaN Water-Based stain
As you can see gel stains and water-based stains are suitable for staining wood-burning projects since oil-based stains may yellow over years.
So, let’s have a look at the correct method of stain over wood burning.
Supplies You Will Need To Stain Burnt Wood
- Light color stain product
- Pre-stain wood conditioner
- Gloves
- 320 grit sandpaper
- 220 grit sandpaper
- Lint-free tack cloths
- Clean rags
- Paintbrush
Check out the Best Brushes For Staining Wood!
Collect the above supplies from quality manufacturers and get ready to stain your burnt wood art without damaging the heat marks.
How to Stain Burnt Wood?
Staining over wood burning is super simple only if you follow the correct method of staining.
Staining before wood burning is not recommended and won’t give what you looked for.
Select the color of stain based on your wood-burning project. if you want to emphasize the tiny details of your art, better to go for a color stain.
Dark color stains will make it harder to see the wood-burned lines in your project.
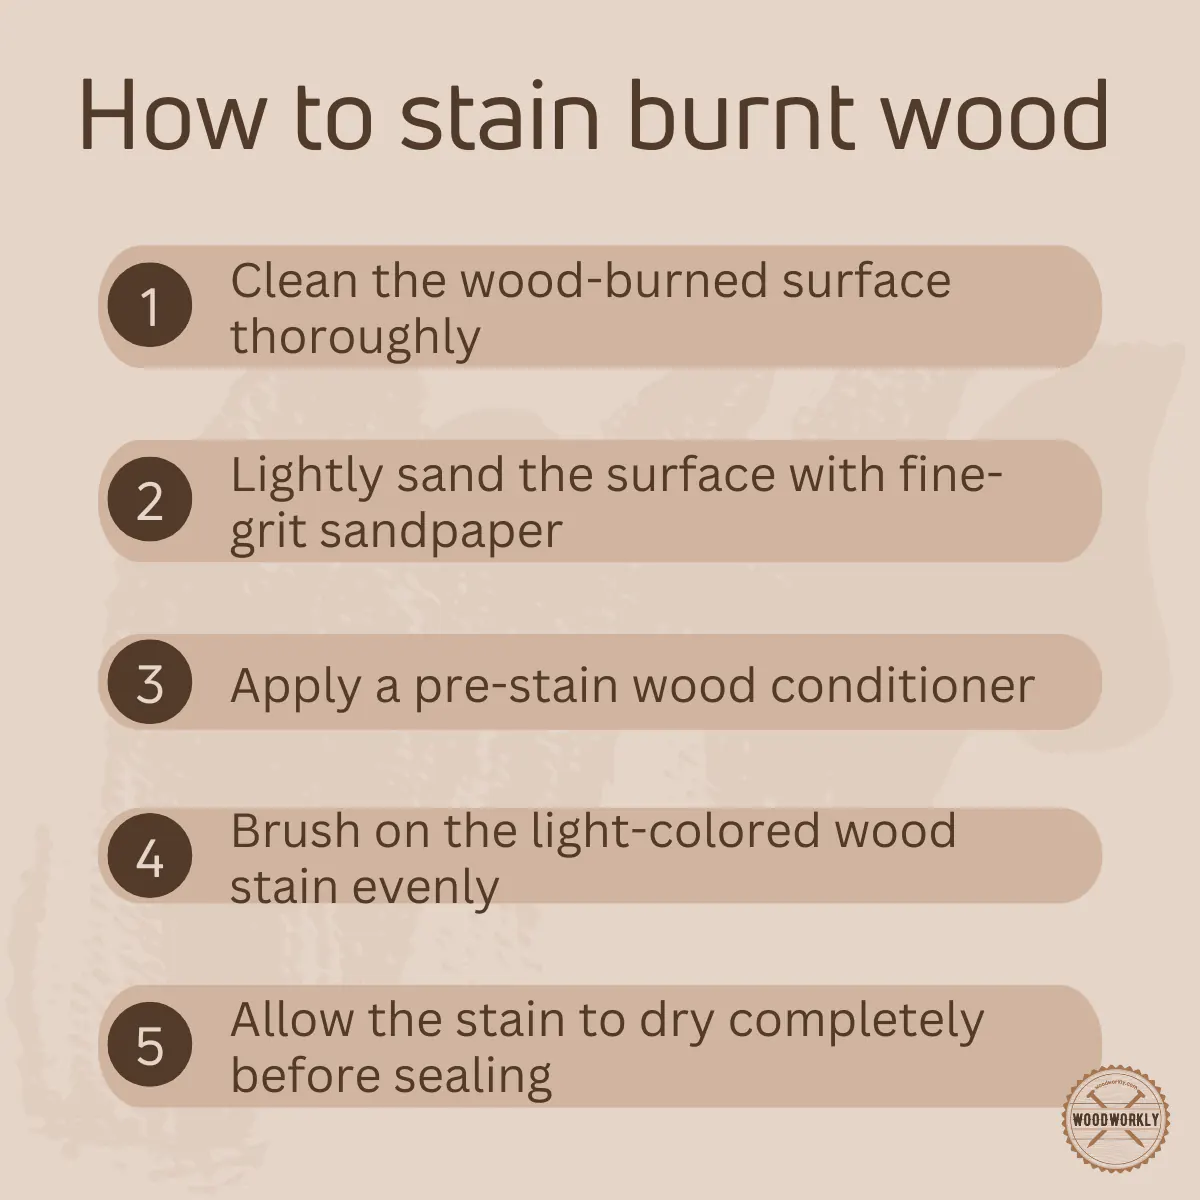
Here are the steps you need to follow when staining a burnt wood project,
- Clean the surface
- Prepare the surface
- Apply wood conditioner
- Apply wood stain
- Let the surface dry and cure
So, let’s discuss each of the above steps in detail to get a good understanding of how to stain wood-burning art properly.
1. Clean The Surface
After you complete the wood-burning project, you need to clean the surface before staining it.
Cleaning is essential to absorb stains evenly and to get an equally beautiful appearance all over the surface.
First, you need to take your wood-burning project to a well-ventilated area since sawdust and burnt particles may spread all over the place and may cause breathing issues if there is no proper air circulation in your working area.
Take the clean rags and wipe down the surface to remove dust and burnt wood particles from the surface.
Or you can use a dust collection pipe system to clean the wood surface.
Making the surface nice and clear is important to stain without making any mistakes.
2. Prepare The Surface
Once you’re done with cleaning the wood burning project, sand the entire surface with 220 grit sandpaper to eliminate any surface imperfections and to smoothen the surface.
Sand along the direction of the wood grain to sand without making any scratches.
Sand all over the without missing any spots by applying even pressure on sandpaper to even out the surface.
Generally, wood imperfections may occur in pyrography since it raises the wooden fibers. By sanding you can eliminate those imperfections and make the surface super smooth and ready to take on wood stain evenly.
Pencil marks, burning marks, and patches can be eliminated by sanding.
Once you’re done with sanding clean the entire surface using a lint-free tack cloth to remove sawdust.
Now the wood-burning surface is super ready to take on a stain.
3. Apply Wood Conditioner
Applying wood conditioner before staining is not a must, but it helps to absorb stain evenly throughout the wood without forming blotches or streaks.
Wood conditioners basically limit the absorption ability of wood fibers and let the stain spread evenly all over the wood.
If you apply stain directly on the surface without applying a wood conditioner you may notice some areas that absorb too much stain and form darker patches and some areas that won’t absorb stain well and end up with lighter patches.
Wood conditioner treats the whole surface equally and is helpful to get the same color of stain coat all over the wood with no surface randomness.
Therefore, I highly recommend you apply wood conditioner before staining to do the staining job with no issues.
Apply wood conditioner all over the surface using a paintbrush along the direction of the wood grain for better absorption.
Then let it settle on the surface for 30 seconds. After several minutes check the surface dryness and you’re good to go for the staining step.
4. Apply Wood Stain
When the surface is dry, dip the paintbrush in the stain and apply the stain all over the wood without missing any spots. Or you can spray stain on the wood.
Apply lighter color wood stain to highlight the burning lines even more with fine details.
Do the staining along the direction of the wood grain to absorb the stain quickly, into the wood fibers.
Apply thin coats of stain fast drying between stain coats to minimize making wood stain mistakes like forming a tacky surface.
Apply wood stain by applying even pressure on the paintbrush. Applying high pressure results in deep color which can make your surface look ugly.
After applying wood stain correctly on wood burning art, let the stain coat dry and cure for 24 – 48 hours.
Make sure not to apply another coat of stain before the previous coat dries completely which can form never never-drying splotchy surface.
A single coat of stain is more than enough to color up your burnt wood project with good protection. Or go for 2 coats of stain maximum.
Wipe the excess stain with a lint-free tack cloth after staining for efficient drying and to avoid getting blotches and streaks.
Do the light sanding between each coat of stain and after the final coat of stain for better absorption of stain and to get a glossy and shiny look.
5. Let The Surface Dry And Cure
After applying wood stain all over the surface let it settle and dry for 24 hours and you need to wait for several days until the stain coats are cured properly.
Once the stain coats are fully cured, you’ll start to see the actual color of the stain and how the color dramatically changes to the color you wished for.
Probably after 2 – 3 days, your stain coats are fully cured, and you can finish the wood-burning project with a protective sealant.
Best Sealants to Apply After Staining The Wood Burning
Here’s a list of the best sealants for the wood burning projects,
- Spar varnish
- Polyurethane
- Polycrylic
- Danish oil
- Resin
- Linseed oil
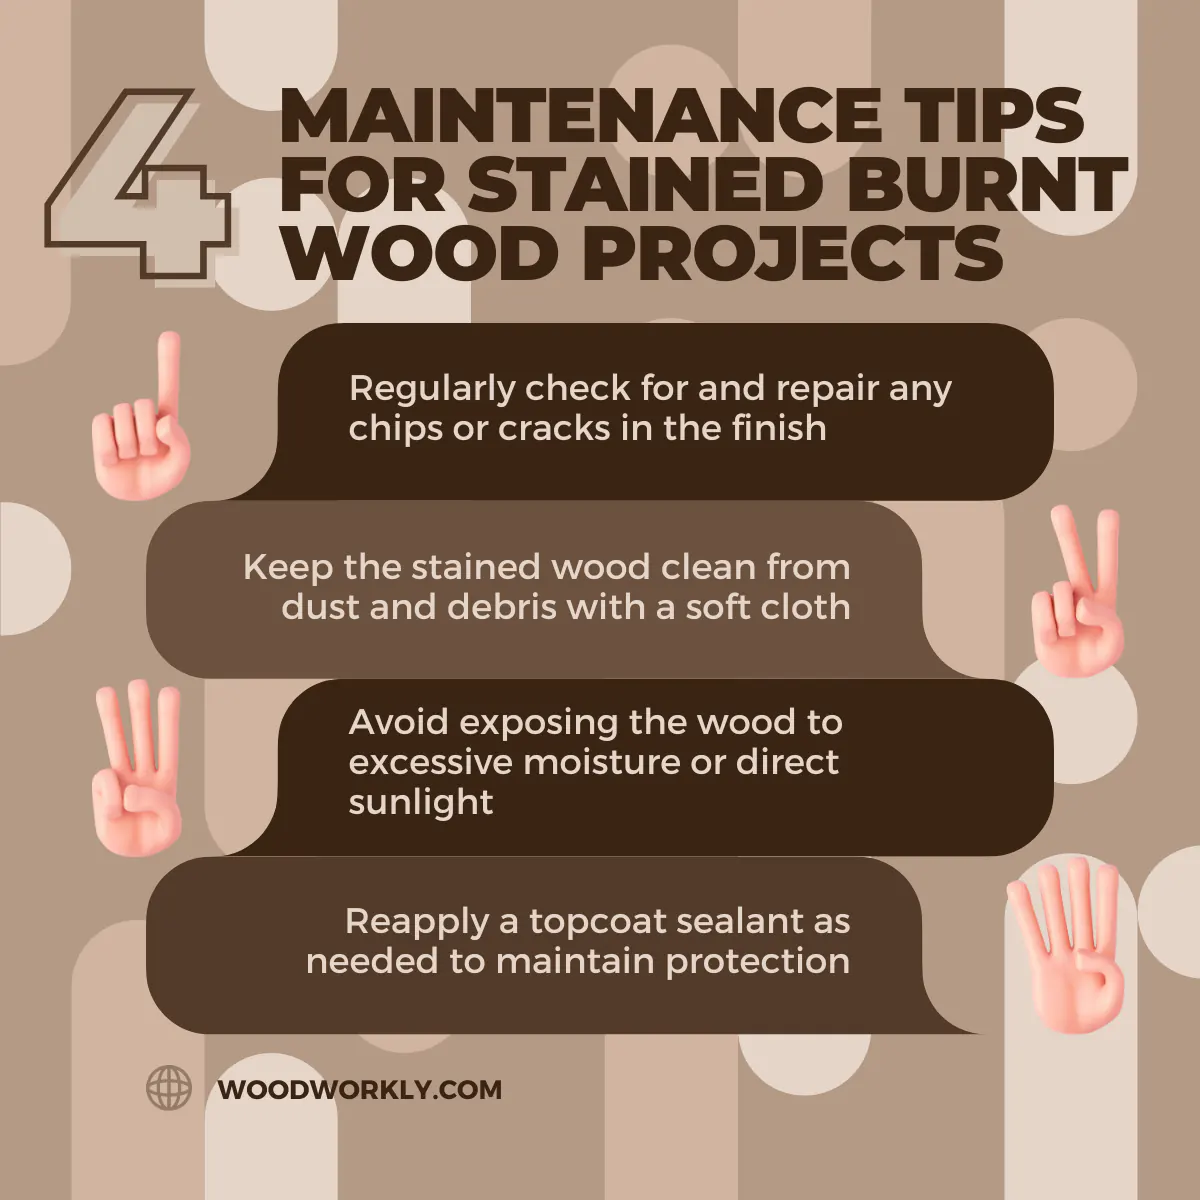
Apply wood sealants on burnt wood properly using the correct procedure to protect your beautiful project from outdoor elements such as moisture, insect attacks, UV light, and temperature changes.
Tips On Applying Stain Over Wood Burning
- Use a well-ventilated area for staining since chemical fumes on the stain, sawdust can cause breathing issues.
- Plus, having good air circulation useful for fast drying between coats
- Use wood conditioner and stain both from the same manufacturer to avoid getting any incompatibility issues
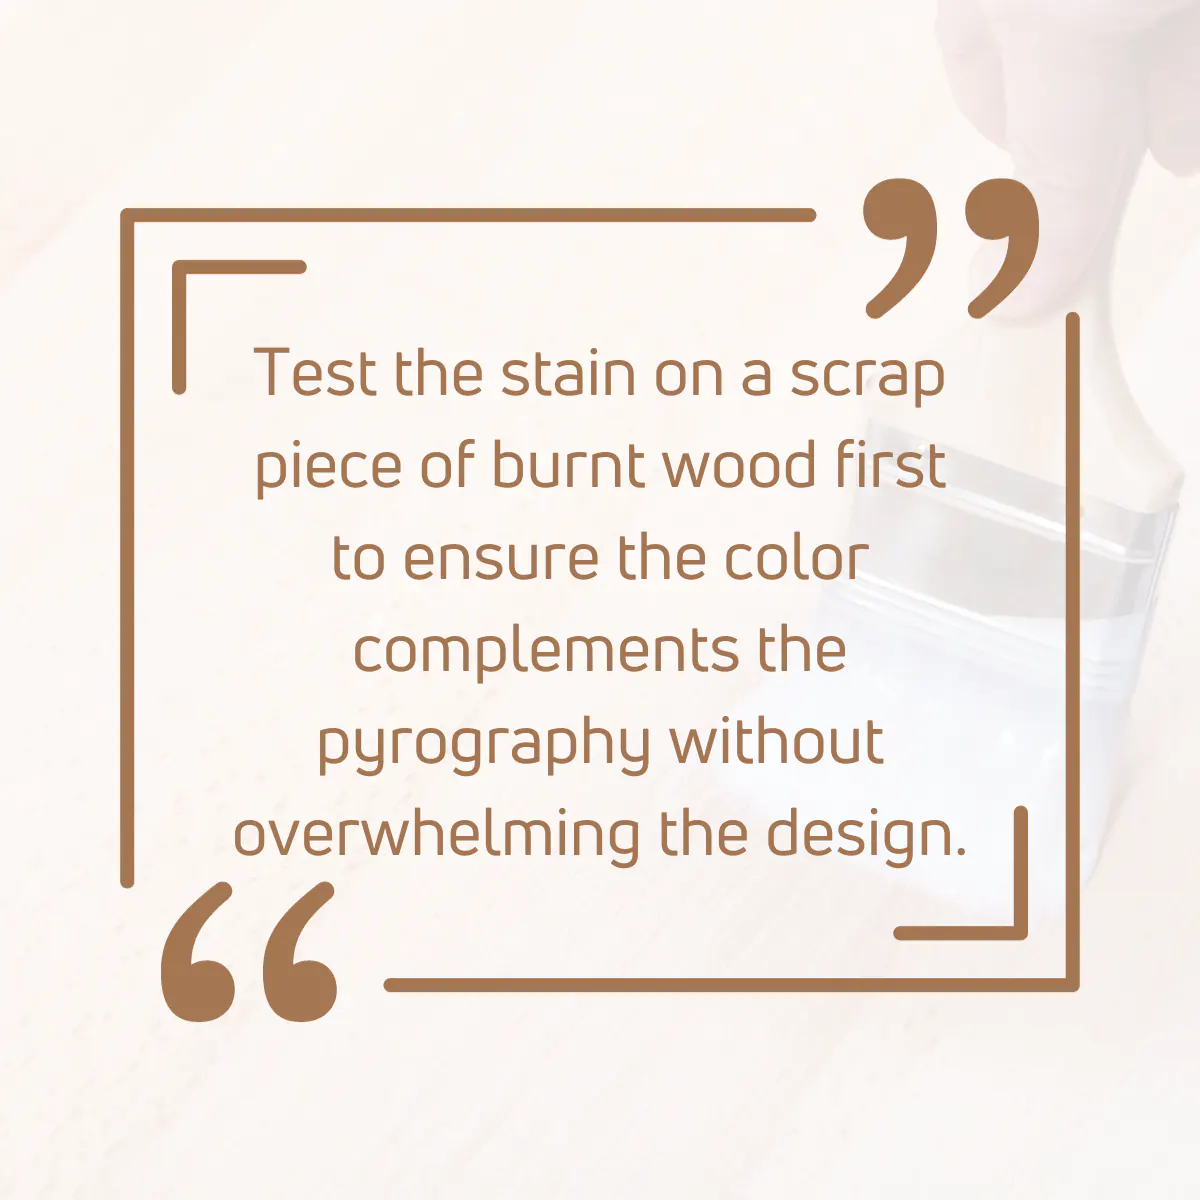
- Test the stain color first on scrap wood
- Apply stain along the wood grain for better penetration
- Always go for lighter color stains to emphasize fine details
- Wipe the excess stain between coats to prevent forming blotches
- Sanding is a must before and between stain coats to get a nice appearance with excellent absorption of the stain
- Wear protective gloves to get rid of dust and harsh chemicals
That’s it, folks! Now you have a crystal-clear idea about can you stain over wood burning projects and how to do that correctly.
Do You Burn Wood Before Or After Staining?
Burn wood before staining since burning wood after staining may release toxic fumes that cause breathing issues and contribute to environmental pollution.
Plus, burning wood after staining increases wood flammability.
Also, you need to make sure that burning wood after staining is against the law of some states of the United States.
Should I Sand After Wood Burning?
Yes, sanding wood after burning is recommended to get finer burning lines and to emphasize the wood’s appearance.
Sanding wood after burning is useful for better absorption of other coats of stain. Therefore, sanding over stain coats is recommended to get the best out of your project.
So, let’s answer some frequently asked questions.
FAQs
What type of stain should you use on burnt wood?
Gel stains and water-based stains are recommended for burnt wood because oil-based stains may yellow over time and alter the appearance of your project.
Do you need to sand burnt wood before staining?
Sanding burnt wood before staining is advised to create an even surface for consistent stain absorption and to prevent issues like blotchiness or streaks.
Should you burn wood before or after staining?
Always burn wood before staining because burning stained wood can release toxic fumes and increase the wood’s flammability, potentially ruining your design.
What are the best practices for applying stain to wood burning art?
Evenly apply the stain over the wood, wipe off excess after a few minutes to avoid blotches, and opt for lighter stains to ensure burnt details stand out.
How long should you let the stain dry on burnt wood before sealing?
Allow the stained burnt wood to dry for at least 24 hours before sealing to ensure proper adhesion and a clear, polished finish.
What are the best sealants to use after staining burnt wood?
Quality sealants like polyurethane, polycrylic, lacquer, or oils like tung oil are suitable for adding a protective layer after staining burnt wood.
Did I cover all you wanted to know about: Can You Stain Over Wood Burning?
In this article, I have deeply discussed, whether can you stain over wood burning, what is the best stain for wood burning, how to stain wood burning, and many more.
You can stain over wood burning to add color and enhance the wood’s natural grain. Use light-colored gel or water-based stains after burning to highlight the details without obscuring the pyrography.
Staining over wood burning helps to change the color of the wood and to improve the wood’s appearance with good protection from the weather elements.
Stain before wood burning is not recommended since it may release harmful fumes.
Furthermore, I‘ve answered frequently asked questions as well.
Hope you have gained good knowledge about the hot topic; can you stain over wood burning?
Try to stain your beautiful pyrography art as your next project to gain practical knowledge about wood burning. Practice makes you perfect!
Very nice tutorial! I would have liked to see more photos of some of your projects…maybe a few before and after stain pics too! Thank you for the excellent info…now if I could just find the time for all of the woodworking projects that I have in my head!